Perth Craft Fair and Quilt West: 2013

27 05 2013

I spent yesterday at the Perth Craft Fair and QuiltWest exhibition. My feet were sore by the end of the day, but it was so inspirational that many of the issues just getting to the Perth Convention Centre disappeared fairly rapidly.

The main issue was that, without any notice, the organisers of the ‘HBF Run for a reason’ event closed The Esplanade from Spring St AND closed the Convention Centre car park until 11 am. All info I had prior to that event was that The Esplanade would be closed from Mill St. Even the trade exhibitors were caught with the closure of the car park at 7:30 am. And it seems the trains didn’t stop at the Convention Centre for some hours either (again, without notice as far as I could tell) — they went on to Central so anyone catching the train had to walk from the city station back to the Convention Centre. Not good for anyone with mobility issues who had deliberately caught the train to be dropped right at the Convention Centre.

Parking was at a premium as the city centre was host to 30,000 runners, but I eventually parked the car up behind Parliament House! My friend Joan and I had a long downhill walk to the Convention Centre…

Back to the Fair… The big plus of those road, train, and car park closures was that the Convention Centre was almost empty of everyone except officials and stallholders for the first couple of hours, which meant we could get around without bumping into other people or being forced to move on because of the pressure of crowds. And we could get to speak to stallholders and view their products without hindrance. And get a seat at some of the free demos.

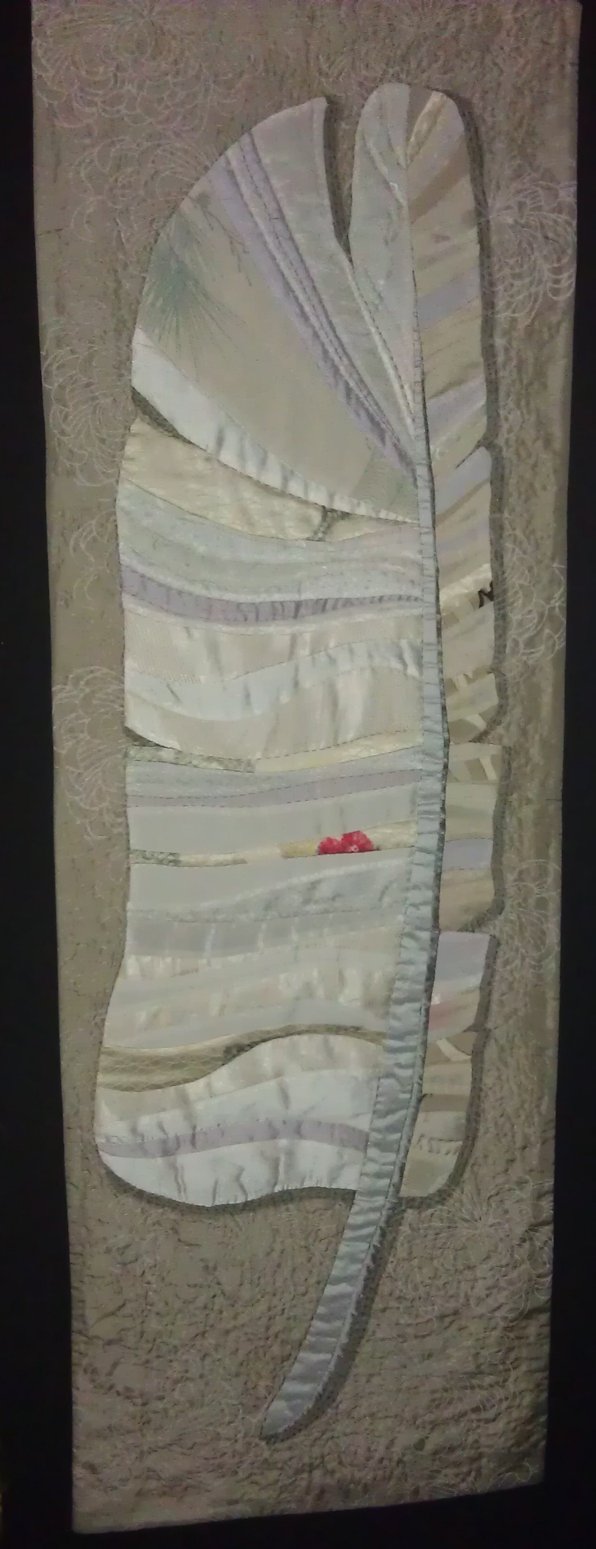
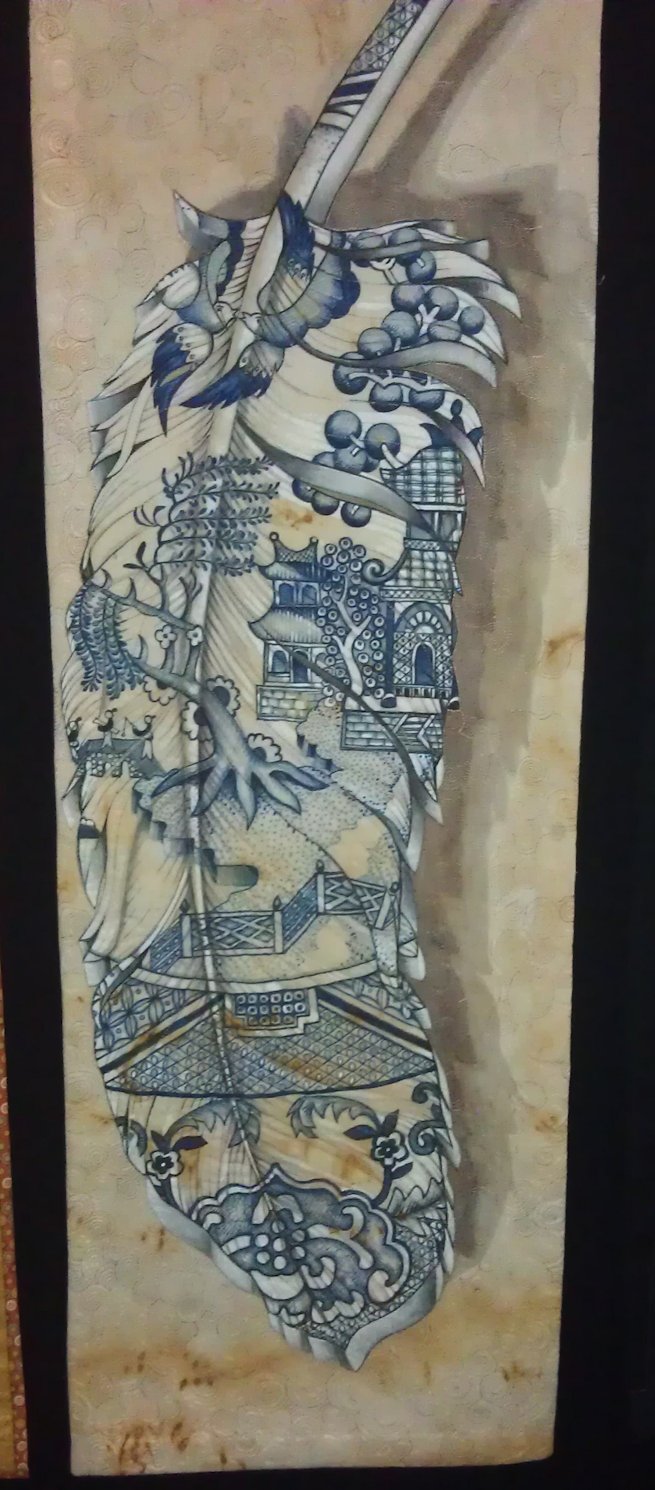
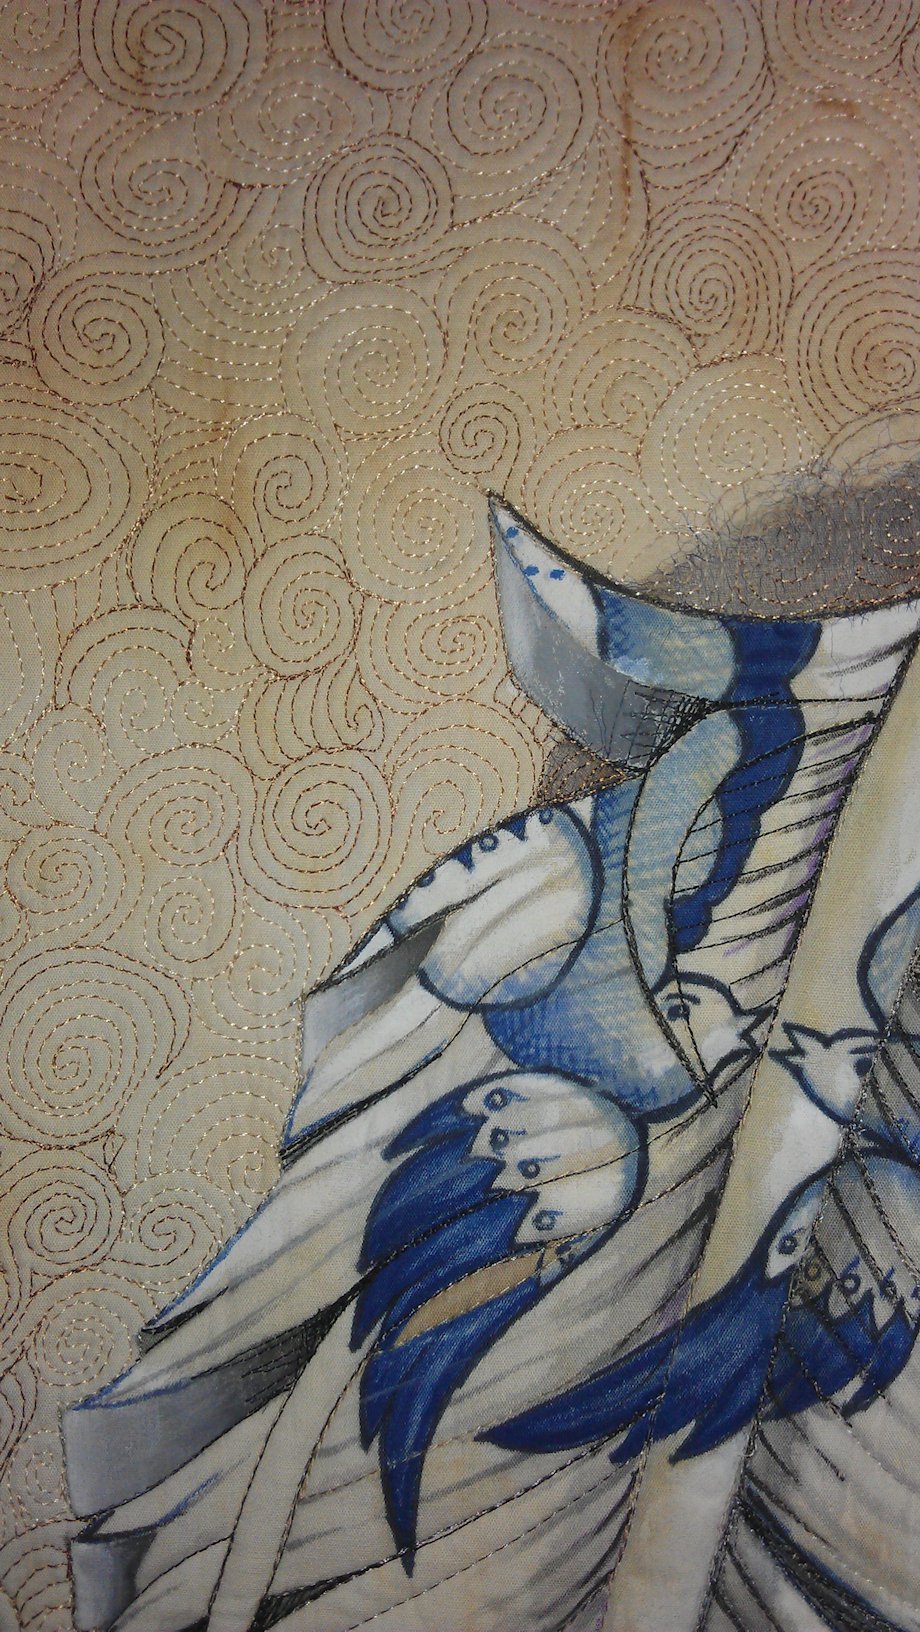
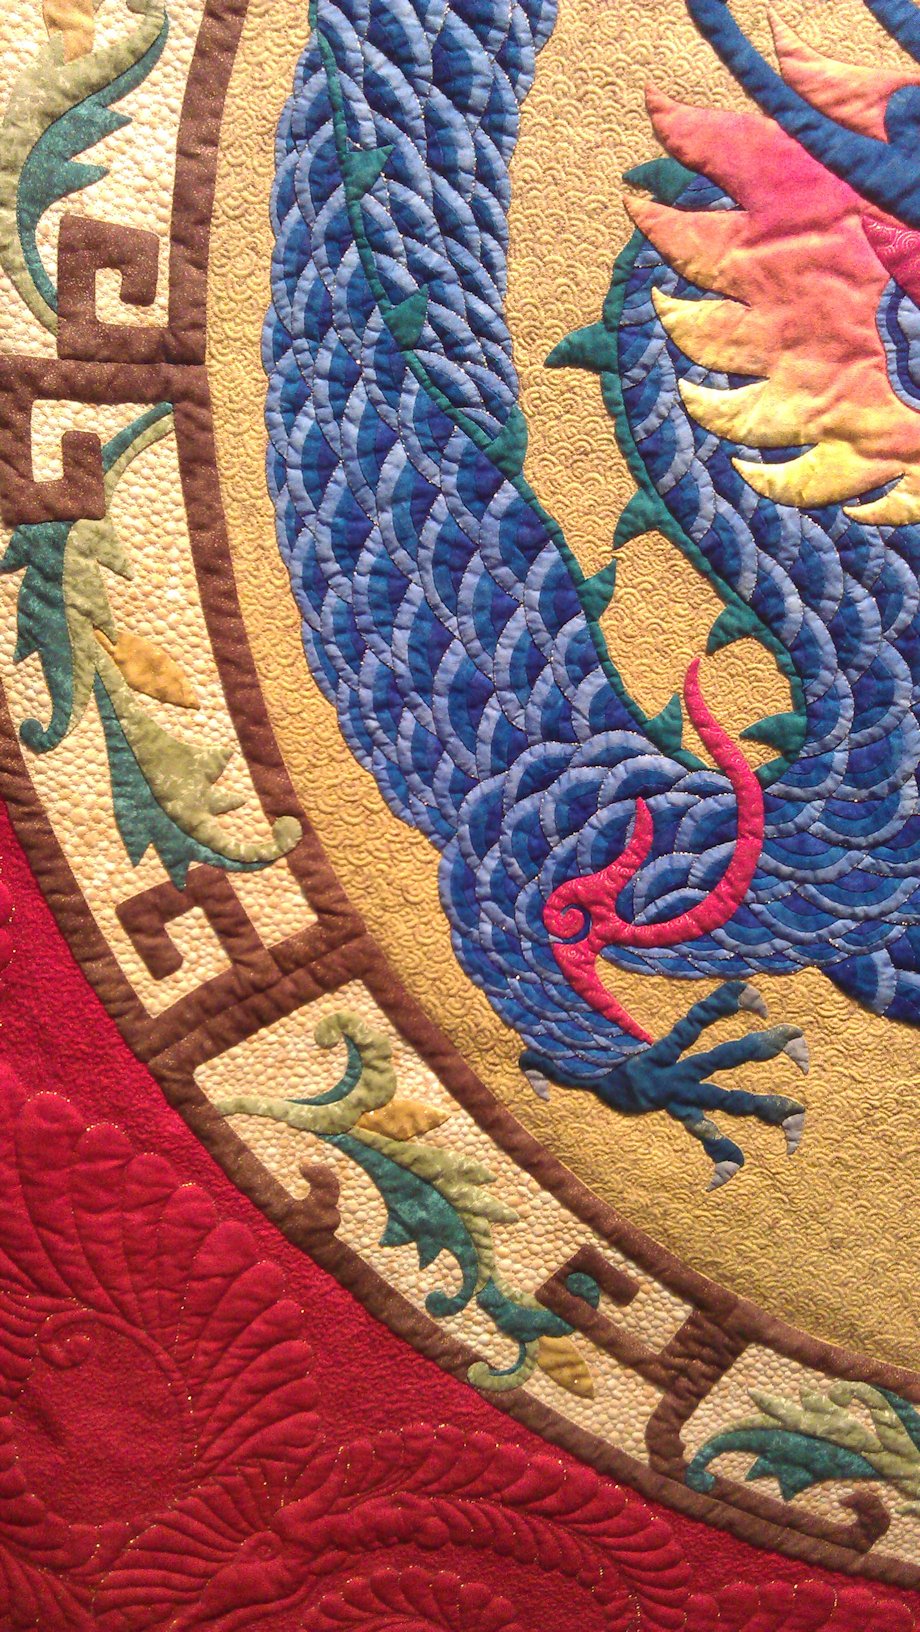
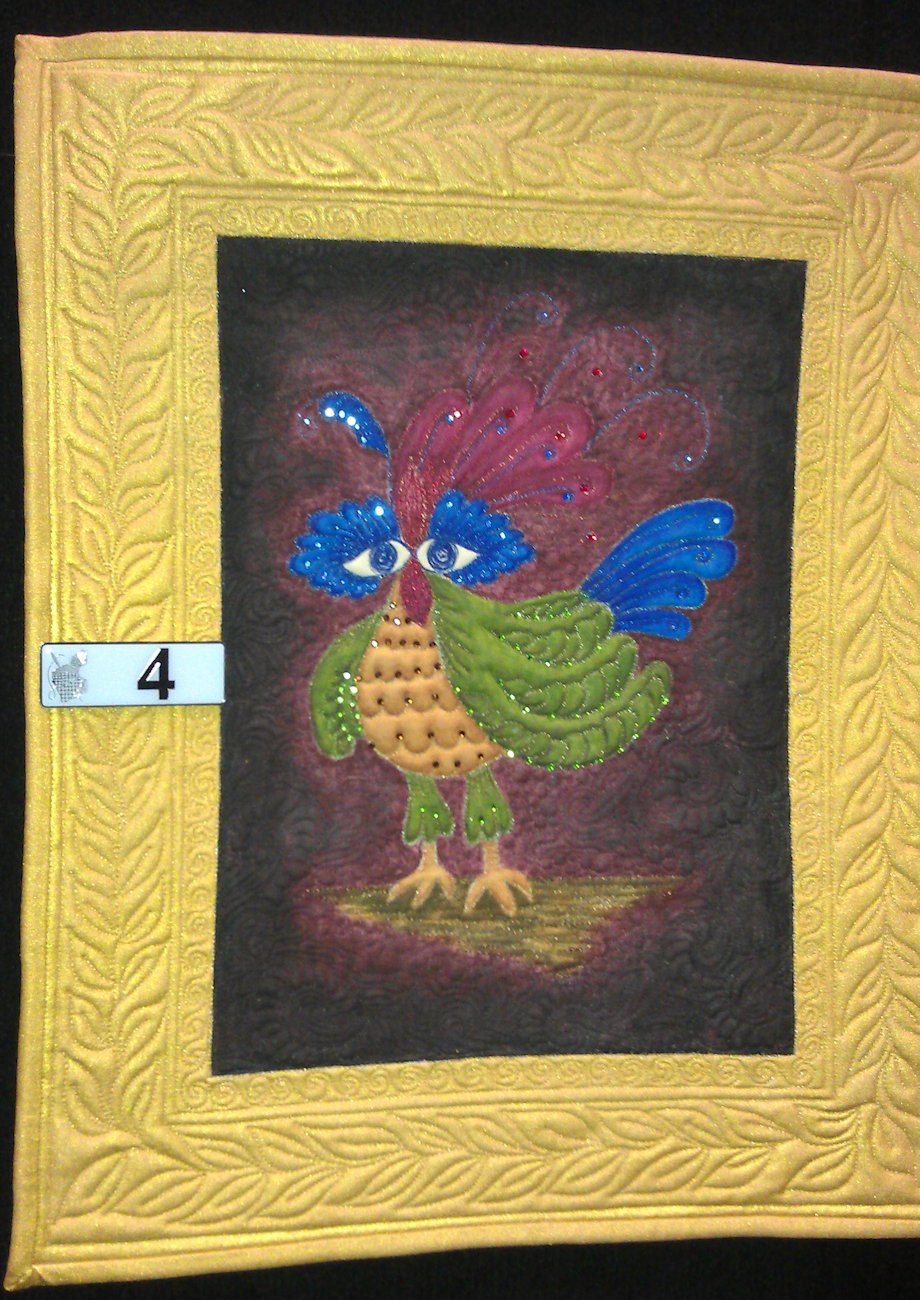
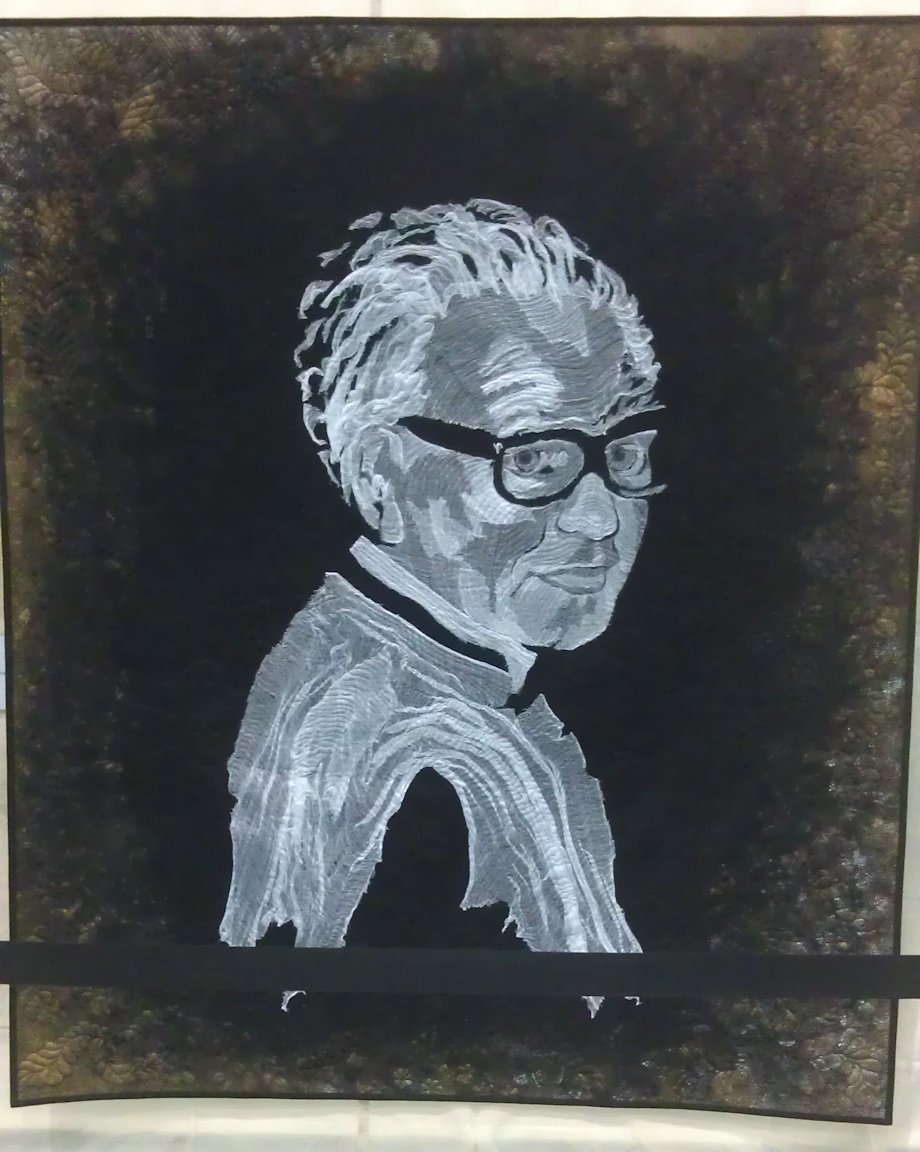
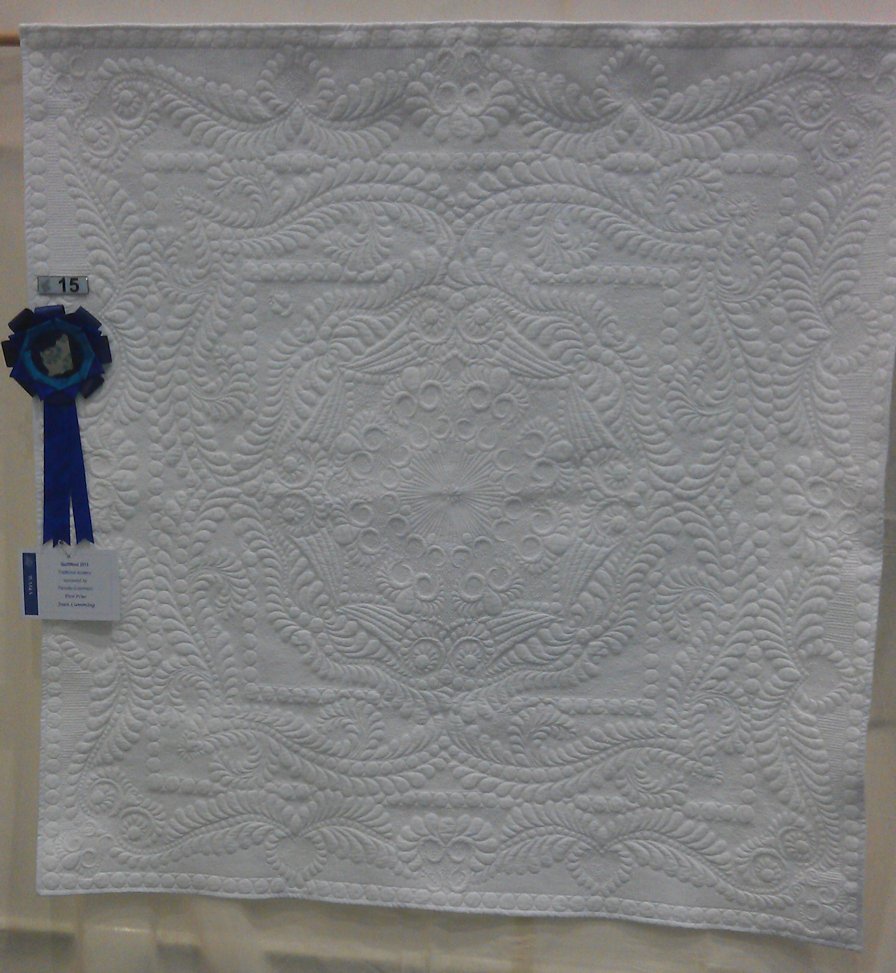
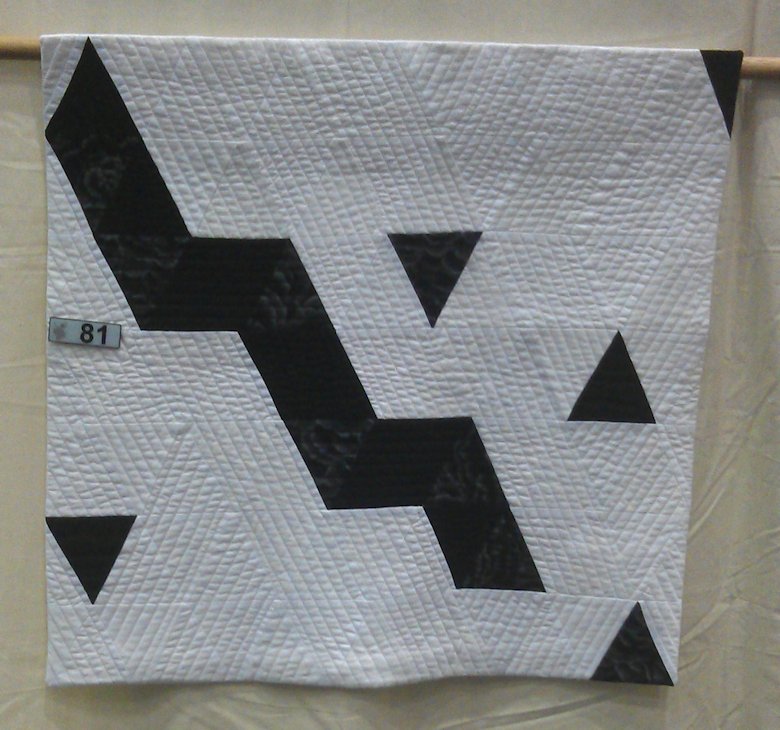
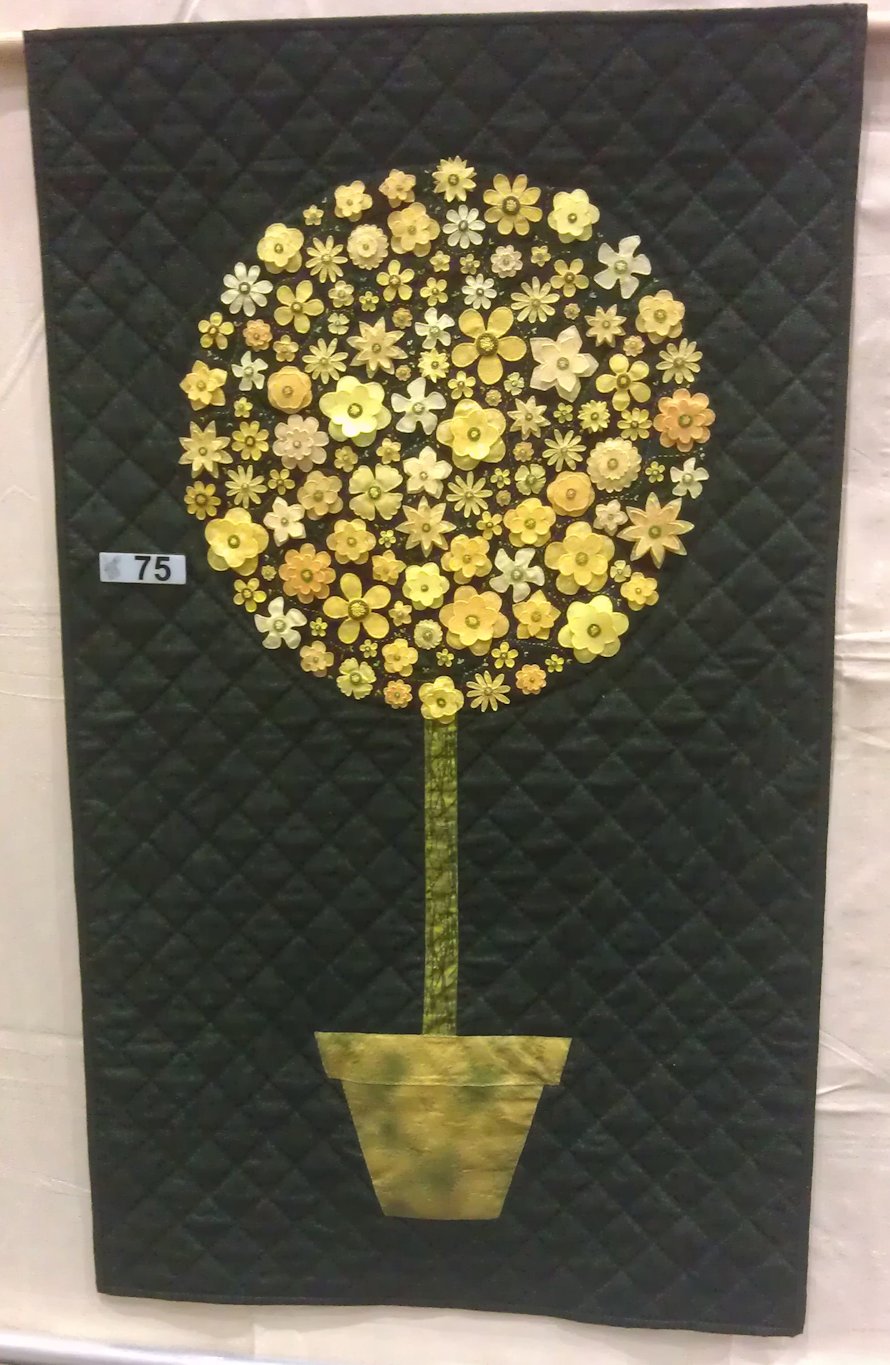
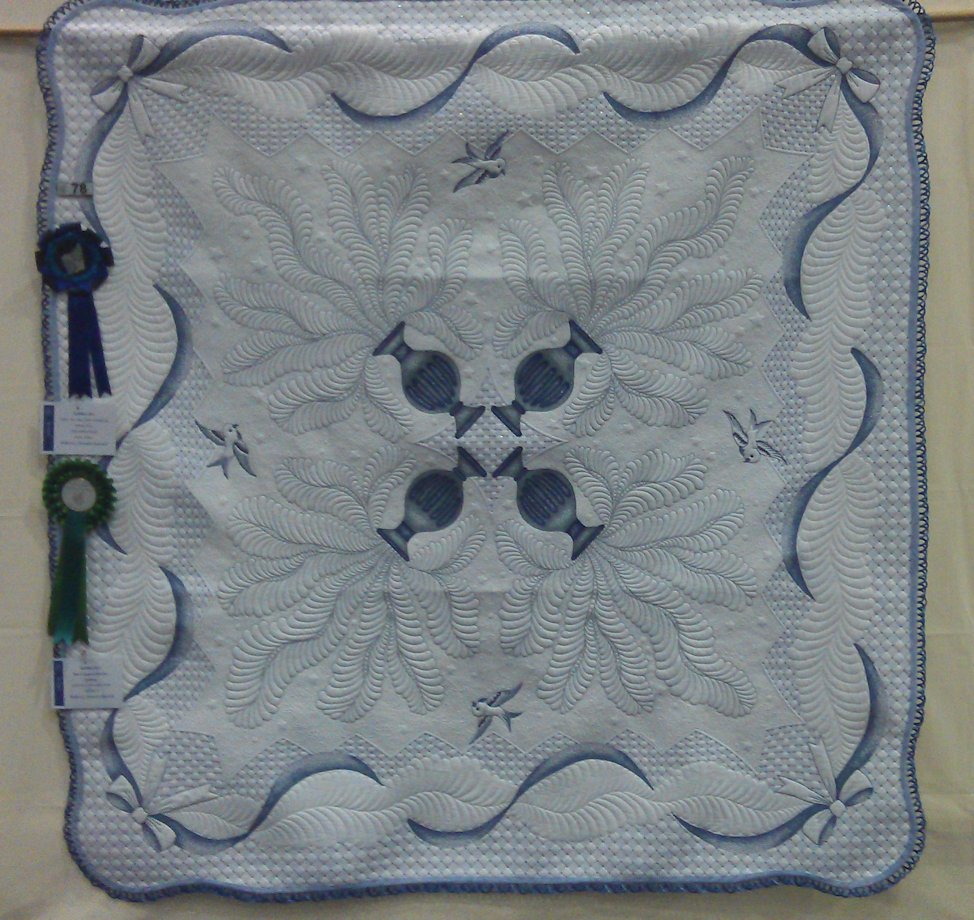
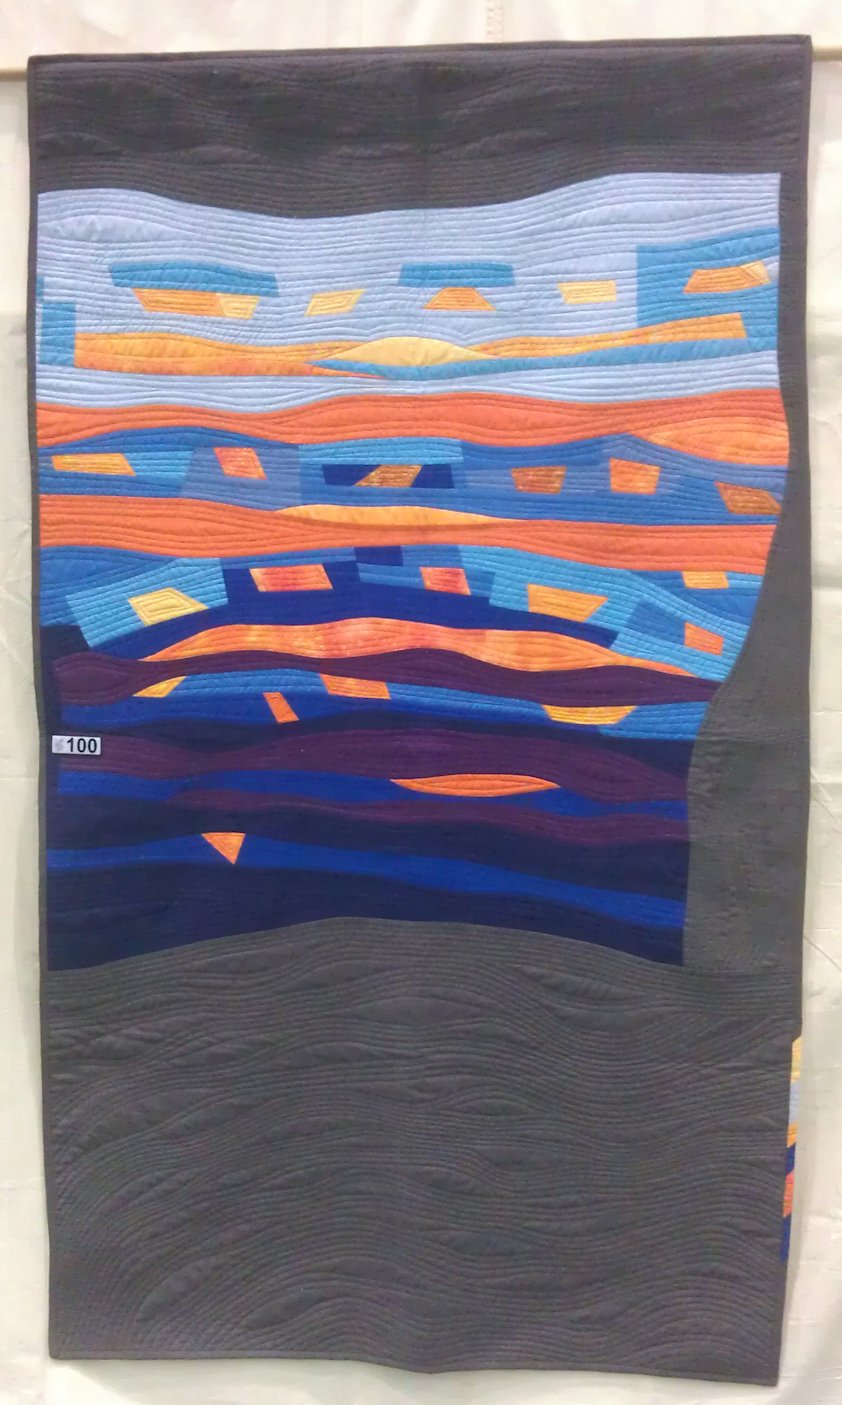
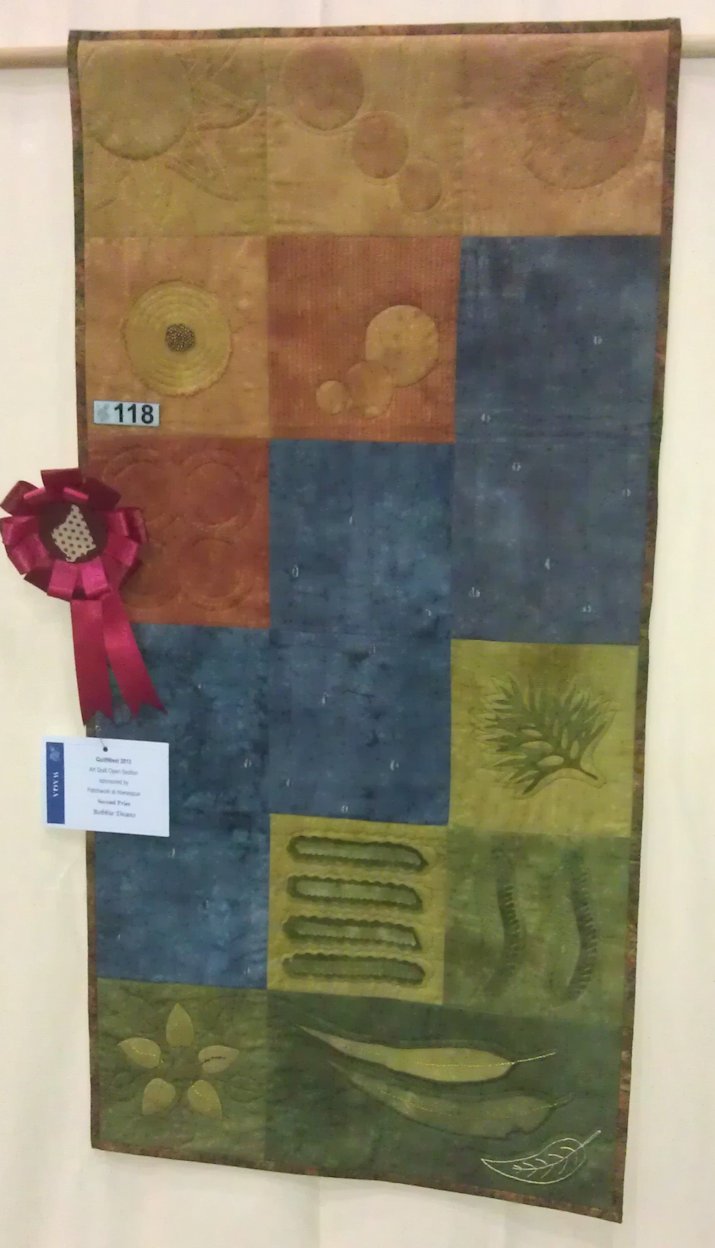
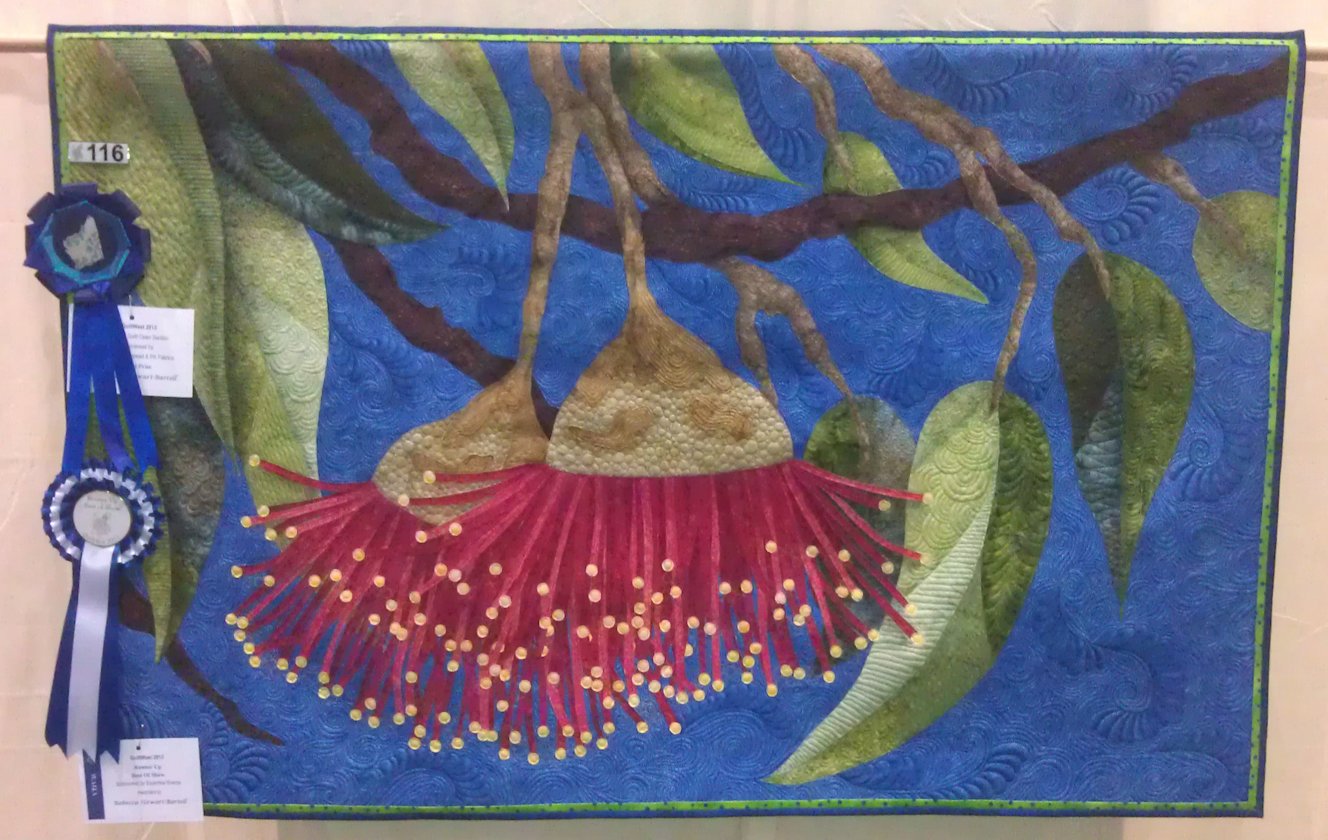
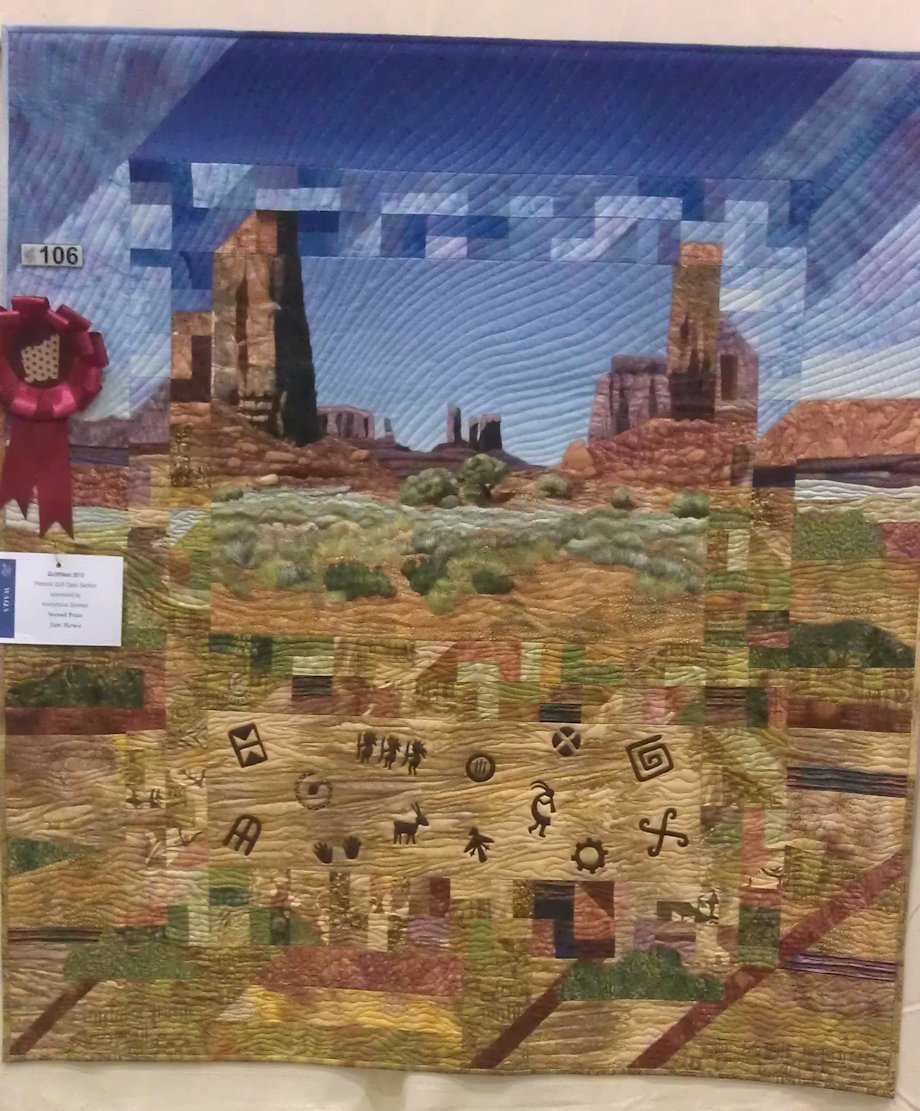
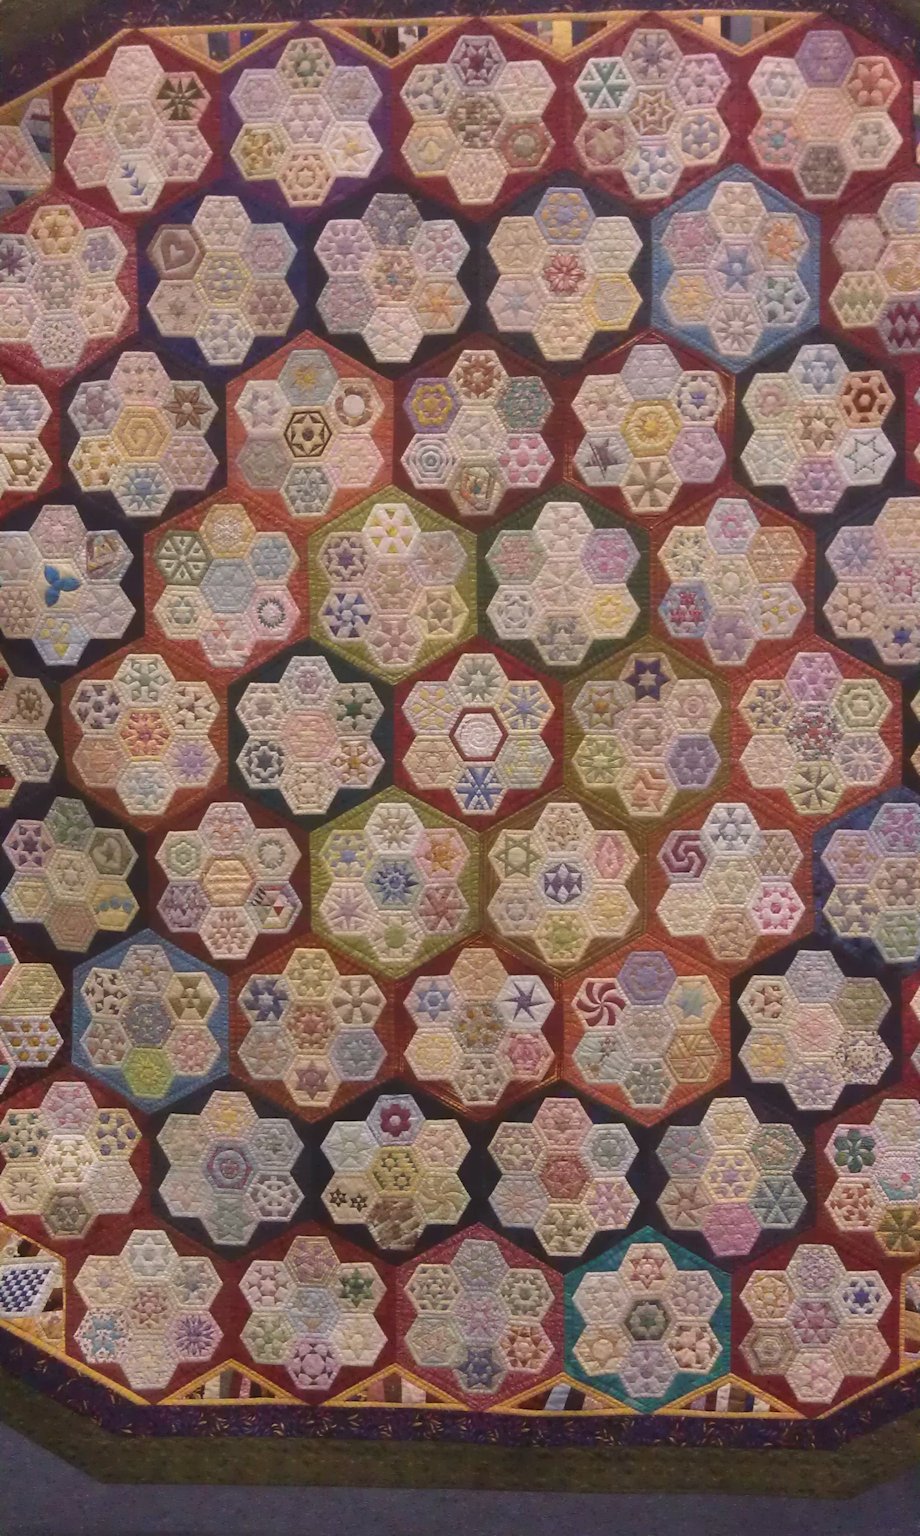
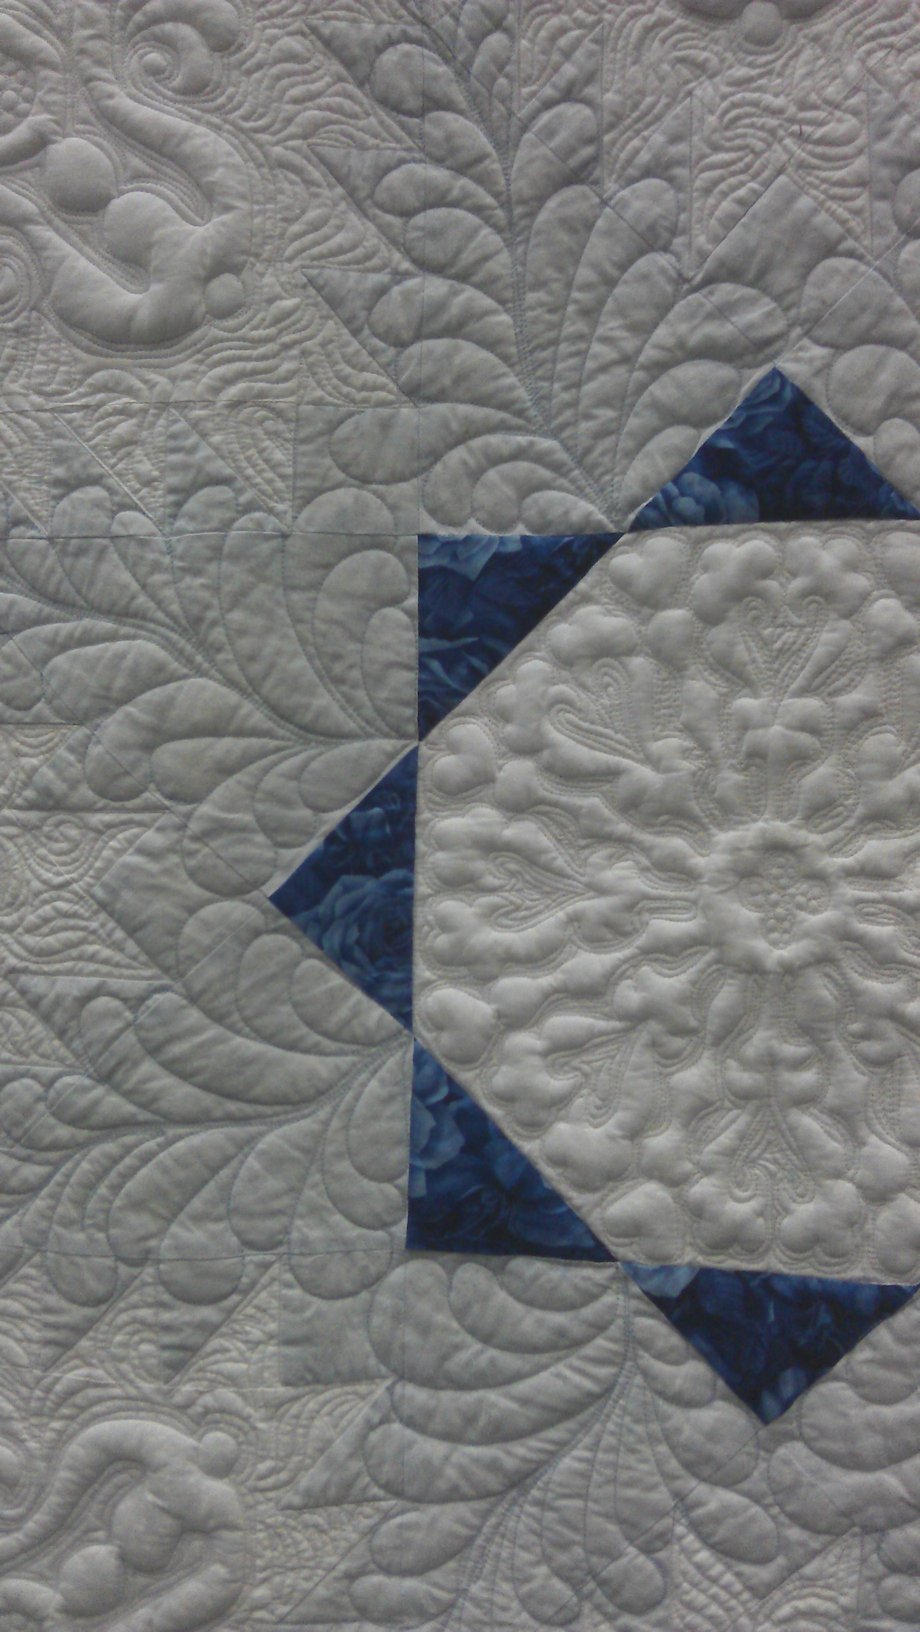
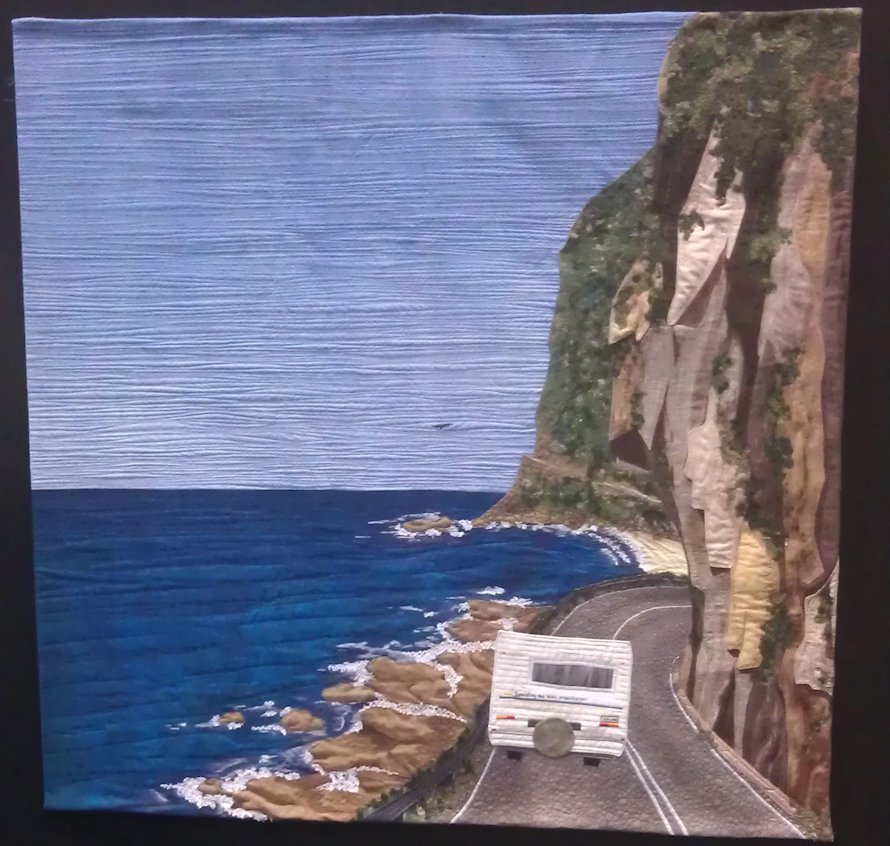
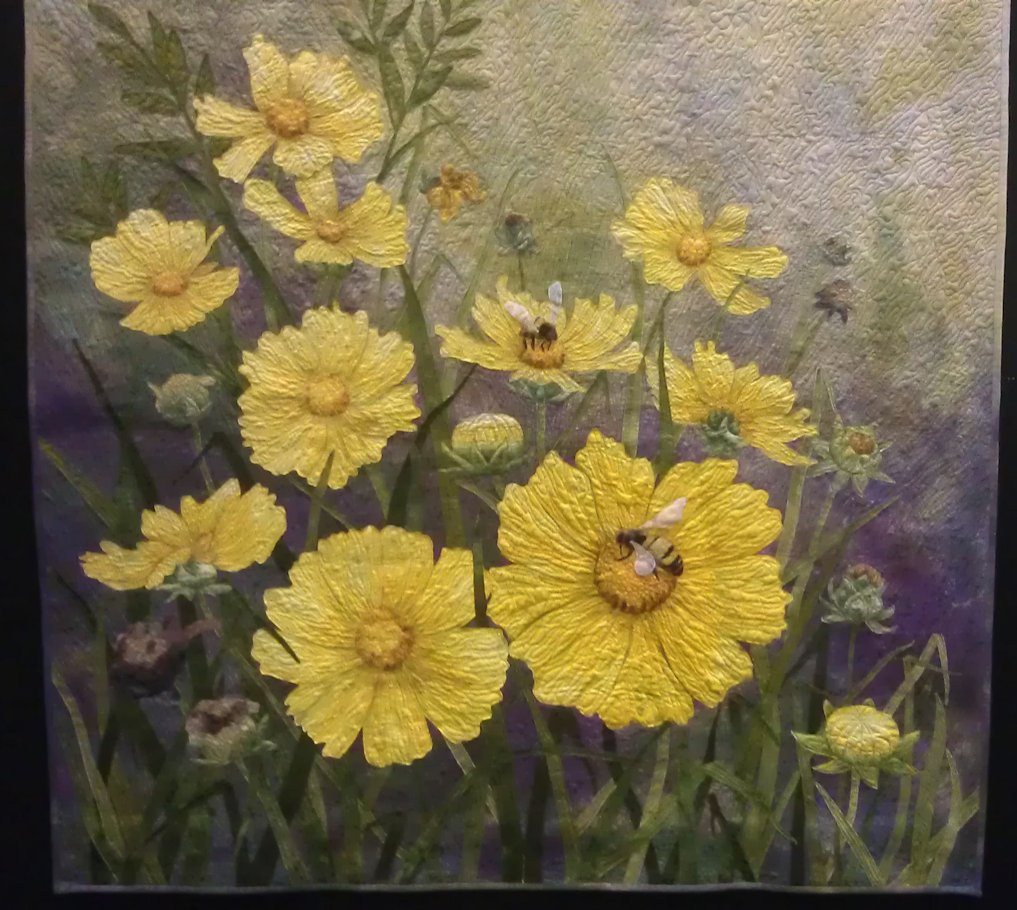
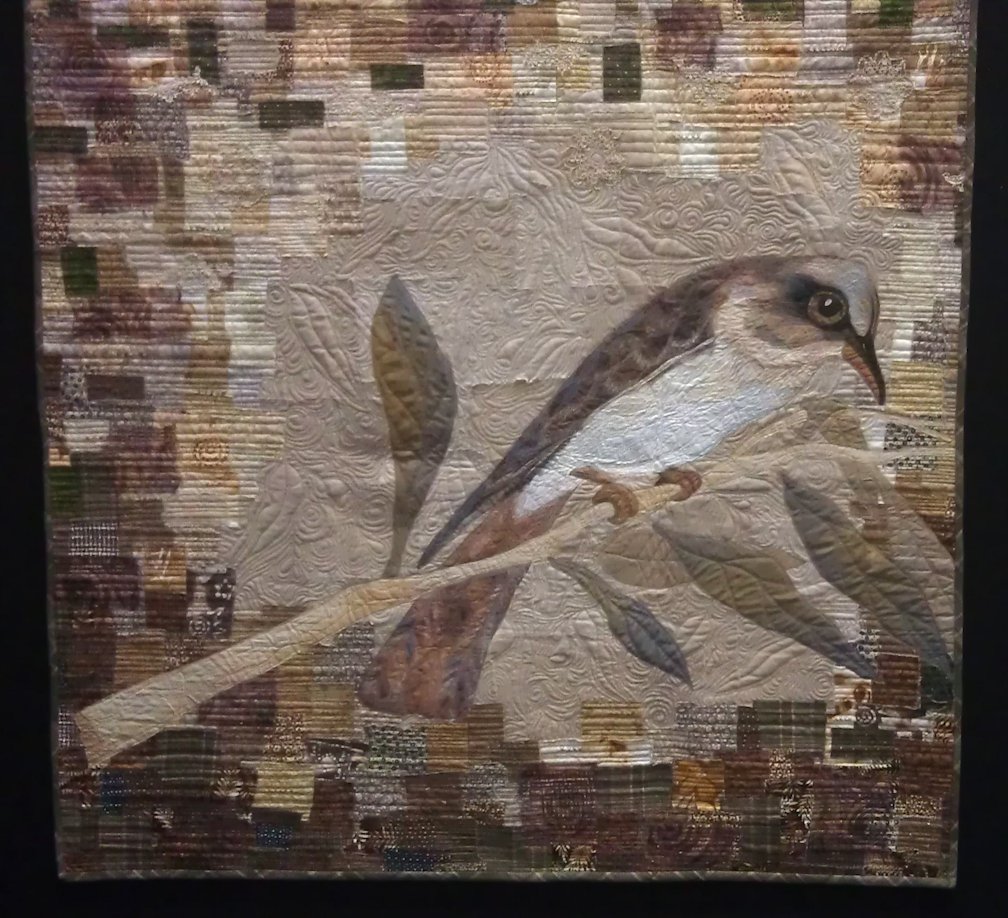
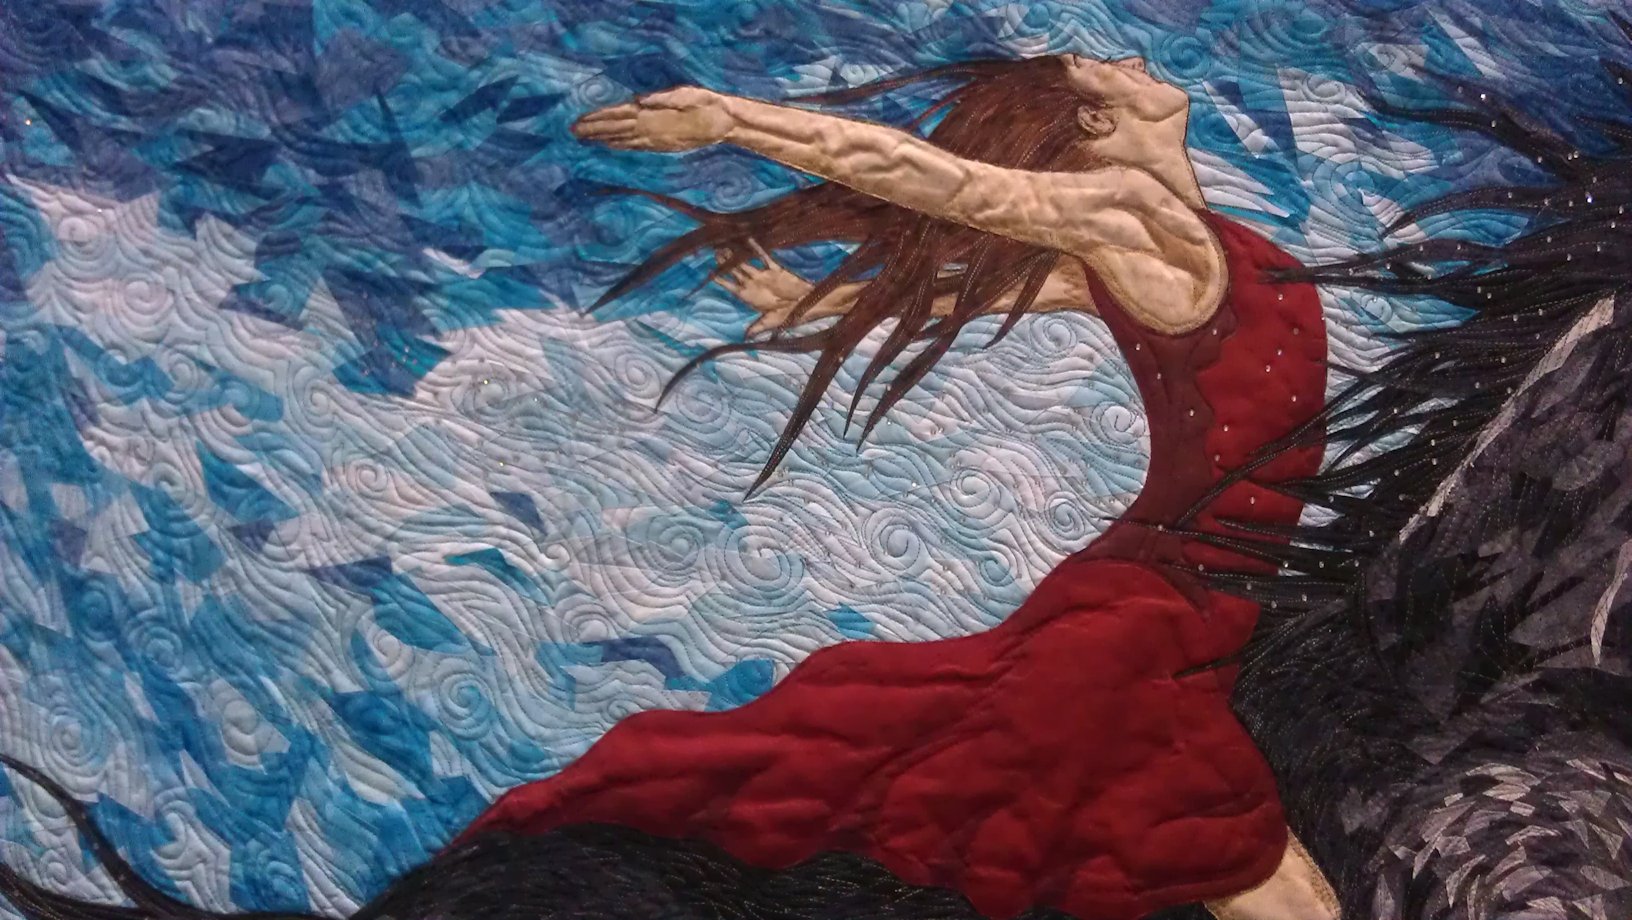
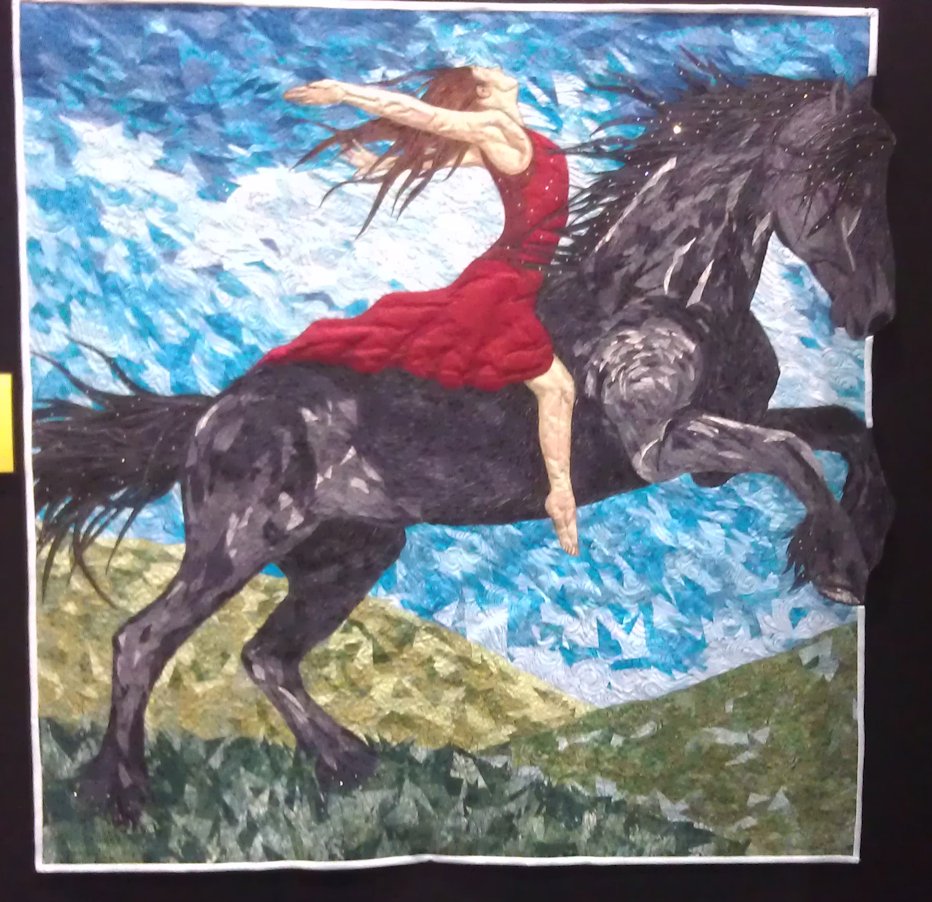
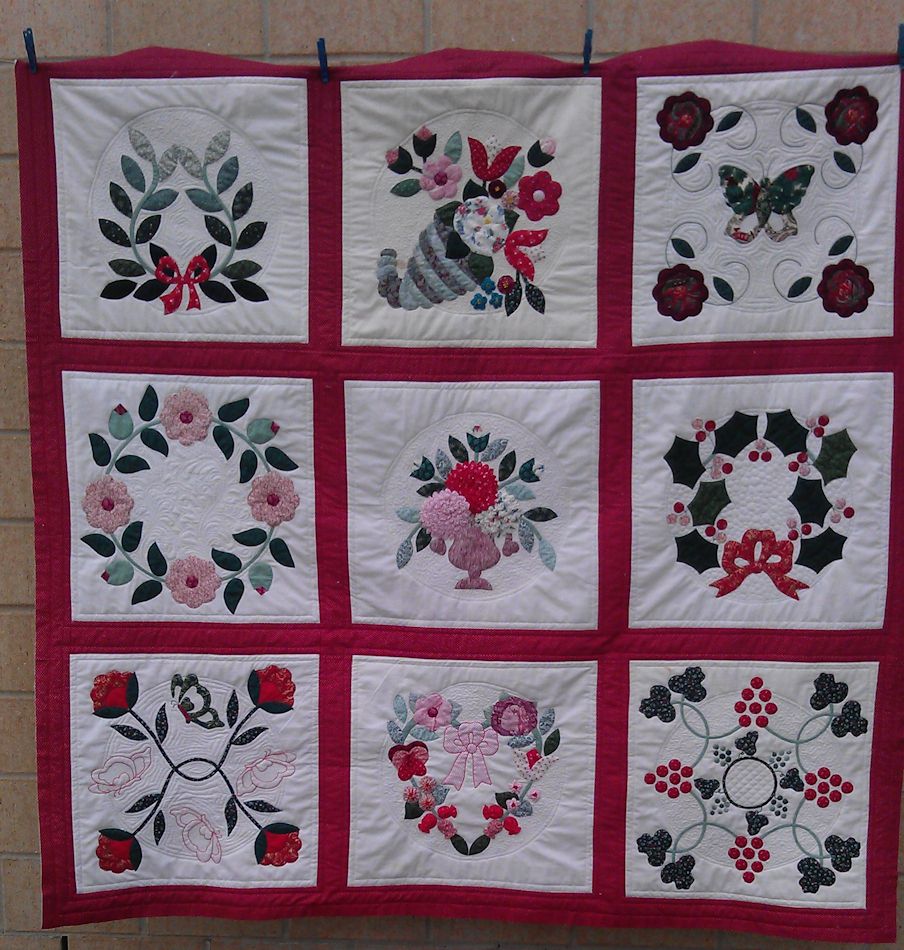
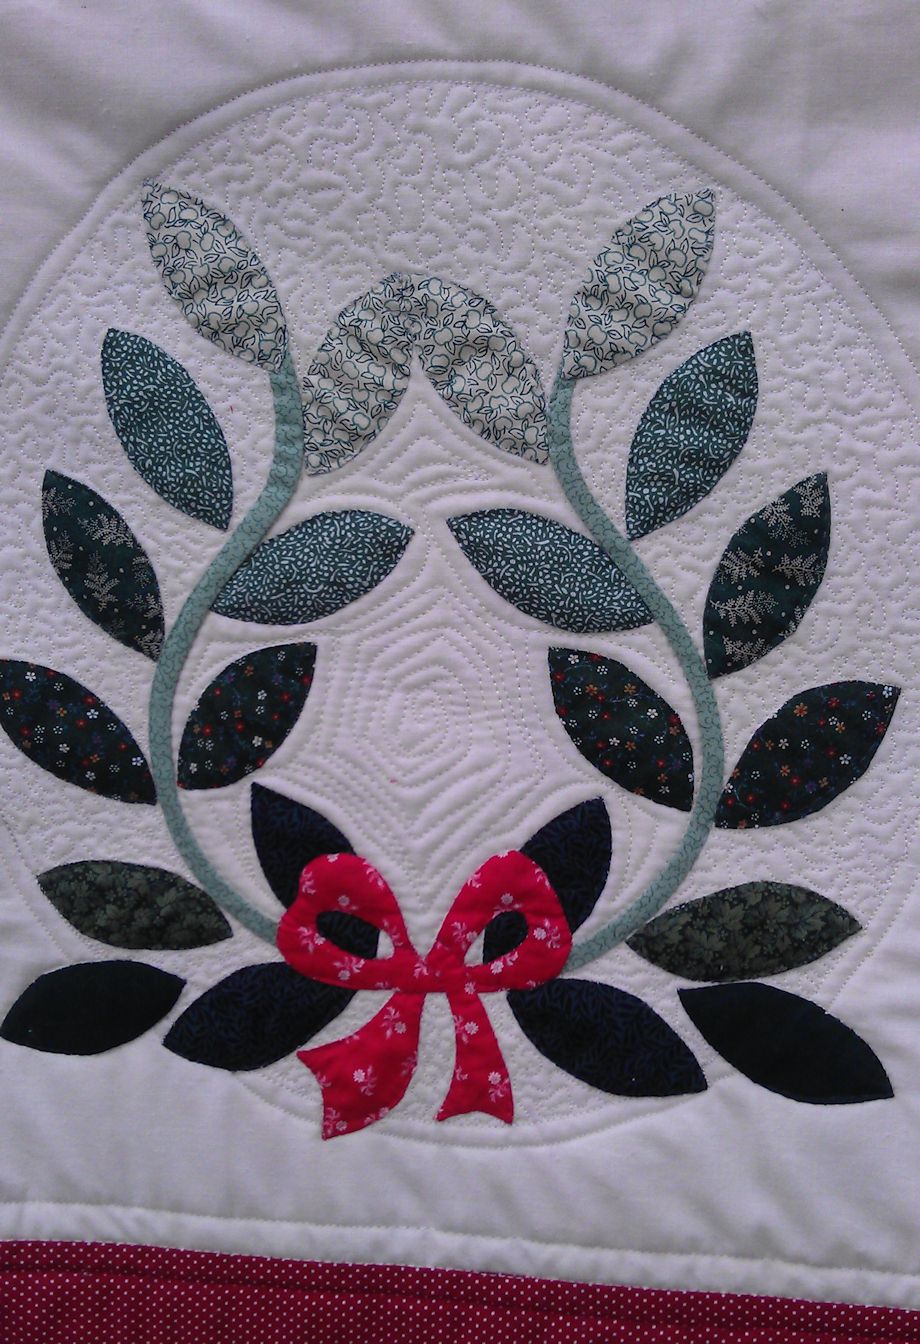
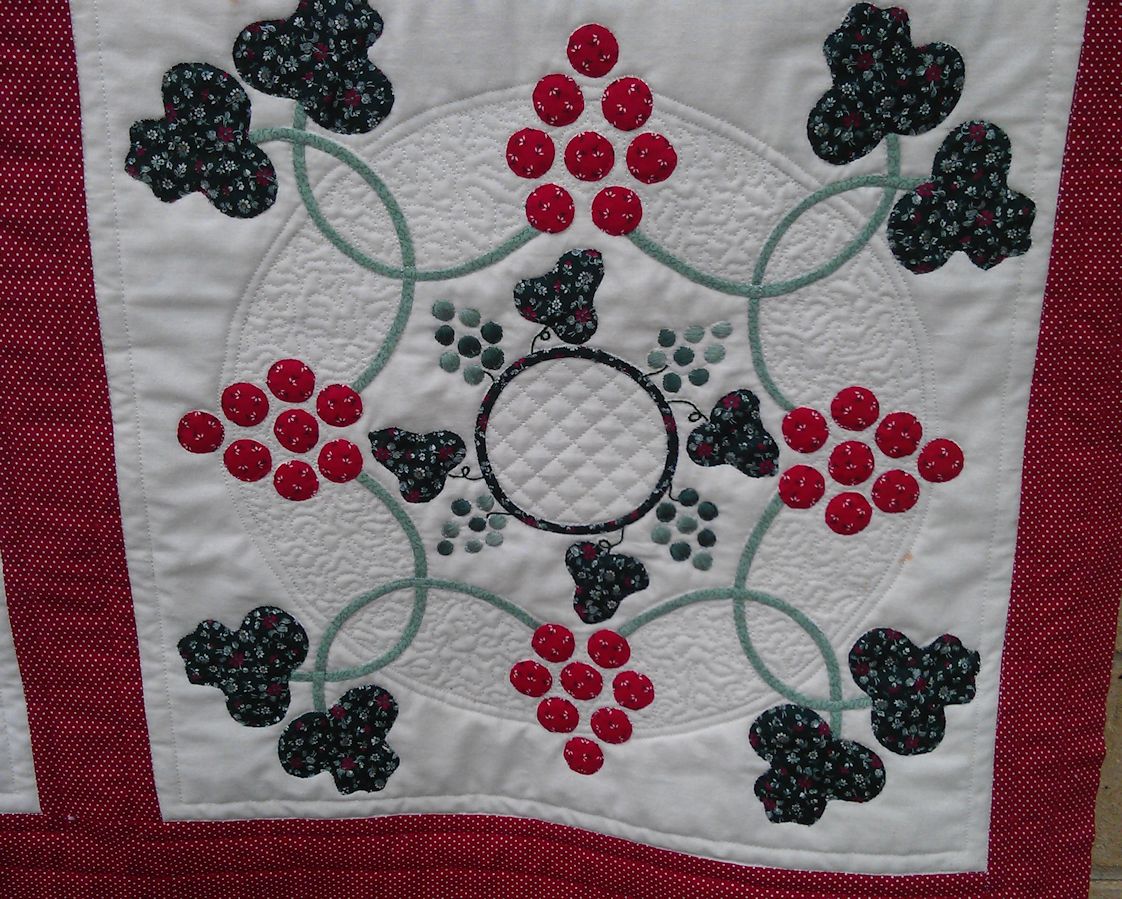
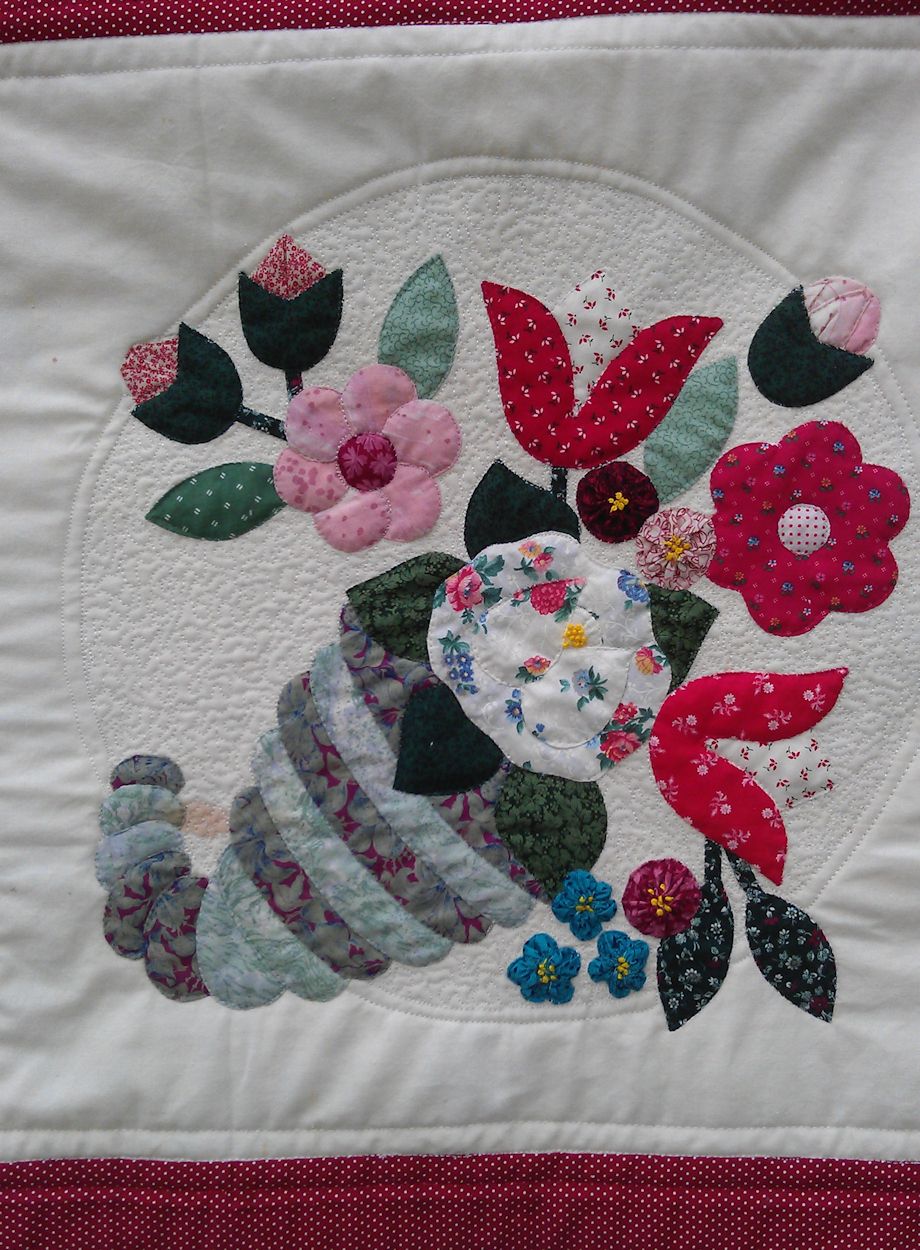
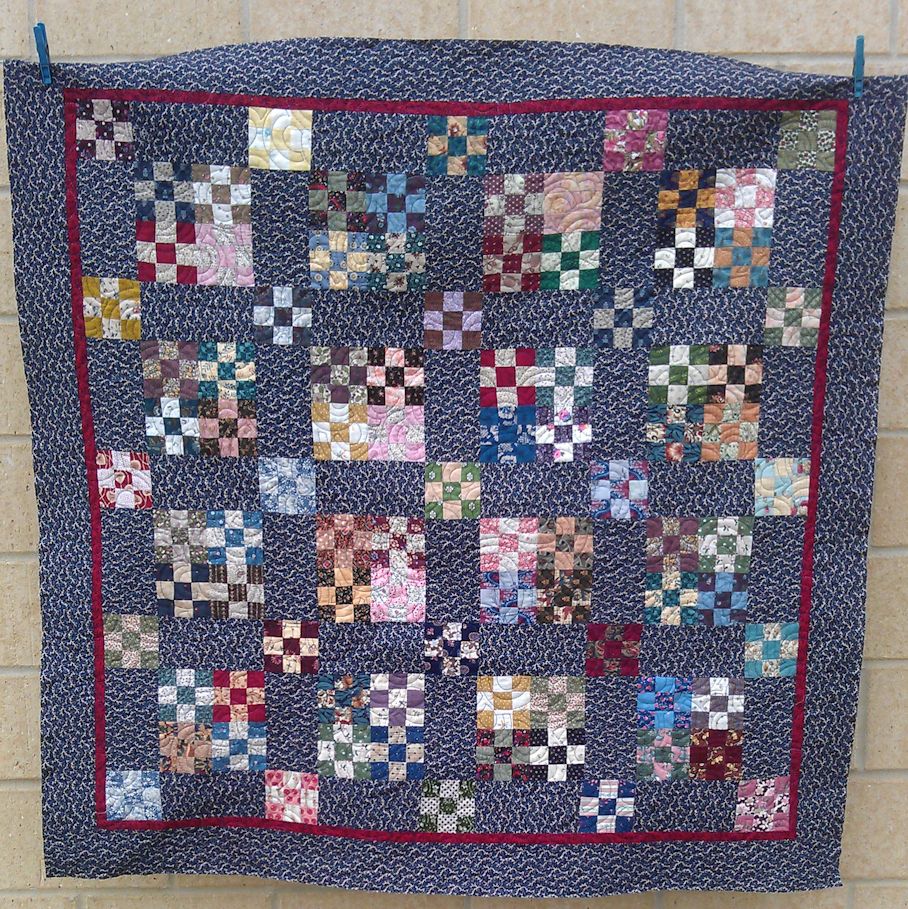
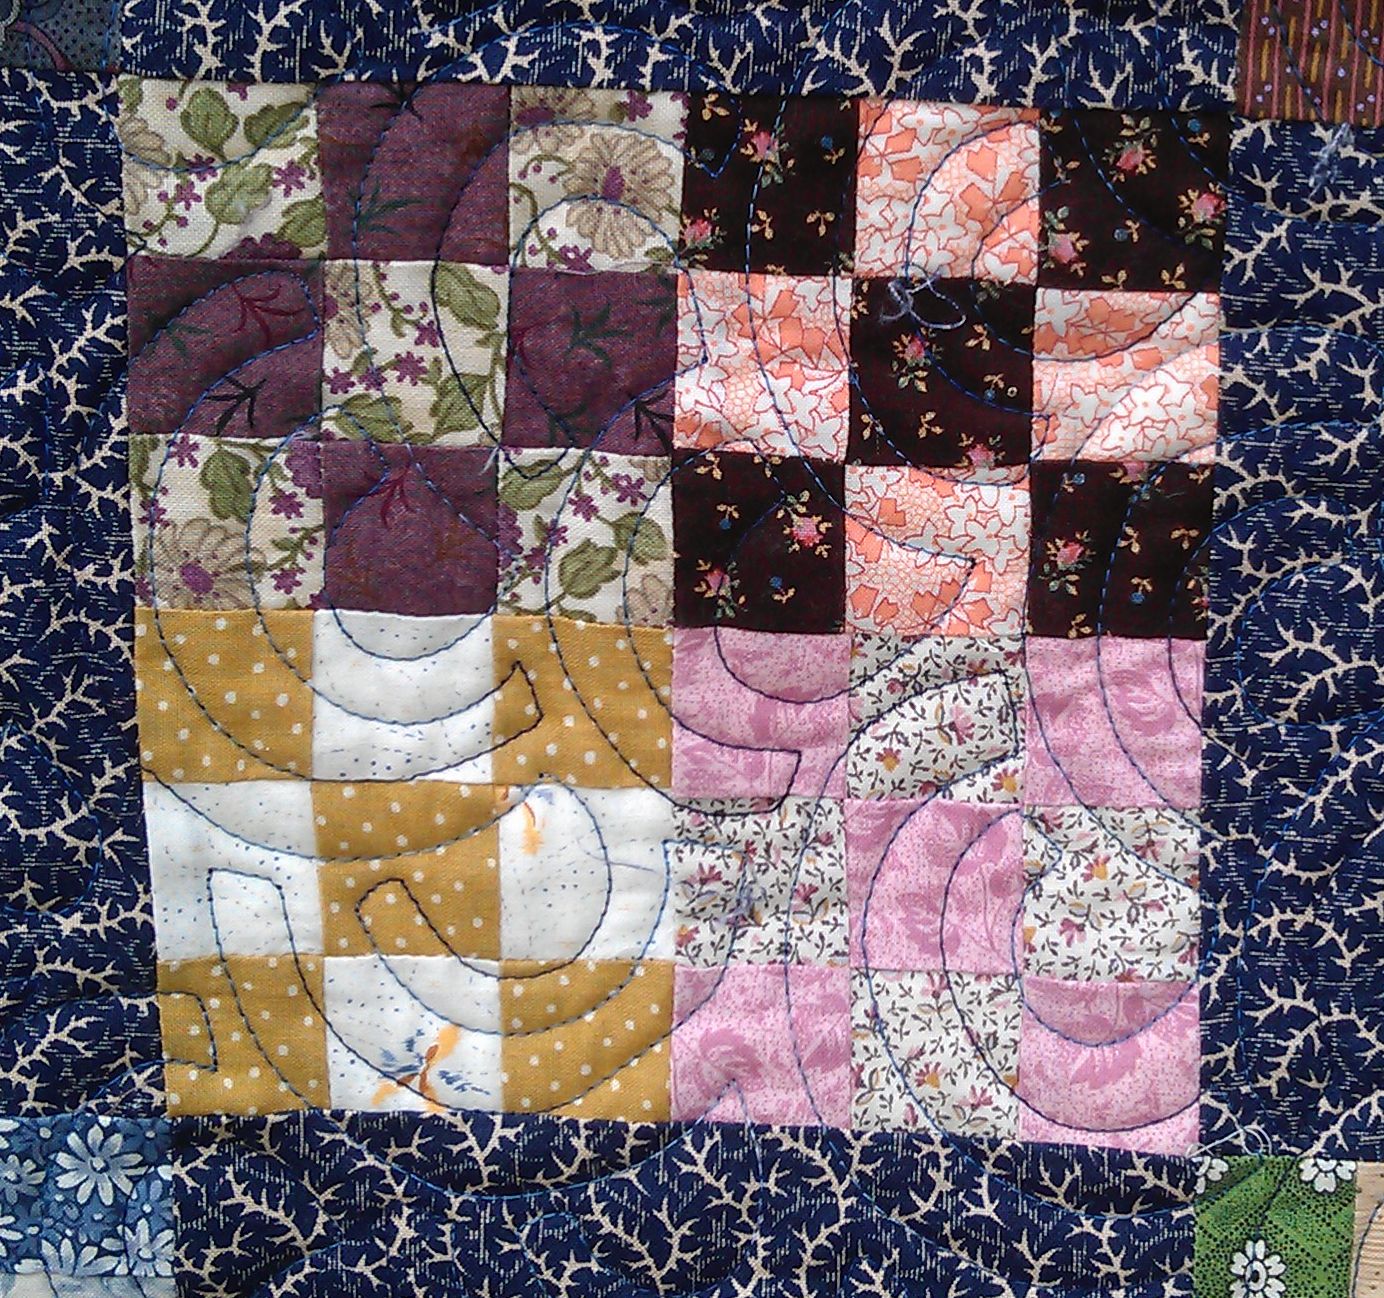
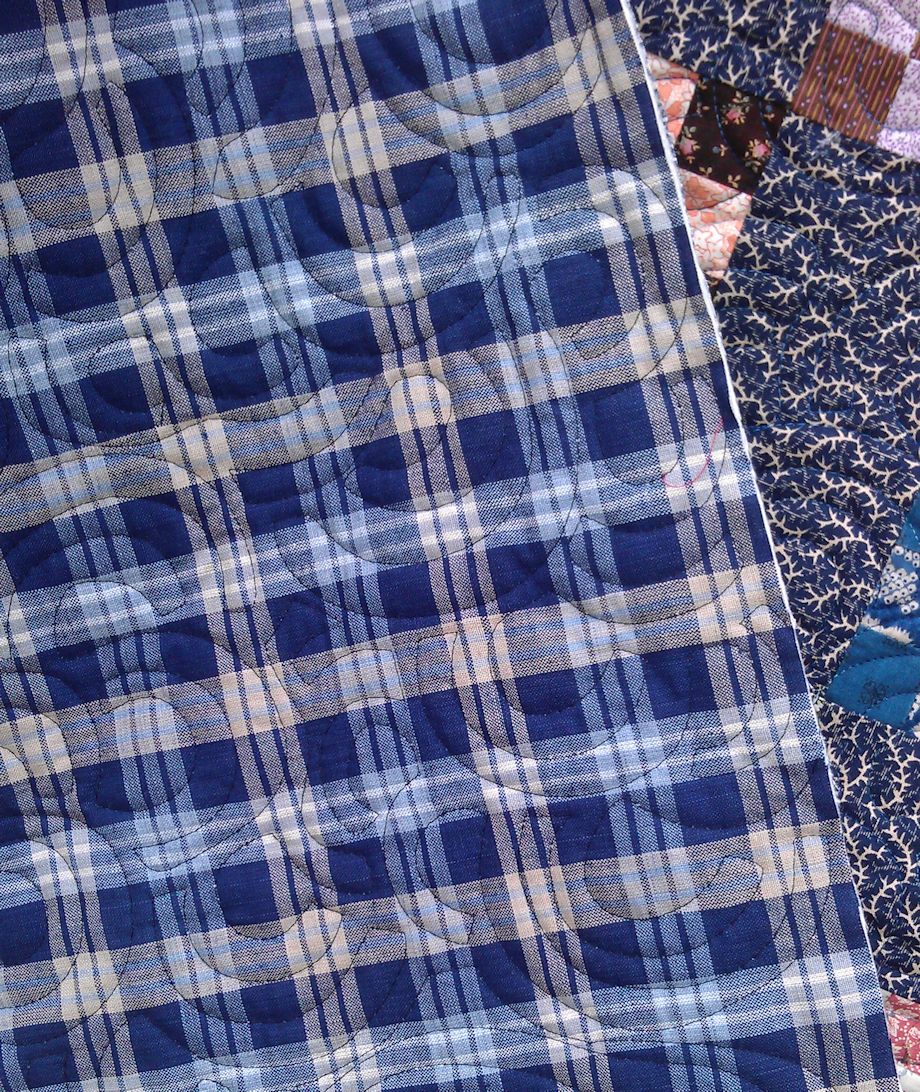
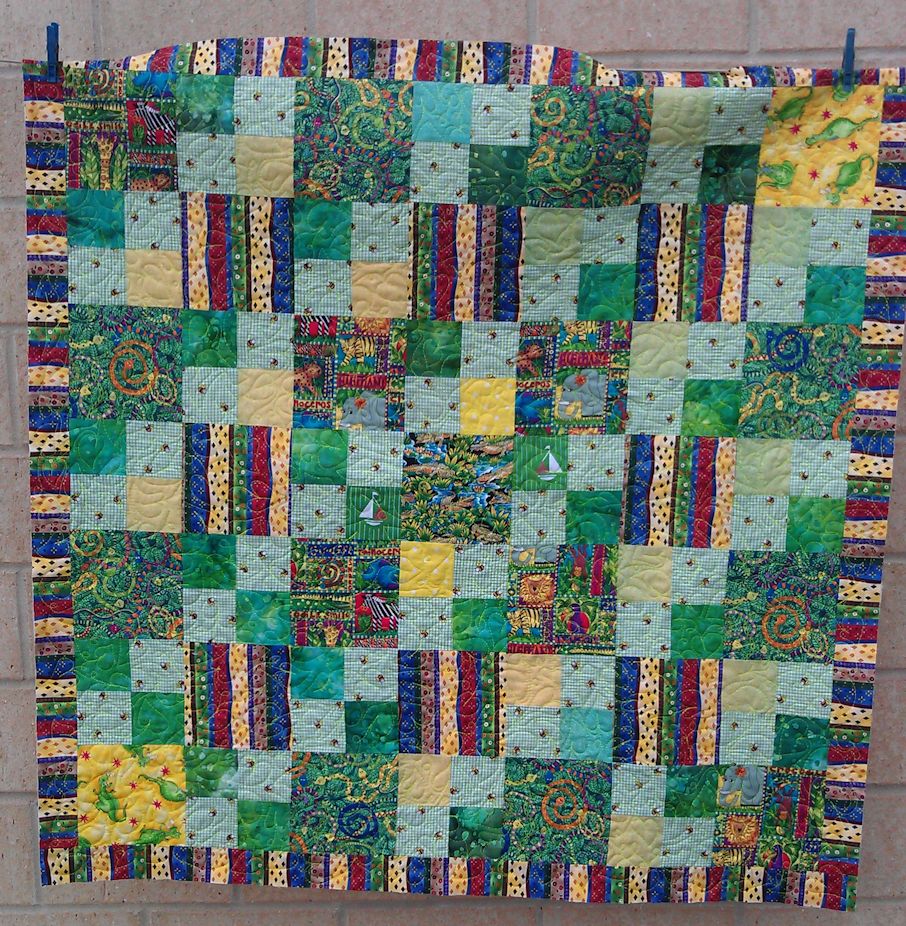
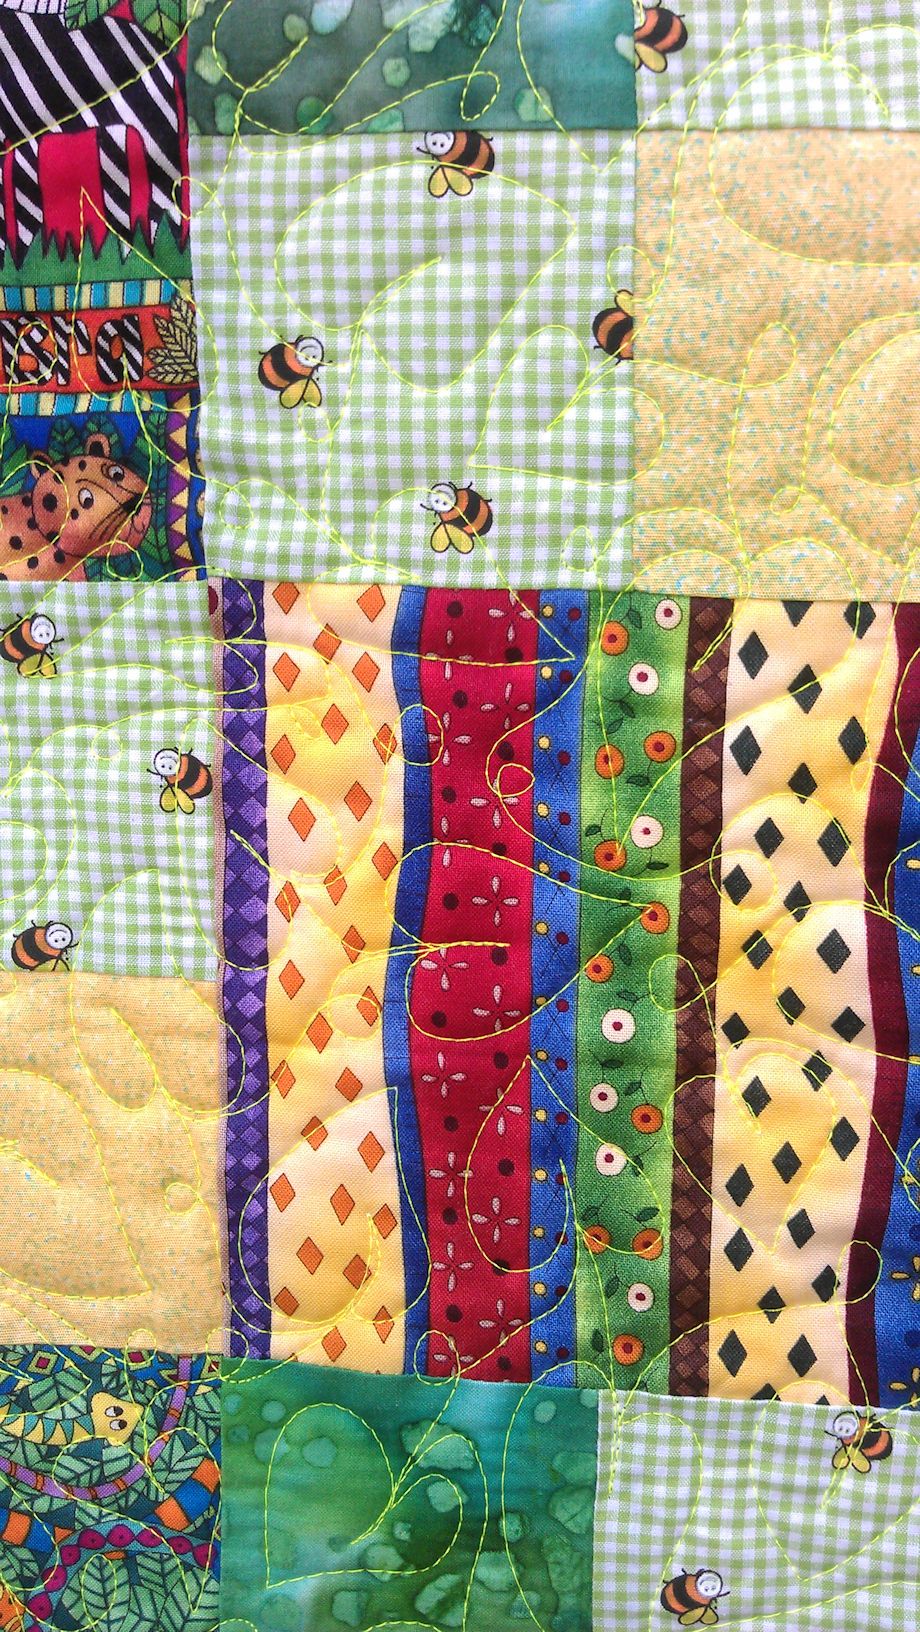
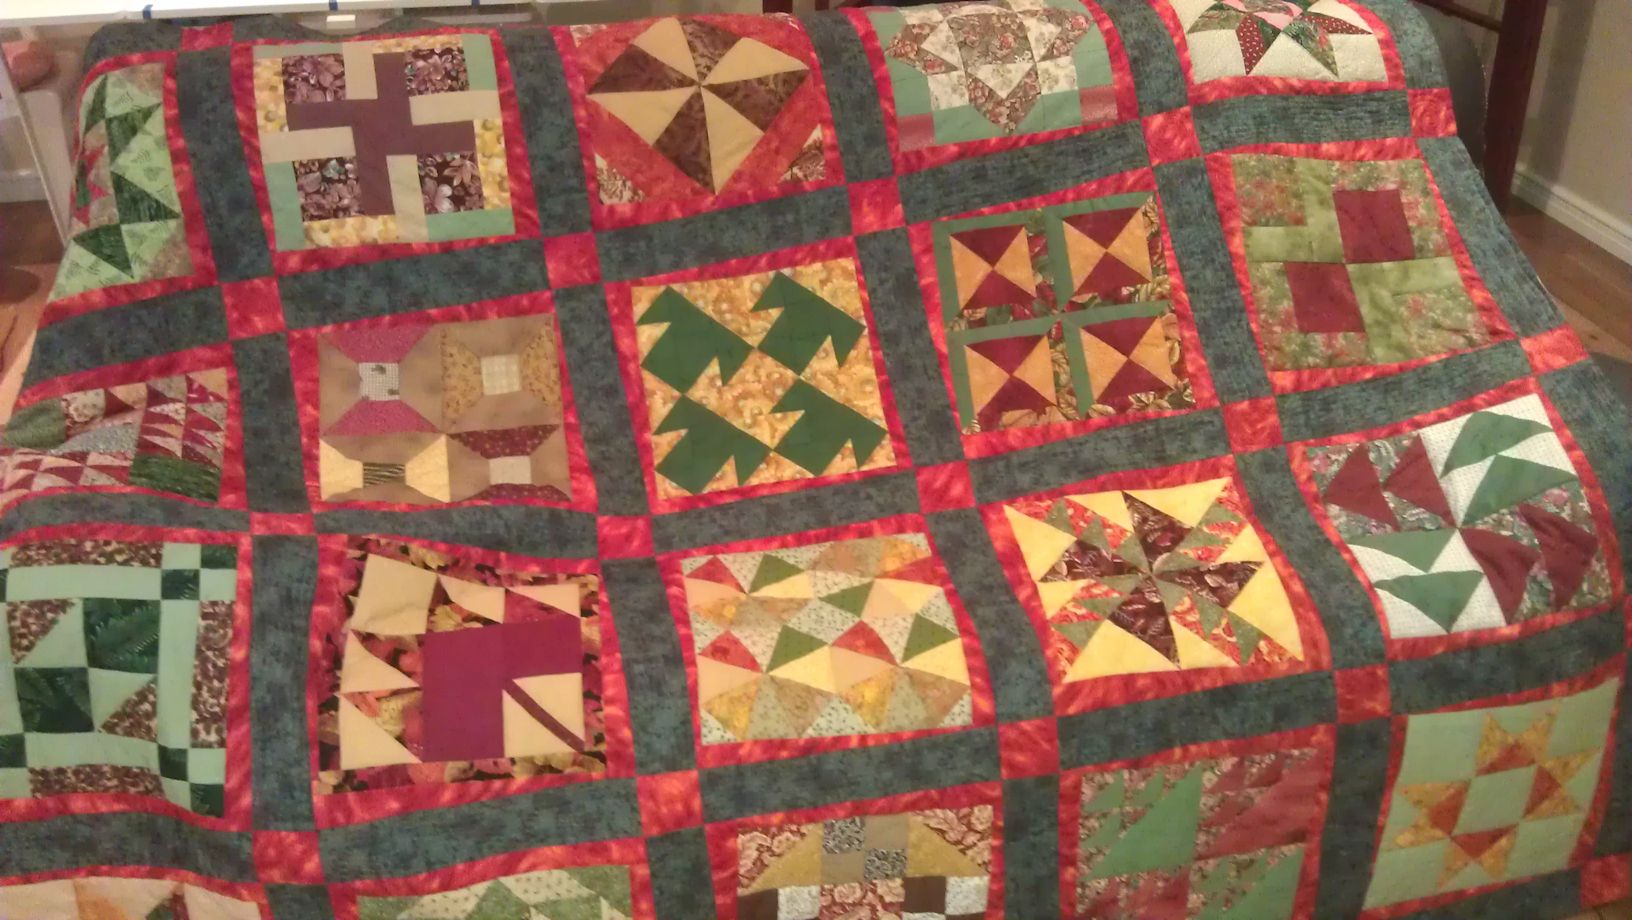
The highlight of the event was the QuiltWest exhibition, which highlighted some of the stunning work by local quilters, and had on display the Australian winners of a national competition, and some from a South Australian competition. And there was a big display of community quilts— many of which I recognised as I’d quilted them 😉

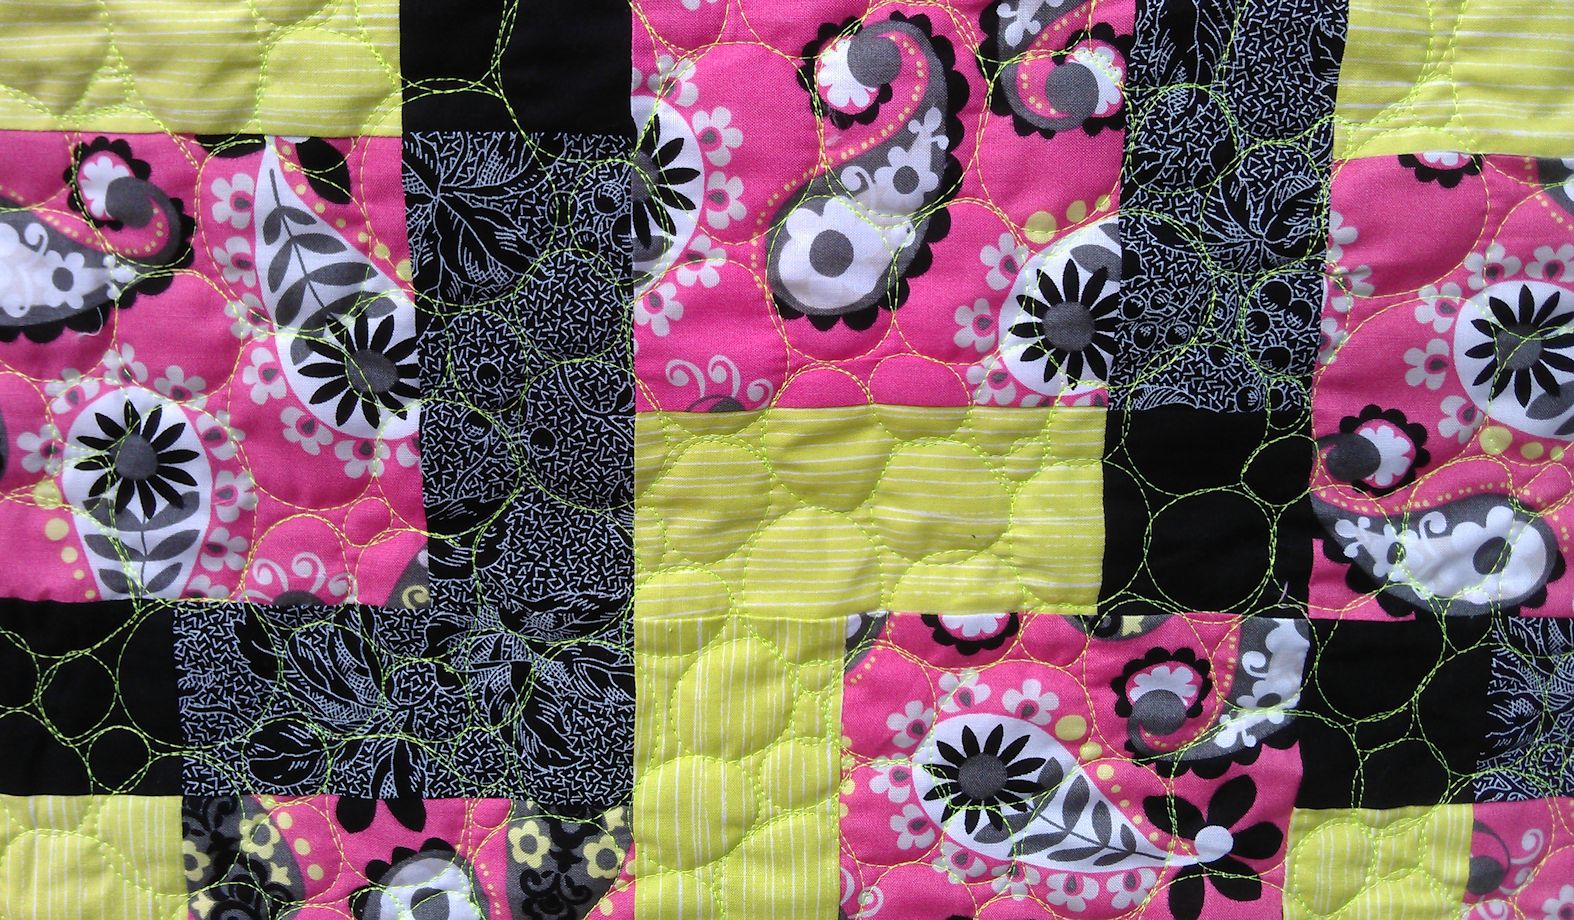
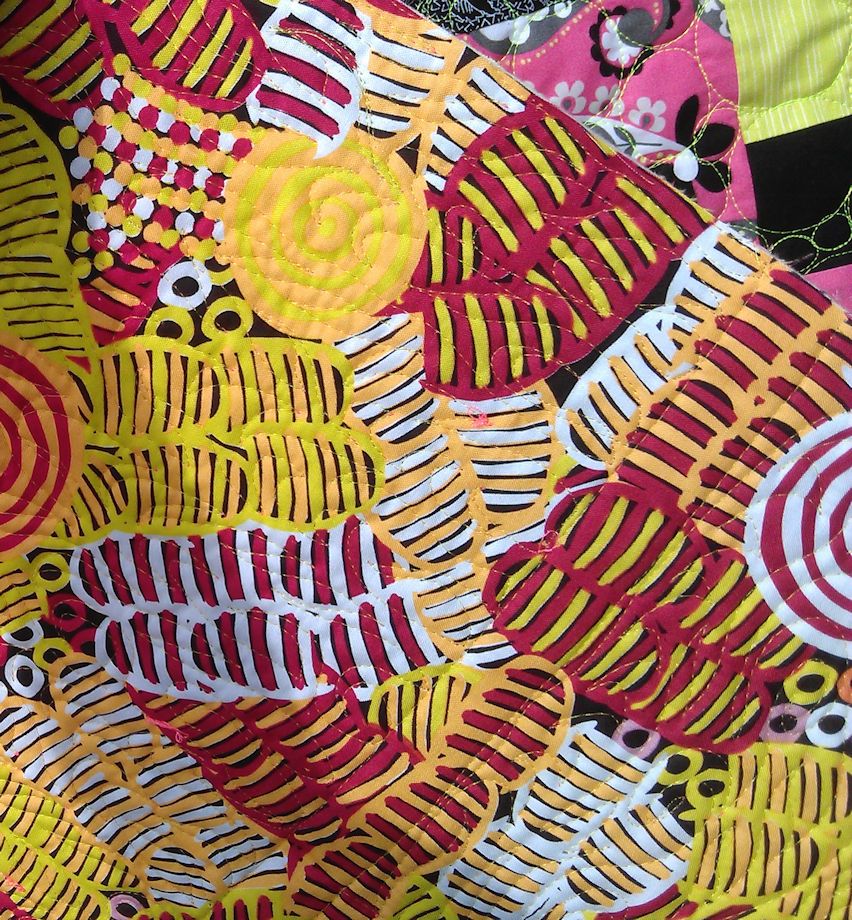
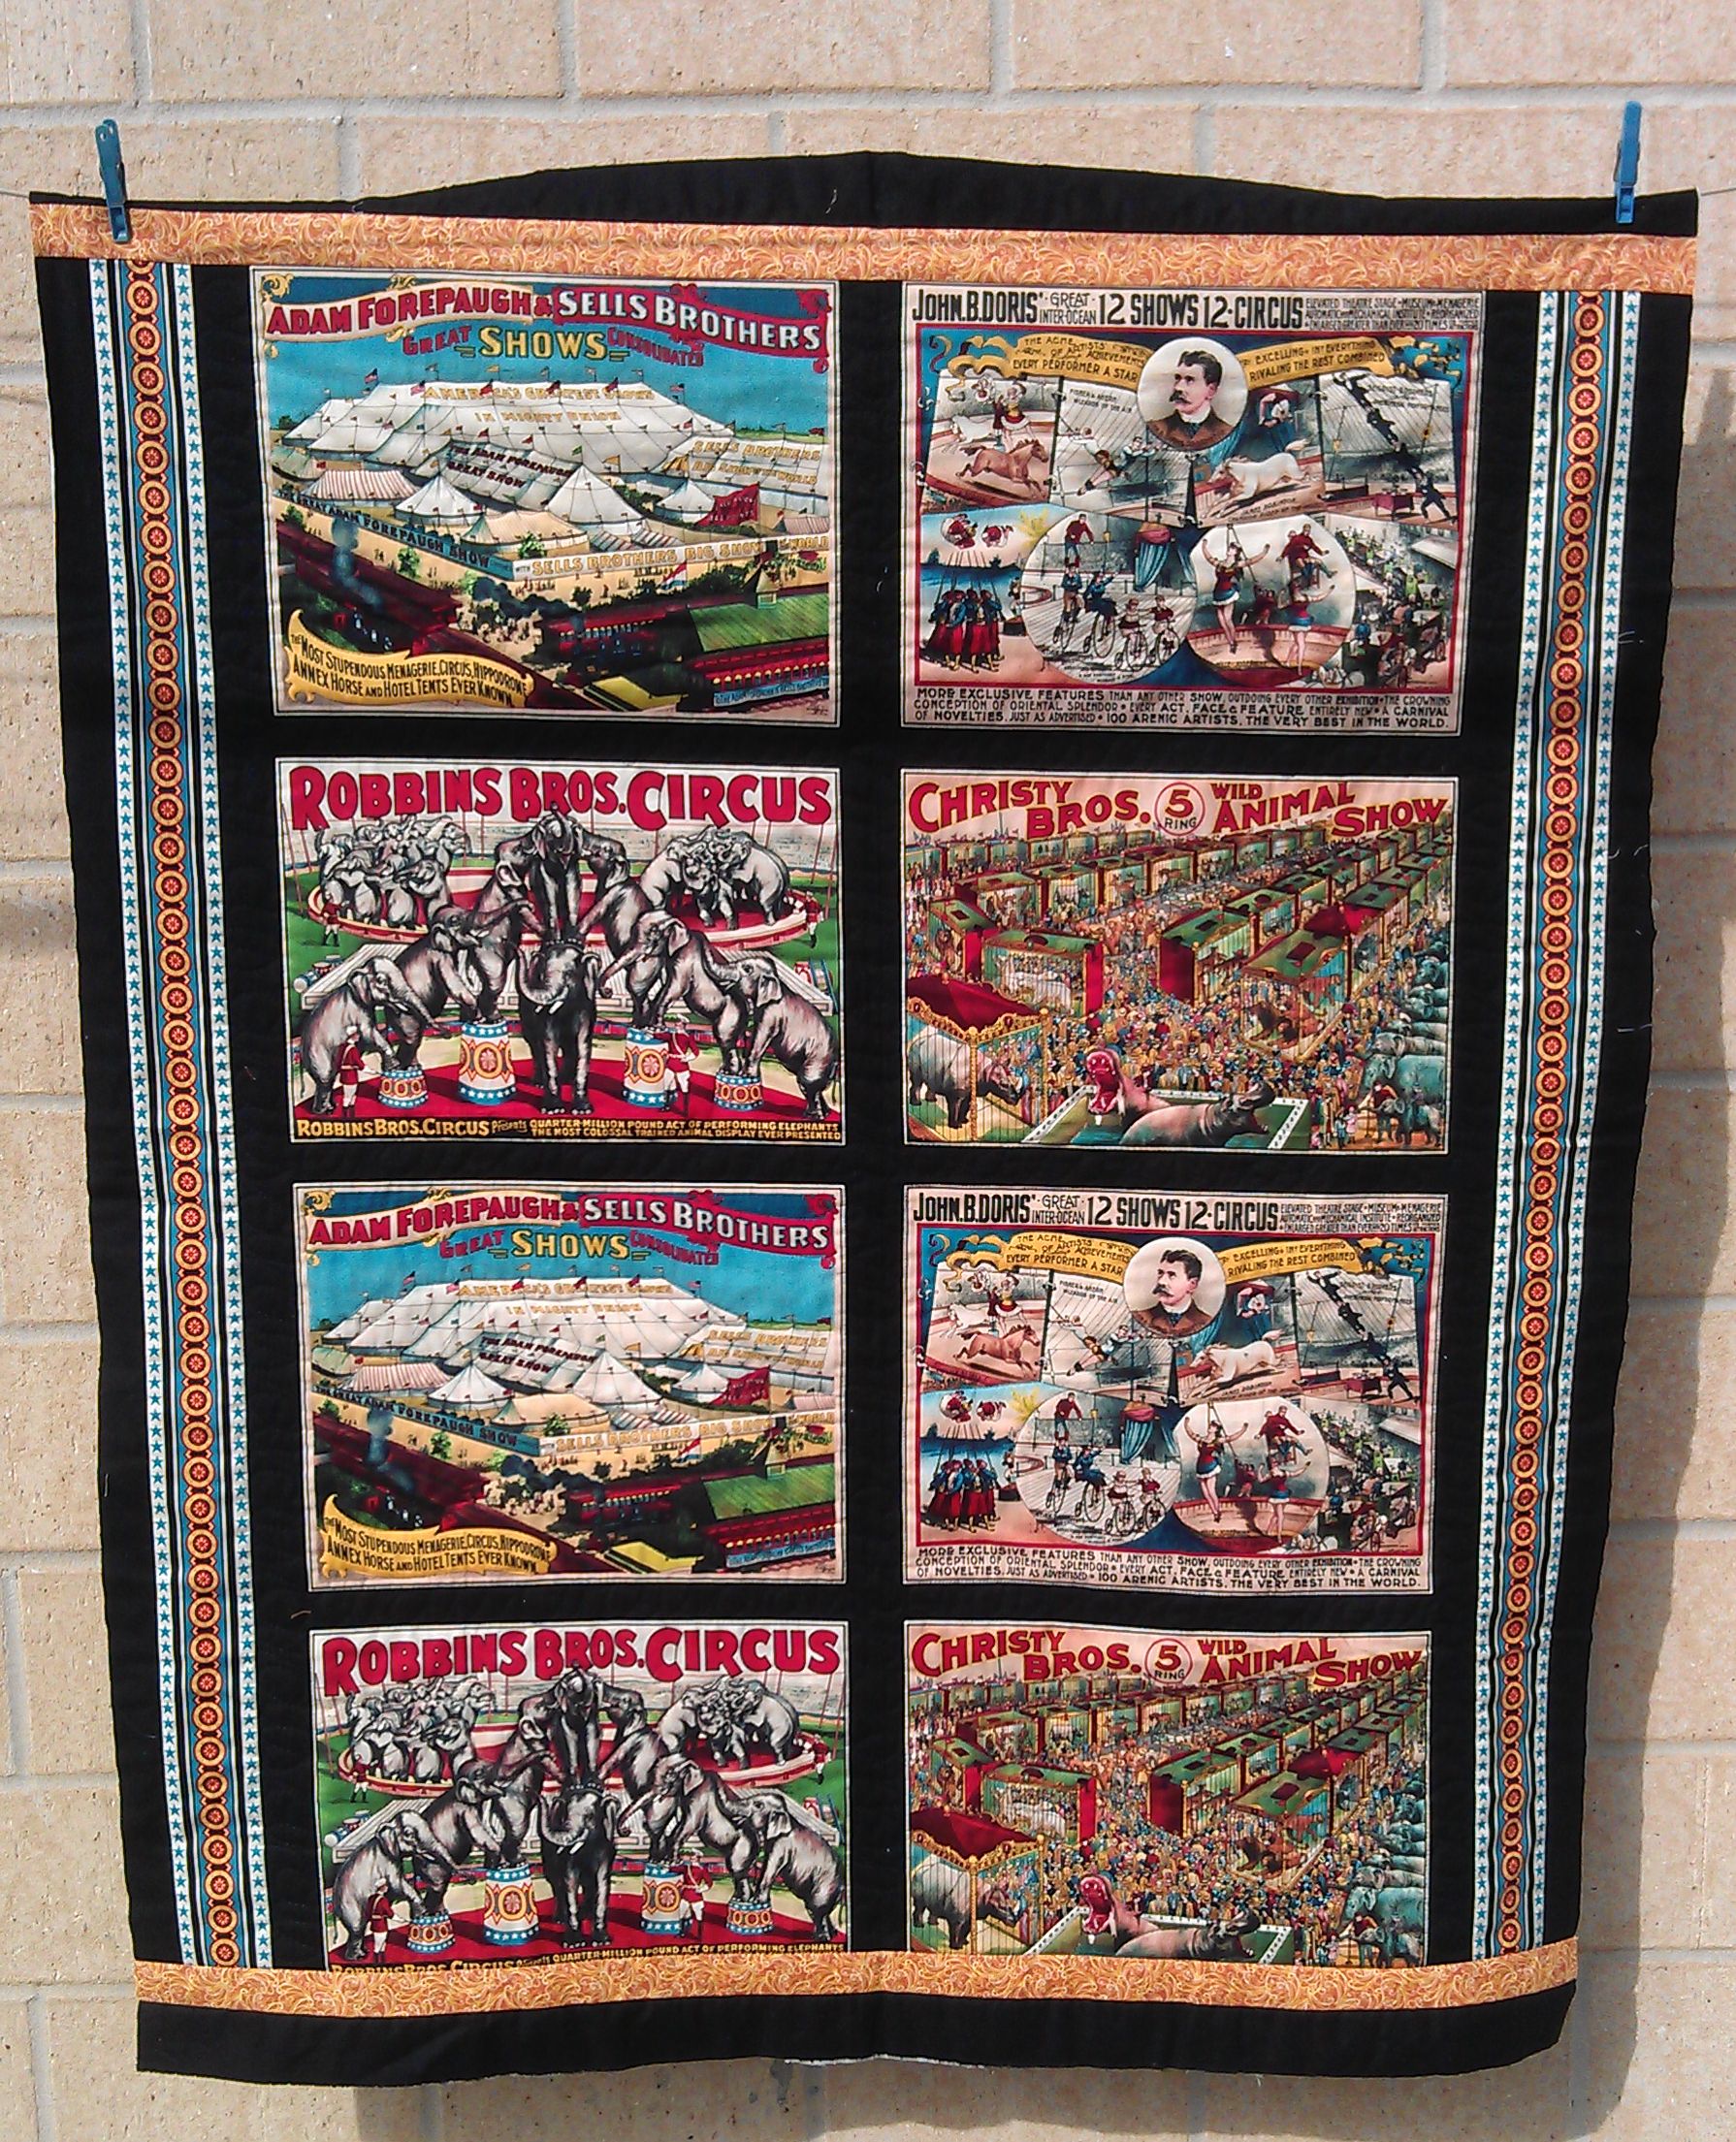
I took a heap of photos on my camera phone, so the quality of the images is not particularly good. I tried to capture the essence of the works, but of course, the exquisite detail is lost. I didn’t record any information about each quilt, so here are the photos, not in any particular order.

IMAG0795

IMAG0796

IMAG0797

IMAG0798

IMAG0799

IMAG0800

IMAG0801

IMAG0802

IMAG0803

IMAG0804

IMAG0805

IMAG0806

IMAG0807

IMAG0808

IMAG0809

IMAG0813

IMAG0734

IMAG0735

IMAG0736

IMAG0737

IMAG0738

IMAG0739

IMAG0740

IMAG0741

IMAG0742

IMAG0743

IMAG0744

IMAG0745

IMAG0746

IMAG0747

IMAG0748

IMAG0749 IMAG0750

IMAG0751

IMAG0752

IMAG0753

IMAG0754

IMAG0755

IMAG0756

IMAG0757

IMAG0758

IMAG0759

IMAG0761

IMAG0762

IMAG0764

IMAG0765

IMAG0766

IMAG0768

IMAG0769

IMAG0770

IMAG0771

IMAG0772

IMAG0773

IMAG0774

IMAG0775

IMAG0776

IMAG0777

IMAG0778

IMAG0779

IMAG0780

IMAG0781

IMAG0782

IMAG0786

IMAG0787

IMAG0788

IMAG0789

IMAG0790

IMAG0792

IMAG0793


Handy Quilter Sweet Sixteen: Fixing a loose top spool holder

27 05 2013

My Sweet Sixteen is just over two years’ old and has had a decent workout (nearly 9 million stitches and counting!). When I took it in for the light ring change out a couple of weeks back, I noticed that the top spool holder was loose. The thread seemed to be stripped from the screw-in part. My rear thread mast was fine, but my dealer did say that she knew of some that were also a tad loose as the thread seemed to be stripped from them.

My solution was a $2 roll of plumbers’ tape from the hardware store! I think I have enough tape to last several lifetimes as I only used a tiny bit to wrap around the screw-in part of the top spool holder, and there seems to be an awful lot more on the roll.

It worked beautifully. The top spool holder is now firm where it screws in to the machine–no more wobbles!

I also put a tiny bit of plumbers’ tape on the thread mast screw-in bit too, just in case.


Community Quilt 84

20 05 2013

This pretty quilt was a real challenge. The first challenge was how to quilt it, the second was how to deal with some of the very bulky 3D objects, and the third challenge was what to do about the unfortunate rust-type staining on some of the blocks.

quilt84_01


Before I stitched any of the main designs, I stitched in the ditch with invisible thread around EVERY single applique motif. Yes, there were a lot… This took several hours.

I tried removing the worst stain with some dishwashing liquid, but while that dulled the stain a little, it didn’t take it out. I sure wasn’t going to wash this quilt as there were a LOT of red fabrics in it and also red thread used for hand embroidery — if only one of those reds ran, I’d be in a worse situation than when I started. So I decided to leave the stains and hope that someone else has a good idea on how to deal with them, or that no-one else will notice them 😉

The very bulky 3D objects (especially the chrysanthemums in the centre block) were hard to get around and I got my open-toe hopping foot caught in them a couple of times, so, where I could, I backed into these objects to avoid creating havoc.

But the big challenge was how to quilt this quilt. The blocks were really big (18″ square) and there was a lot of white space surrounding each of the hand-appliqued motifs. I decided on a circle around each, but puzzled over what circular household object I had that was big enough for me to make a circle template. Nothing… So I sent my brain further afield to the shed where I remembered that we had a rock/soil sieve that was large and circular. Off to the shed… Yep — that worked! I pulled apart a 30-pack Diet Coke carton and drew two circles on it with a Sharpie — one for the larger circle at the top of the sieve (nearly 16″ diameter) and the other for the smaller base of the sieve (~13″ diameter). I then cut the templates out of the cardboard and laid them over the motifs. Initially I was going to use the larger one, but decided on the smaller one as I could get an under/over effect with it on almost all the applique designs; with the larger one, almost every design was going to be inside the circle.

I then used an ordinary 2B pencil to lightly trace around the template on each motif — light enough to see the pencil lines when I was stitching, but not enough for them to show once stitched. Then I used an off-white thread to stitch each circle along the marked lines. Then I braved ‘winging’ it by eyeballing a stitching line 1/4″ outside the main circle, thus creating a circular border. Some of the lines were a little wobbly, but I was pretty pleased with them overall.

Next came the decisions about how to quilt inside each circle — or whether to leave the insides unstitched and only stitch the areas outside the circles. I decided on stitching inside the circles, and while I initially thought I’d quilt outside the circles too, I decided not to once I’d quilted the insides, as I thought it would be overkill. Of course, each motif was different — should I use the same quilting stitch inside every circle, or vary it according to the design of the motif?

The end results are below. I’m pretty please with how they turned out, but they took much longer than I thought they would — I guess I spent about eight to twelve hours quilting all the blocks, in addition to the time spent stitching in the ditch.

Finally, what to do with the red sashing and the borders… I went with something very simple here so as to not draw the eye away from the centres of each block, and just did a straight line box around each block, some 1/2″ inside the block (in off-white), stitch-in-the-ditch at each seam (also in off-white), and 1/2″ outside the block (in red thread).

(Click on a photo to view each block in detail)

quilt84_06

quilt84_05

quilt84_04

quilt84_03

quilt84_02

quilt84_10

quilt84_09

quilt84_08

quilt84_07

Threads used:

  • Top: Off-white: Fil-Tec Glide (40 wt, trilobal polyester, colour ‘Linen’ #10WG1); Red: Fil-Tec Glide (40 wt, trilobal polyester, colour ‘Cardinal’ #70001); Green (for the holly stems): Robison-Anton (40 wt, rayon, colour ‘Evergreen’ #2315)
  • Bobbin: Invisifil (100 wt, beige)


Community Quilt 83

20 05 2013

Not my colours, not my favourite design, but hey — when you do community quilts, you get to quilt what’s been given to you 😉 And that’s part of the fun of the challenge!

For this one, I decided to use a matching variegated dark blue thread so that it disappeared into the quilt and didn’t try to overpower it. I also used a squared off ‘open headband‘ motif because I wanted to add some curves to the very geometric quilt design, but flowers etc. weren’t going to work for this fairly dark and masculine quilt.

(Click on a photo to view it larger)

quilt83_01

quilt83_02

Back:

quilt83_03

Threads used:

  • Top: Wonderfil Tutti (50 wt, Egyptian cotton, colour TU24
  • Bobbin: Invisifil (100 wt, navy)


Community Quilt 82

20 05 2013

What a bright, fun quilt! Some child will love this one as it’s full of jungle animals and other animals, and has such gorgeous bright colours.

Deciding on a all-over leaf quilt design was pretty easy with that jungle theme going on… and deciding on a bright fluoro lime green was easy too.

Unfortunately, it was quite a dull day when I took the photos, so they’re a little washed out.


(Click on a photo to view it larger)

quilt82_04

quilt82_03

quilt82_01

Back:

quilt82_02

Threads used:

  • Top: Isacord (40 wt, trilobal polyester, colour #6010)
  • Bobbin: Bobbinfil (white)


Community Quilt 81

14 05 2013

I had high hopes for this quilt. It was big and it had a rich backing fabric that led me to believe that the top would be as exotic. Unfortunately, it wasn’t as exotic as I’d hoped for. And the batting was a high-loft polyester wadding, which meant that this quilt was hard to handle as it kept wanting to ‘run away’ from me.

As a consequence of its sheer size and the thick polyester wadding, my first job was to stitch it down. Normally, basting pins are sufficient, but this one needed the ‘ESS’ touch (‘[stitch] Every Stinking Seam’ — attributable to Cindy Needham), so I stitched in the ditch around every block, and then within the blocks using a very lightweight (100 wt) thread in a matching beige. While I didn’t quite achieve ESS, I came close. I started using my Line Tamer ruler for the stitch in the ditch, but as some of the blocks only had short straight lengths, I discarded it and went for ‘eyeballing’ the straight lines.

Although I was tempted to do some quite detailed quilting in each block, time was against me (and I really didn’t like the ‘hand’ of the quilt with all that polyester wadding), so instead I decided to just quilt the sashing borders with a decorative orange thread, spiralling in the keystone blocks, and doing vertical and horizontal wavy lines between the spiral blocks.

I had to take the photos of this quilt inside as it was bucketing with rain outside and I was in a hurry to get this one packaged up and taken with me to Perth to be dropped at the Community Quilts coordinator’s house. So the photos are a little blurry.

(Click on a photo to view it larger)

quilt81_01

quilt81_02

Threads used:

  • Top: Robison-Anton (40 wt, rayon, colour Dk Tex Oran #2469); Invisifil (100 wt, light tan/beige)
  • Bobbin: Invisifil (100 wt, navy)


Swapping out the circuit board on my Sweet Sixteen

14 05 2013

As a precaution and in case it may have contributed to the issues I had with the various light rings on my Handi Quilter Sweet Sixteen, my dealer swapped out the circuit board in my machine when I took it up to her on the weekend (the board was swapped out on 11 May 2013). I also got the new light ring (Handi Quilter now has a new supplier and, as a bonus, brighter lights!).

Because I thought that swapping out the board and replacing it with a new one might mean that all my stitch counts would likely be reset to zero, I took a photo of my total stitches prior to the replacement board being put in.

In the two years I’ve had my Sweet Sixteen, I had done some 8.53 million stitches! If you look at the leading zeros, you can see that the board on the machine can tally up to 999,999,999 stitches. Whether the machine itself would last that long is something to be confirmed at a much later date 😉

stitches_HQ16_two_years_may2013

Now, if you looked at the stitch count only, my machine appears to be brand new as the new board had just 249 stitches recorded on it, which I’d guess was done as part of the manufacturers’ testing.

I wonder how long it will take me to reach another 8.5 million stitches…

Update August 2014: I got the new software upgrade (C-pod replacement) and the stitch count since this post (May 2013) was 6.2 million stitches, for a total to August 2014 of approximately 14.7 million stitches.


Storm brewing

14 05 2013

We had a few stormy days last week, with quite a lot of rain. In between breaks in the downpours, I took this photo of the next band of rain about to hit. Ominous, but not as ominous as the bands that had gone before it!

storm_brewing_may2013


Community Quilt 80

6 05 2013

And then there are the quilts that are just so bright and, well, jolly! This was one of them. Who’d have thought that flouro lime green and bright pink would go together? But with the addition of black, they sure did.

But how to quilt it? I thought about emulating the paisley motif in the pink fabric, or doing just straight lines (a la modern quilts), but ended up opting for largish circles in a neon/fluoro lime green thread in the main top, then a sort of ‘stem and leaf’ motif in neon/fluoro pink in the borders, leaving the solid pink border empty of any quilting.

I had fun doing the circles, but the stem/leaf borders took much longer than I expected.

I also loved the Aboriginal design backing fabric on this quilt, and felt it was a bit lost there — it would make a good quilt in its own right.

(Click on a photo to view it larger)

quilt80_01

quilt80_03

quilt80_02

Back:

quilt80_04

Threads used:

  • Top: Mettler Poly Sheen (40 wt polyester, colour 5940 [lime green]); Isacord (40 wt trilobal polyester, colour 1940 [pink])
  • Bobbin: Bobbinfil (white)


Community Quilt 79

6 05 2013

A few of the quilts I get to quilt for the Community Quilts program are just weird, in my opinion — this one falls into that category. I have no idea what inspired Windham Fabrics to make this circus panel from the 19th century/early 20th century, or what inspired someone to buy it, or what/who inspired them to make a quilt with eight panels rolled straight off the bolt of this strange fabric!

I suspect this is an old panel, as the backing fabric also looked old and a dessicated carcass of a beetle feel out when I opened it up. Also, it had been hand basted and the thread used for the basting felt old too.

So, how to quilt it? There was so much going on in the panels that I decided to just outline the main features in a 100 wt almost-black thread. I wasn’t sure what — if anything — to do with the ‘sashing strips’ surrounding the panels and eventually decided to just stitch the cursive word ‘circus’ multiple times (in the same thread) to hold them down.

A very strange quilt…

(Click on a photo to view it larger)

quilt79_01

If you look carefully, you might see the word ‘circus’ stitched in the black sashings/borders:

quilt79_02

Threads used:

  • Top: Wonderfil Invisifil (100 wt polyester?, colour IF 179)
  • Bobbin: Wonderfil Invisifil (100 wt polyester?, colour IF 179)