Handi Quilter Sweet Sixteen: Using bobbin thread as the top thread

29 04 2013

I had a devil of a time with a small spool of 100 wt Wonderfil Invisifil thread — it kept getting caught in the slot on the spool that secures the thread, or wrapping itself around the vertical or horizontal thread spool holder. It was the only spool of that colour that I had and it was perfect for the top stitching I wanted to do. But how to get it off the horrible spool and put it onto something that wouldn’t catch?

I had a lightbulb moment — I’d use the bobbin winder and wind the thread onto a bobbin then put the bobbin on the spool holder and I could use the thread without it catching every few seconds. Easy peasy. But not so fast, Batman…

Once I’d wound the thread off the spool and onto the bobbin, I was reminded that the Handi Quilter Sweet Sixteen has a thicker rod for spools than it does for bobbins! (that’s a silly design flaw, in my opinion — if the spool rods were a tad narrower they could take both spools and bobbins, not just spools). That meant that I couldn’t put the full bobbin onto either the vertical or horizontal spool holder. And I couldn’t wind the thread back off the bobbin and onto a different sort of spool as the bobbin winder can’t do that. Thwarted…

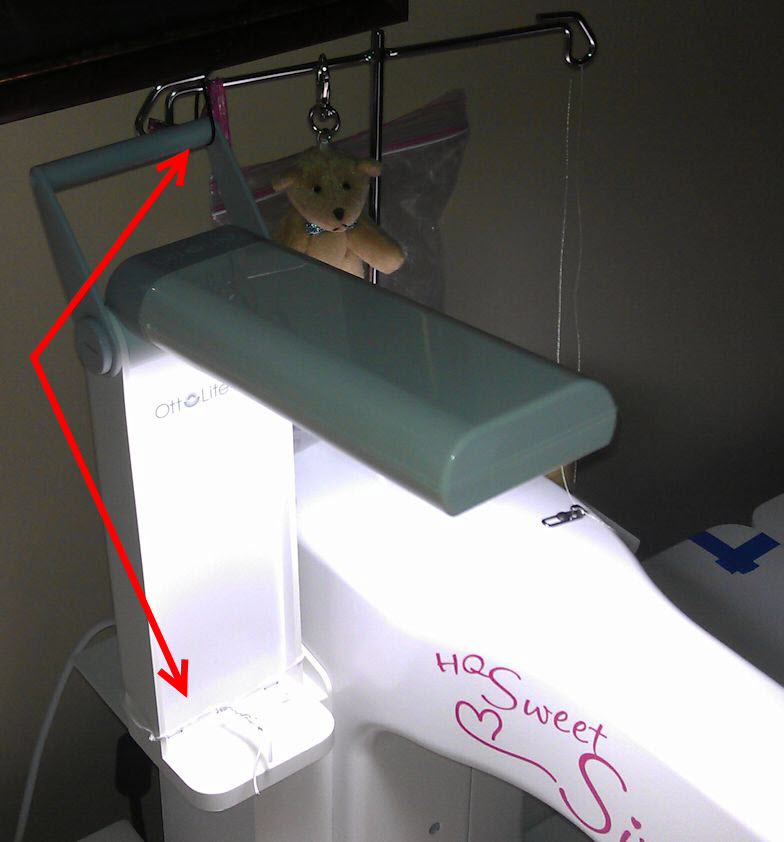
Except the previous day I’d rigged up a temporary lighting system for my Sweet Sixteen 😉 Surely I could do the same for the bobbin so I could use it as the top thread? Off to the sewing room, the kitchen and the shed to see what would work. I came back with an artist’s paintbrush, a roll of painters tape, and a satay stick. Well, the satay stick wasn’t going to work as it was way too thin. But the paintbrush was an option — the bobbin spun nicely on it, until I set it up, when I found that the 100 wt thread just wanted to spool off the bobbin and get wrapped around the paintbrush. So that was no solution.

bobbin_as_top01

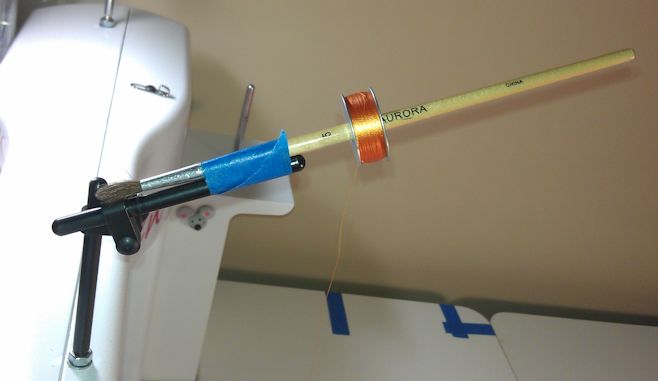
This solution didn’t work as the thread kept coming off the bobbin and winding around the paintbrush

The problem was that there was nothing to prevent the thread from coming loose from the bobbin and winding itself around whatever makeshift spool holder I had. I needed a cap of some sort… Just like on my domestic machine. My husband brought out a screwdriver that was the perfect diameter — my domestic sewing machine caps and felt pads fitted perfectly. It was then a matter of attaching the screwdriver to the machine with painters’ tape and off I went!

bobbin_as_top02

This solution was perfect — the felt pads and the caps from my domestic sewing machine kept the bobbin thread where it belonged, and the diameter of the screwdriver was such that the bobbin spun smoothly.

So now my Sweet Sixteen looks like some sort of makeshift Heath Robinson invention! I have an OTT Task Lamp tied to the left side with twist ties, a floor lamp on the right, and now this screwdriver spool holder for my bobbin full of the thread I wanted to use 😉

This option would not have been necessary if Handi Quilter had built these machines with slightly narrower diameter spool holders that would comfortably take thread spools and cones, AND M bobbins. Such a small design change would offer more thread delivery options to users.


Proteas

29 04 2013

I have a few protea bushes in the garden, of at least three different varieties (one I know is a Pincushion protea). One of the bushes (tree?) is in flower at the moment. I know it’s not a King Protea, but it’s similar and has a large flower. Anyone know what variety it is? At a guess, the flower head is about 10 to 15 cm (4 to 6 inches) across.

protea02

protea04


Black swans are congregating again

29 04 2013

There are always black swans on the estuary close to us, but a couple of times a year there are hundreds, if not thousands, of them. These mass congregations seem to be about September and April, and are possibly related to nesting/mating and hatching seasons, though I haven’t confirmed this. Mostly, the congregations are well out in the middle of estuary, but this year I’ve seen quite a few swans reasonably close to shore when I’ve driven into town (the road hugs the estuary for much of the way).

And for the first time, I’ve even seen one (twice) on the other side of the road, near a natural (?) pond with bulrushes right next to a house. I suspect this bird is nesting there, though waddling across the road would be fraught with danger.

Here are some photos I took with my phone the other day on my drive back home from the shops. None of the birds was really close to shore, but it was such a nice day and the estuary was looking so good, I wanted to take some photos! The black dots in the background are some of the swans — this is where they normally hang out. The estuary is about 20 km long, and there are swans along the whole length of it, so these pictures are only a tiny snapshot of some of the swans.

black_swan01

black_swan02

black_swan03


Necessity is the mother of invention

28 04 2013

Another light ring on my Handi Quilter Sweet Sixteen has started flickering… So, as I need to use my machine, I’ve turned the light off to stop the strobing effect. But there’s not enough natural light to see what I’m doing and the overhead lights are too yellow and just create lots of shadows. So I’ve placed a floor lamp with a white light on the right on the table, and I’ve ‘jerry-rigged’ an OTT Task Lamp on the left.

I used long twist ties to tie the OTT light to the spool holder on the left and to tie the handle to the left side of the thread mast. It’s not as good as the light ring, but it works!

ott_lite


Community Quilt 77

26 04 2013

And then there are the wonky quilts… This one was the wonkiest I’ve tackled so far. All those bias edges were wonky when sewn into the blocks, and the border was wonky.

So how to quilt a wonky quilt with fabric that bunched up in many places? You beat it into submission with lots of fairly dense quilting! 😉

I chose a matching variegated thread in blues, greens and purples, using a rounded spiral morphing into spikes, then echoed with rounded hops. I have no idea what this design is called but it achieved the end result of flattening this very wonky quilt top.

(Click on a photo to view it larger)

quilt77_01

quilt77_02

Back (still with some loose threads caught):


quilt77_03

Threads used:

  • Top: Superior King Tut ‘Cairo’ (40 wt cotton, colour 932)
  • Bobbin: Wonderfil Invisifil (100 wt, red)


Community Quilt 76

26 04 2013

Some quilts just sing. And this one had a whole choir going on 😉

I love batiks, and I especially likes how the maker combined shades of batiks I’d never have thought to put together to make this HUGE quilt top (I think this is the biggest I’ve done on my Sweet Sixteen). With the colour and the chevrons, and the overall linear movement of the quilt, I just had to stitch it with straight lines, a la modern quilting. I used a variegated thread with purples, greens, and browns/tans. And I used my Line Tamer ruler for the straight lines.

(Click on a photo to view it larger)

quilt76_01

quilt76_02

Update Sept 2014: This quilt became a raffle quilt, raising $1850 for a charitable organisation and going to a lovely family: http://waquilters.com/2014/09/30/friends-of-larche-raffle-quilt/

Threads used:

  • Top: Wonderfil Mirage (30 wt, polyester?, colour SD 29)
  • Bobbin: Wonderfil Inivisifil ( 100 wt, polyester, navy)


Handi Quilter under table storage solution

26 04 2013

I’d been using a temporary tray for storing my brush, oil etc. for my Handi Quilter Sweet Sixteen. I didn’t realise it was temporary until it started to split apart! So it was time for a different solution. The real problem with the shelf underneath the Sweet Sixteen table is that it’s narrow and shallow — 9.75 x 2 inches (24.5 x 5 cm) MAXIMUM internal dimensions. It’s deep, so length isn’t an issue, but the height and width of whatever you put under there are critical. And you still need to leave enough space for your fingers to grab the storage tray too.

I was in KMart (in Australia) and saw a neat little bamboo tray in the kitchen aisles. But as I wasn’t sure of the width of the shelf, I called my husband and got him to measure it. Unfortunately, the tray was too wide for the space. So I went looking a little more… And in the same KMart store, but in the stationery area, I found what I was looking for in the scrapbooking section — a tray with lots of fixed and removable dividers with lid that snaps closed.

I only added a couple of removable dividers — I sure didn’t need the 30 (!) removable dividers that were included in the box (though if you’re a beader or scrapbooker, then maybe they’d be super useful).

It’s a PERFECT tray for storing my oil, brush, small tools, spare fuse for the bobbin winder, and needles. And it cost me the princely sum of $5! Gotta be happy with that!

storage


17% mortgage interest

24 04 2013

I was going through some old files the other day, weeding out stuff that was no longer relevant, when I came across this letter from my bank regarding my mortgage. It’s dated 1989 and took me straight back to the time when struggling to pay the mortgage was a grim reality.

bank_interest_redacted

I’d sold my first house and had really extended myself for my second place. When I took out the mortgage on the second property in April 1988, interest rates were around 13.5% and I budgeted my payments for 15%. The creeping rates became a real concern when they went past 15% and just didn’t stop.

The only good thing about those rising interest rates was that they forced me into taking in a rent-paying roommate. I was more than content to live by myself, but my killer mortgage forced me into sharing my house with a total stranger who happened to be a good friend (and later wife) of an old friend of mine. Well, that stranger — a young girl from Minnesota — became a really good friend, someone whom I still keep in touch with today.

So good things can come out of dark days.


Oh no!

22 04 2013

There I was on Sunday afternoon — happily in my quilting zone, when all of a sudden something happened with my machine. I’ve learnt to listen to the ‘hum and purr’ of my Handi Quilter Sweet Sixteen and to stop immediately if anything sounds different.

This time it was a snapped needle — my second in a couple of weeks. In hindsight, I wonder if the first needle breakage put the timing out a tad and this caused the second one to go. Since the first needle snap (the first needle to break in 7.5+ million stitches), I’ve had all sorts of little issues — tension issues, skipped stitches etc. Nothing too bad, but annoying and time-consuming to fiddle with and fix. I’m also wondering if it’s the needle — this one was a Schmetz size 16, and I’m pretty sure the previous one that broke was a Schmetz too (I normally use the Groz-Beckert needles, but the only 16s I had were the Schmetzs supplied when I purchased the machine).

Anyhow, this needle is stuck firm in the bobbin case housing. No amount of pulling by me or my husband using needle-nose pliers, tweezers etc. would budge it.

needle_stuck01

Today I called the local sewing machine repair guy, but he can’t look at it for another two weeks at least. So I called my dealer in Perth and found out that her technician is in tomorrow and only has one machine scheduled for service etc. So I drove to Perth and back today to drop off my machine — of my 6+ hours out of the house today, 4+ were driving hours. At least the weather was great for driving!

With luck, the technician will be able to remove the needle tip tomorrow and reset the timing (which will be well and truly out) and that will be it and my husband can drive up to collect my ‘Bee’. The worst-case scenario is that I have to have the whole hook assembly replaced, which will entail not only an expense I wasn’t expecting, but also a longer wait for the part to come from Sydney or, even worse, from the US.

I’m sensing withdrawal symptoms already… 😉

Update 23 April 2013: The technician called. She was able to remove the needle tip and reset the timing, all for just under $50 (it seems a replacement assembly is about $500 [!], so I was lucky no further damage was caused). And there’s a bonus too — she’s heading down south for a few days, and so will bring the machine with her and I will pick it up from where she’s staying about 40 mins from here, so I don’t have to drive to Perth and back again.


Basting table

22 04 2013

After watching Cindy Needham’s excellent Craftsy class (Design it, quilt it), I decided to try her method of basting a quilt, using a taped down pin to mark the centre of the table and quartering the backing, batting, and top. But as I’ve only been using an angled kitchen counter top for basting, that method wasn’t going to work.

So I combined three things to create myself a great basting and/or cutting table! A fold-up table from Bunnings (if in the US, try your Home Depot, Lowes or similar) with straight legs ($35), a length of PVC pipe (I think I got two metres) that slips over the legs without being too loose or too tight (cut into four equal lengths for free by the staff at the Bunnings trade counter; ~$6 for two 1-metre lengths), and four rubber feet to fit over one end of each of the four pieces of PVC (~$2 each).

It’s a PERFECT height for basting! I don’t have any clamps (yet), so I’ve been using strong masking tape to stretch and hold the backing fabric in place while I place the batting and top. Update: I’ve now purchased 8 hand clamps from Bunnings (at $2.10 each, so ultimately cheaper than using lots of tape).

All up, the cost of my table and its accessories was less than $60.

Here’s my table with a really big quilt on it that I’m basting:

basting_table

basting_table_clamps03

basting_table_clamps02

basting_table_clamps01