Navigating the new Yahoo! Groups

11 09 2013

A few weeks ago, the Yahoo! Groups web interface underwent a redesign. Some people on one of my Yahoo! Groups are having trouble finding the uploaded files and how to search for archived messages. So here are the instructions for the members of that group — they apply equally to other Yahoo! Groups that have this new — but less user friendly — interface.

Here’s a screenshot of the new interface; I’ve used numbers to mark the areas I discuss below.

yahoo_groups

After logging into Yahoo! Groups, you’ll see all your groups listed in the Groups Home panel on the left (#1 in the screenshot above), and your Yahoo! ID will show in the top right corner (#7). Click on the group you want to see.

The main menu for the selected group sits under the banner photo — the active view has a dark blue line underneath it (Conversations [#2] in the screenshot above). When you’re in the Conversations view, you can change the subview from Topics to Messages to Trending. Messages is selected in the screenshot (#3) — when selected, the text changes to black and a tiny pale white indicator shows beneath it. Yes, that indicator is very hard to see!

How to find the files

  1. Click More on the menu bar immediately below the banner picture (#4 in the screenshot).
  2. Select Files.
  3. Click the folder you want to view.
  4. Click the file you want to open. Depending on your browser window settings, the file will either open in your browser, or open independently in the applicable application (e.g. Acrobat Reader, Microsoft Word).
  5. If you want to download the file to your own computer, right click on the file, then select Save Link As (for Firefox) or Save target as (Internet Explorer) (I can’t give you the options for other browsers as I don’t have them installed).

How to search the messages

  1. Look ABOVE the banner picture! (yes, it took me a while to find it too!)
  2. Enter your search text in the Search Conversations box (#5 in the screenshot).
  3. Click Search Groups (#6).
  4. Once you’ve got your search results, you can either scroll down, or continue on and do an advanced search (that box is just above the start of the results list).


Thread tension on the Handi Quilter Sweet Sixteen

5 09 2013

On the Yahoo! Group for the HQ Sweet 16 (and now Babylock Tiara), Mary asked about tension and threads.

Here’s my response:

Threads are unlikely to be your problem (except at the very thick and thin ends of the thread spectrum). The main problem with tension is getting to know your machine. For the first few weeks, I got very frustrated with incorrect tension, and then it seemed to click.

threads

Many factors affect thread tension:

  • thread path to the needle – I use 1, 2, or 3 of the little holes after the thread mast or horizontal spool, depending on the thread
  • incorrect needle size – thick thread = larger needle; thin thread = smaller needle
  • tension knob – don’t be afraid to turn that baby several times when testing tension. The better the result, the smaller turns you need to make to get it perfect
  • possible lint/fluff caught in the top tension disks
  • incorrect thread path – did you ‘floss’ between the top tension disks or did you miss them and the thread is in the spring? Have you put the thread through ALL parts of the thread path?
  • thread caught on thread path – thread on the horizontal spool can come off and get caught on the spindle and wrap around it, causing tension to go wacky. I’ve now put one of those felt pads from my domestic sewing machine between the spindle and the spool to help prevent this
  • thread getting twisted — the three holes at the top are meant to prevent this, but some threads don’t go through all three holes, or just don’t behave. I use a thread net for those
  • not getting the bobbin tension right – Jamie Wallen’s excellent video on bobbin tension: http://www.youtube.com/watch?v=Q1mRhcquZTM You should not have your bobbin tension too tight

Keep a practice sandwich next to the machine to test the tension every time you change threads or bobbins – even if the bobbin was wound at the same time with the same thread and settings as the previous bobbin.

The only threads I’ve haven’t been able to use successfully (yet!) are 12 wt Egyptian cotton threads (my needle sizes only go up to 18, so I need to buy a bigger needle size for that thread) and 100 wt threads (my size 14 needle is probably too big for that and so I may need to buy smaller needles for that thread weight). I’ve used two 40 wt rayon threads going through the needle at the same time, and I believe you can use three threads (using the horizontal spool holder too) if your needle size is big enough.

Tension is a matter of time and patience. Threads are only one part of the story.

See also:


Handi Quilter Sweet Sixteen: Changing the hopping foot

12 07 2013

In case I need it again in a hurry, here’s a link to Handi Quilter’s YouTube video on changing the hopping foot on a Sweet Sixteen.

NOTE: These instructions were quite different regarding the raising/lowering of the needle bar than the printed instructions I got with my machine back in 2011.


Reusing quilt batting in the garage

24 06 2013

Well, necessity is the mother of invention 😉 I was concerned that one day I’d knock the car door against the brick pillar in the garage. I’m always very careful not to, but you never know… So I wondered what I could put on the pillar and how I could make it stick to the rough bricks.

And then it came to me — quilt batting! It has really good adherence to any rough surface, so I got some batting cut-offs that I was saving for some other yet-to-be-decided purpose, stitched them together, then pressed the batting wad onto the bricks. I did this about two weeks ago, and it hasn’t fallen off yet 😉

I’m also not quite as concerned about opening the car door just that little bit much anymore. So it works well, but I think I’ll make another one that’s longer so it can cover the entire width of the pillar.

batting

Update: I made a bigger one and it’s MUCH better. Gives better coverage to the whole car door now.

garage_battimg


Handy Quilter Sweet Sixteen: Fixing a loose top spool holder

27 05 2013

My Sweet Sixteen is just over two years’ old and has had a decent workout (nearly 9 million stitches and counting!). When I took it in for the light ring change out a couple of weeks back, I noticed that the top spool holder was loose. The thread seemed to be stripped from the screw-in part. My rear thread mast was fine, but my dealer did say that she knew of some that were also a tad loose as the thread seemed to be stripped from them.

My solution was a $2 roll of plumbers’ tape from the hardware store! I think I have enough tape to last several lifetimes as I only used a tiny bit to wrap around the screw-in part of the top spool holder, and there seems to be an awful lot more on the roll.

It worked beautifully. The top spool holder is now firm where it screws in to the machine–no more wobbles!

I also put a tiny bit of plumbers’ tape on the thread mast screw-in bit too, just in case.


Handi Quilter Sweet Sixteen: Using bobbin thread as the top thread

29 04 2013

I had a devil of a time with a small spool of 100 wt Wonderfil Invisifil thread — it kept getting caught in the slot on the spool that secures the thread, or wrapping itself around the vertical or horizontal thread spool holder. It was the only spool of that colour that I had and it was perfect for the top stitching I wanted to do. But how to get it off the horrible spool and put it onto something that wouldn’t catch?

I had a lightbulb moment — I’d use the bobbin winder and wind the thread onto a bobbin then put the bobbin on the spool holder and I could use the thread without it catching every few seconds. Easy peasy. But not so fast, Batman…

Once I’d wound the thread off the spool and onto the bobbin, I was reminded that the Handi Quilter Sweet Sixteen has a thicker rod for spools than it does for bobbins! (that’s a silly design flaw, in my opinion — if the spool rods were a tad narrower they could take both spools and bobbins, not just spools). That meant that I couldn’t put the full bobbin onto either the vertical or horizontal spool holder. And I couldn’t wind the thread back off the bobbin and onto a different sort of spool as the bobbin winder can’t do that. Thwarted…

Except the previous day I’d rigged up a temporary lighting system for my Sweet Sixteen 😉 Surely I could do the same for the bobbin so I could use it as the top thread? Off to the sewing room, the kitchen and the shed to see what would work. I came back with an artist’s paintbrush, a roll of painters tape, and a satay stick. Well, the satay stick wasn’t going to work as it was way too thin. But the paintbrush was an option — the bobbin spun nicely on it, until I set it up, when I found that the 100 wt thread just wanted to spool off the bobbin and get wrapped around the paintbrush. So that was no solution.

bobbin_as_top01

This solution didn’t work as the thread kept coming off the bobbin and winding around the paintbrush

The problem was that there was nothing to prevent the thread from coming loose from the bobbin and winding itself around whatever makeshift spool holder I had. I needed a cap of some sort… Just like on my domestic machine. My husband brought out a screwdriver that was the perfect diameter — my domestic sewing machine caps and felt pads fitted perfectly. It was then a matter of attaching the screwdriver to the machine with painters’ tape and off I went!

bobbin_as_top02

This solution was perfect — the felt pads and the caps from my domestic sewing machine kept the bobbin thread where it belonged, and the diameter of the screwdriver was such that the bobbin spun smoothly.

So now my Sweet Sixteen looks like some sort of makeshift Heath Robinson invention! I have an OTT Task Lamp tied to the left side with twist ties, a floor lamp on the right, and now this screwdriver spool holder for my bobbin full of the thread I wanted to use 😉

This option would not have been necessary if Handi Quilter had built these machines with slightly narrower diameter spool holders that would comfortably take thread spools and cones, AND M bobbins. Such a small design change would offer more thread delivery options to users.


Handi Quilter under table storage solution

26 04 2013

I’d been using a temporary tray for storing my brush, oil etc. for my Handi Quilter Sweet Sixteen. I didn’t realise it was temporary until it started to split apart! So it was time for a different solution. The real problem with the shelf underneath the Sweet Sixteen table is that it’s narrow and shallow — 9.75 x 2 inches (24.5 x 5 cm) MAXIMUM internal dimensions. It’s deep, so length isn’t an issue, but the height and width of whatever you put under there are critical. And you still need to leave enough space for your fingers to grab the storage tray too.

I was in KMart (in Australia) and saw a neat little bamboo tray in the kitchen aisles. But as I wasn’t sure of the width of the shelf, I called my husband and got him to measure it. Unfortunately, the tray was too wide for the space. So I went looking a little more… And in the same KMart store, but in the stationery area, I found what I was looking for in the scrapbooking section — a tray with lots of fixed and removable dividers with lid that snaps closed.

I only added a couple of removable dividers — I sure didn’t need the 30 (!) removable dividers that were included in the box (though if you’re a beader or scrapbooker, then maybe they’d be super useful).

It’s a PERFECT tray for storing my oil, brush, small tools, spare fuse for the bobbin winder, and needles. And it cost me the princely sum of $5! Gotta be happy with that!

storage


Basting table

22 04 2013

After watching Cindy Needham’s excellent Craftsy class (Design it, quilt it), I decided to try her method of basting a quilt, using a taped down pin to mark the centre of the table and quartering the backing, batting, and top. But as I’ve only been using an angled kitchen counter top for basting, that method wasn’t going to work.

So I combined three things to create myself a great basting and/or cutting table! A fold-up table from Bunnings (if in the US, try your Home Depot, Lowes or similar) with straight legs ($35), a length of PVC pipe (I think I got two metres) that slips over the legs without being too loose or too tight (cut into four equal lengths for free by the staff at the Bunnings trade counter; ~$6 for two 1-metre lengths), and four rubber feet to fit over one end of each of the four pieces of PVC (~$2 each).

It’s a PERFECT height for basting! I don’t have any clamps (yet), so I’ve been using strong masking tape to stretch and hold the backing fabric in place while I place the batting and top. Update: I’ve now purchased 8 hand clamps from Bunnings (at $2.10 each, so ultimately cheaper than using lots of tape).

All up, the cost of my table and its accessories was less than $60.

Here’s my table with a really big quilt on it that I’m basting:

basting_table

basting_table_clamps03

basting_table_clamps02

basting_table_clamps01


Bobbin storage

2 04 2013

Here’s a great idea I saw on Facebook the other day — using ice block trays for storing bobbins! I happened to have an old tray with large openings, just perfect for three of my Handi Quilter Sweet Sixteen M size bobbins. This particular tray will hold 48 bobbins, and I only have about 20 or so, so there’s plenty of room for more 😉

Even better, this storage system slides neatly onto the shelf under the HQ Sweet Sixteen table.

ice_block_bobbins

Suggestion: As this ice block tray came with an old fridge, and I’m not sure they make trays with this sort of depth or width these days, perhaps try a secondhand store or op shop.


Using the Line Tamer ruler with the Handi Quilter Sweet Sixteen

28 01 2013

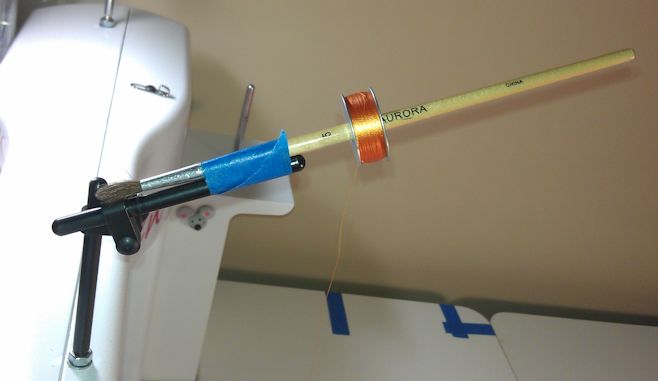
I haven’t done much ruler work with my Sweet Sixteen, with the exception of straight line work (e.g. stitch in the ditch) using the Line Tamer ruler from Four Paws Quilting. I love this ruler as it has channels to hold the hopping foot in place and so there’s very little that can go wrong — for example, it’s not easy to wander off line if you use it correctly.

However, I initially had a few trials and errors in using it, so this short tutorial shows you how I use it and what to watch for so that you can keep your stitching lines nice and straight.

PLEASE NOTE: This ruler is NOT for use with domestic sewing machines — it is made specifically for mid-arm and long-arm quilting machines and it comes in two sizes, depending on the machine you have.

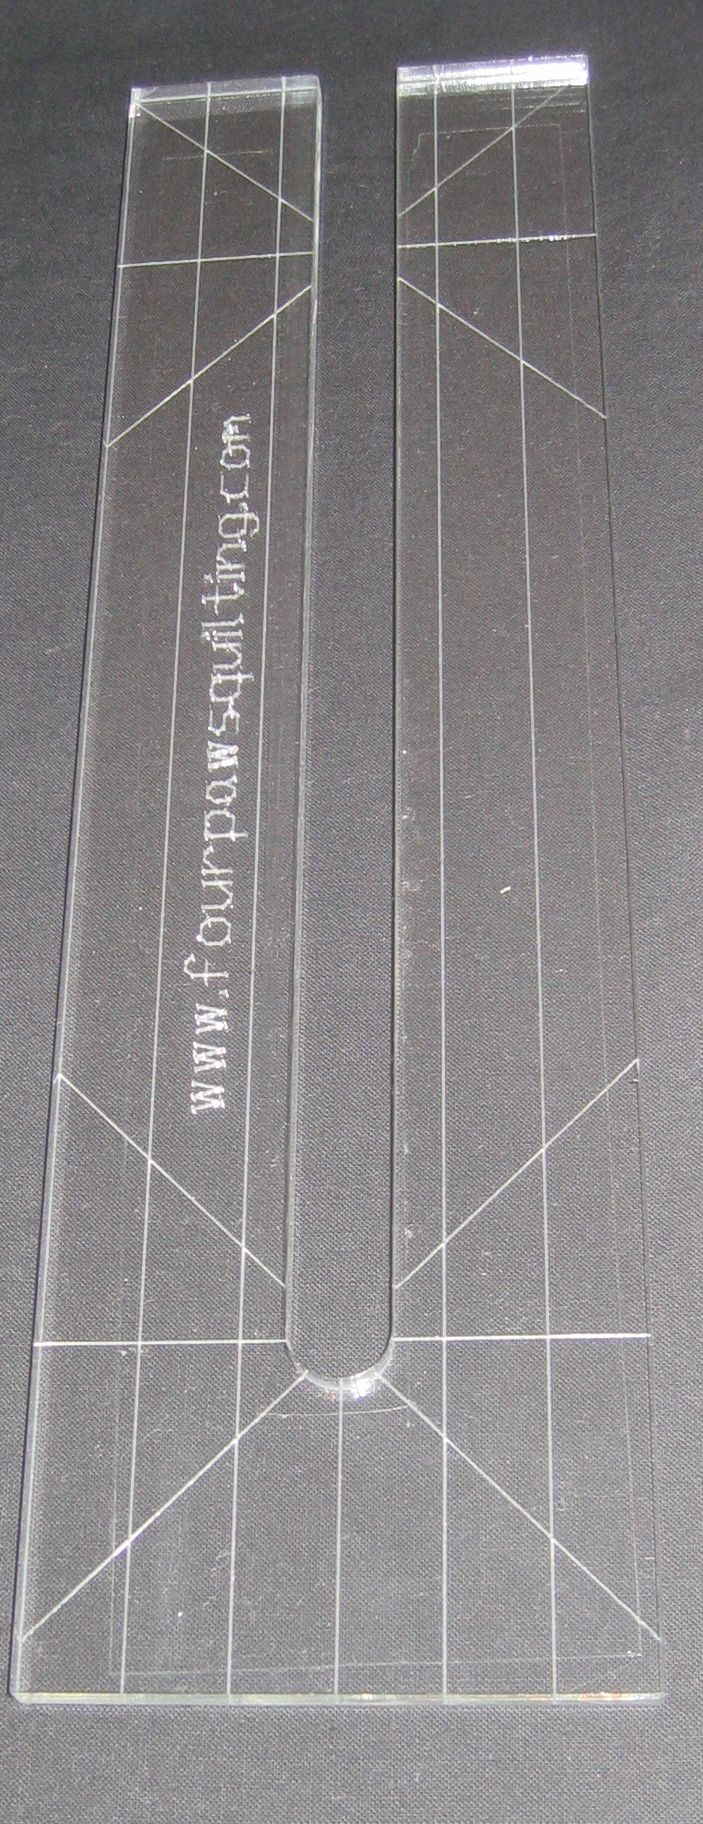
First, let’s take a look at this ruler (click on a photo to view it larger):

line_tamer04

The ruler is 10.5 inches long, with vertical lines laser-etched into the plastic every 0.5 inches. There are two horizontal lines — the top one near the opening is 1.5 inches down from the top, and the bottom one is 1.75 inches from the base of the ruler. On my ruler (suitable for the HQ Sweet Sixteen hopping foot), the half-inch lines near the inner edge of the slot are in effect 0.25 inch vertical lines. There are also some 45 degree lines.

You have several positioning choices when using this ruler:

  • place the slot vertical to your body position, then either pull the ruler and quilt towards you, or push it away from you
  • place the slot horizontal to your body (i.e. push/pull it to the left or right)
  • or some other angle of your choosing.

NOTE: If you are using the open-toe hopping foot, be careful if you’re trying to use the ruler at any angle other than vertical — the sides of the hopping foot need to touch the edges of the slot, and at non-vertical angles, that can be an issue.

If you look closely at the picture above, you’ll see other faint ‘lines’ — this is the cut edge of the ‘ClearGrip’ I have put on the underside of the ruler. ClearGrip helps hold the ruler in place on the quilt. (UPDATE: I now use small squares of Handi Grip on the underside of the ruler — it sticks the ruler to the fabric much better.)

I tend to use the ruler vertically, and slide the slot around the foot so that the open part of the slot is furthest away from me. I then pull the ruler (and quilt) towards me. But that’s me — you’ll need to practice to find out the best position for you.

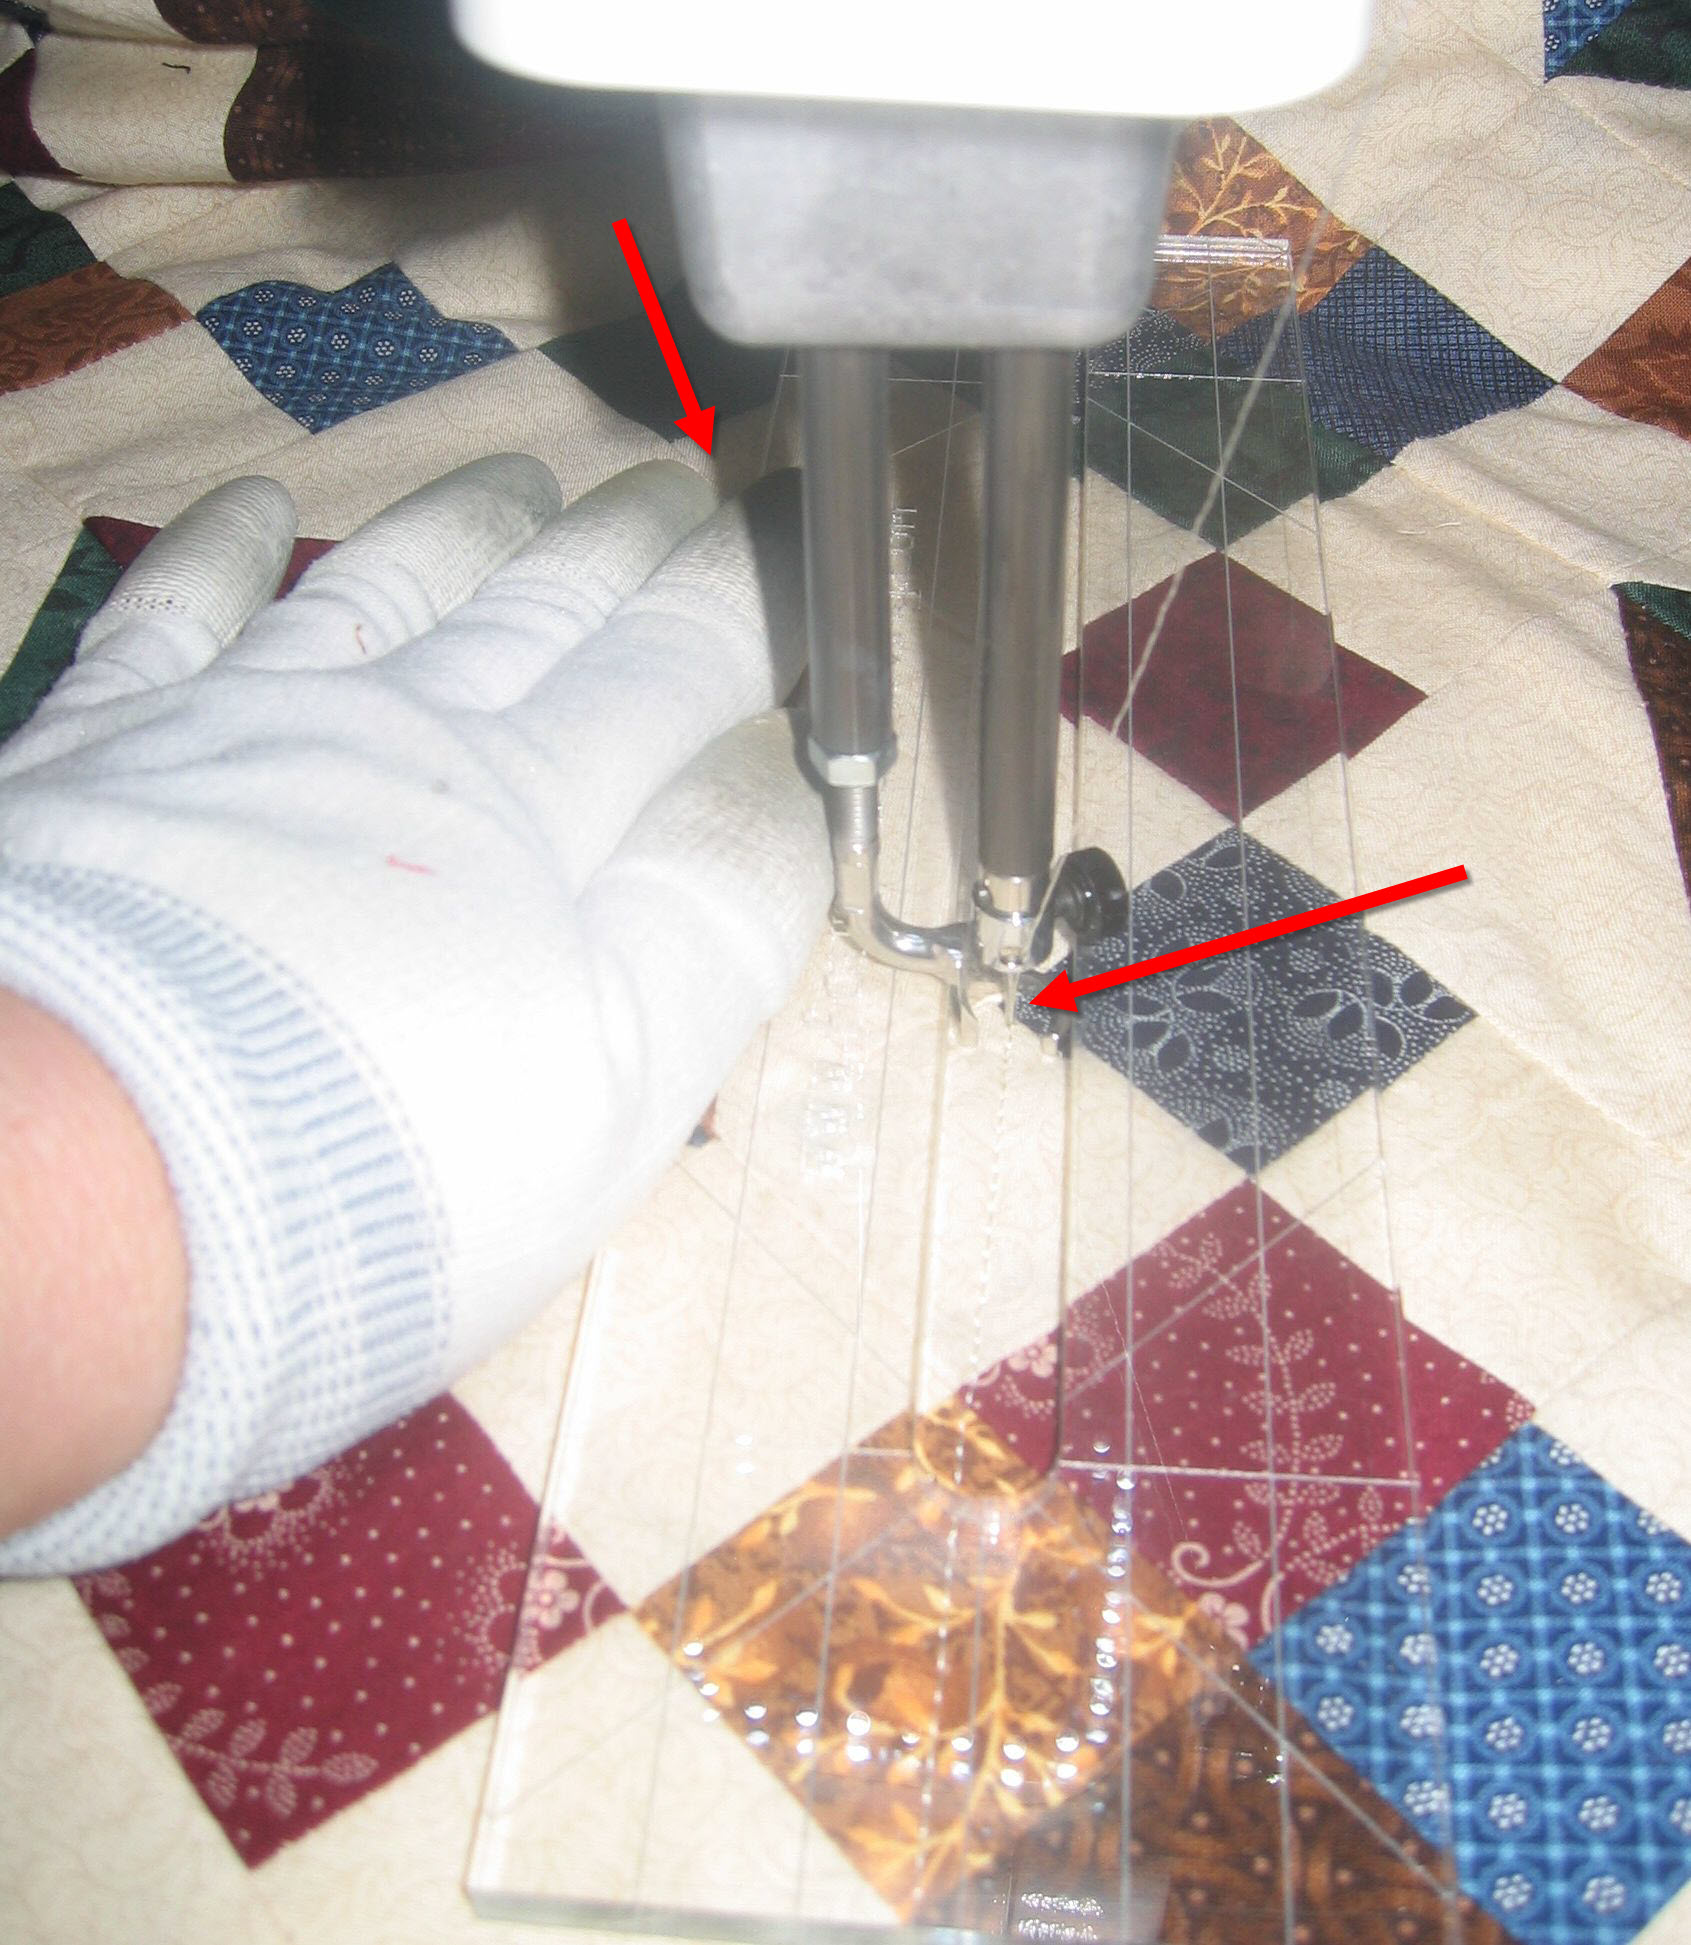
I also use Machingers quilting gloves when using the ruler as it gives me better grip. In the photo below, you can only see my left hand as I used my right to take the picture! But I’d normally have both hands on the ruler, applying downward pressure with the heels of my hands, thumbs, and forefingers as I move the quilt and ruler towards or away from me. Notice that my third finger (left red arrow) is resting against the edge of the ruler. I do the same with my right third finger, and in this way I can adjust the position of the ruler as smidge if I need to as I’m stitching just by moving those fingers to the left/right as required. I think of this finger control like a horse’s bridle — with a well-trained horse, you only have to adjust the bridle a tad to the left or right to make the horse go where you want it to go. Or, if you’re not familiar with horses, think of power steering in your car — you only need to touch it a tiny amount to make small changes in direction. In the example below, I’d use my right finger to make a tiny leftward adjustment to the ruler so that I didn’t stitch over that point (right red arrow). Actually, I’d normally have made that adjustment a few stitches back. NOTE: In this photo I’m using light coloured thread, so I’d make any adjustments in direction in the light areas of fabric, not in the dark areas where they’d be noticeable.

line_tamer01

In the picture below, you can see how I’ve lined up the ruler — the green arrows show the alignment of the centre line with the previous stitching and how the stitches just touch/skim the dark fabric points. The red arrows show another alignment method — placing the laser-etched lines parallel or on the seam lines. Of course, this will only be successful if the elements in the block are perfectly square ;-). Notice the area where the top green arrow is pointing — see how the hopping foot is snug against the edges of the slot? Sometimes, when you move the ruler to the next position, you can end up with it sitting on top of the hopping foot if you’re not watching carefully — if you stitched with it like that, you could damage your hopping foot, the needle, the timing of the machine, and/or the ruler!

line_tamer03

The final picture (below) shows how I’ve lined up the stitching line so that it will go exactly in the centre of the slot. I eyeball this, and with some practice have got pretty good at ‘guessing’ where that stitching line will go. Again, the green arrows show the visual cues I use to align those points with the centre of the slot, and the red arrow shows the vertical line parallel to the block.

line_tamer02

Takeaways:

  • Rulers work best with the machine set to the ‘needle down’ position. If you have to make adjustments, you won’t have jumps in your stitches if you use ‘needle down’.
  • You only need to make small adjustments to change direction.
  • You need to apply downward and push/pull pressure to move the ruler and quilt under the needle.
  • Make sure the hopping foot is snug in the slot before you start stitching.
  • Use the laser-etched lines on the ruler as guidelines. You can line them up with seams, with other stitching lines (for an exact echo measurement), or with other elements on the quilt.
  • When stitching long lines, you don’t need to stitch the full length of the slot before adjusting the ruler. Stitch as far as you’re comfortable with (this might only be 4 or 6 inches), then stop. Adjust the ruler and start stitching again. With practice, you’ll be able to guide the ruler a smidge with your fingers as you’re stitching, but initially stop, then start again.
  • You WILL improve with practice! On my Sweet Sixteen, I can now stitch straight lines at 60-70% speed; when I first started using this ruler, I was going at about 15% speed.

Quilts I’ve stitched using this ruler: https://rhondabracey.com/?s=%22line+tamer%22