Threads and tension: Practise before quilting

26 04 2014

On the Yahoo! Groups forum for the HQ_Sit_Down_Model, J asked for some advice on what sort of threads (top and bobbin) I use in my Sweet Sixteen, and how I get the tension right. She also wanted to know whether I used the same size/colour/weight thread in the top and bottom threads.

Here’s my (long) reply… You might want to get yourself a coffee…

***************

I know that the purists say to use the same colour top and bottom, and even the same thread top and bottom. But I wasn’t taught by a purist and I didn’t know ‘the rules’, so I do what works for me. The bottom line (no pun intended!) is that I use whatever thread I want in the top and whatever thread I want in the bottom. I always stitch on a small practice sandwich first to make sure the tension is right, and then off I go.

So with that said, here are some of the things I do when deciding on a thread to use and then testing it out:

  • I pick one or more colours for the top thread. I don’t really care what brand – it’s the colour I’m looking for. I tend to favour the trilobal polyesters over cotton (far less lint!), and favour Glide and Isacord over other brands. But if the colour I want to use is only in a rayon or cotton, then I’ll use that. I’ve even used DECADES OLD overlocker/serger thread in the top! See also: Threads I’ve used in my Sweet Sixteen
  • Most of my top thread stash is 40 wt thread, no matter what variety.
  • I’m lazy so I don’t like winding/changing bobbins too often. So I’ll try to use either a pre-wound Magna Glide Classic (no cardboard sides) bobbin (made by Fil-Tec; 60 wt, size M), or a bobbin filled with a lighter weight thread (a bobbin takes a lot more light weight thread than 40 wt, for example). I’ve used these sorts of threads in the bobbin – Deco Bob (80 wt) and Invisifil (100 wt) from Wonderfil; Bobbinfil (70 wt I think); and 40 wt threads as per the top. My preference is the Magna Glide Classic pre-wounds (I only have their ‘white’, which is really a light creamy colour when you look at it; part # 12445), followed by Bobbinfil, followed by Deco Bob and then Invisifil. I’ve never used Bottom Line in my bobbin as it’s hard to get where I live and is very pricey compared to the others.
  • Mostly, my top and bottom threads are totally different in brand, weight, and type – as I said, I’m not a purist.
  • My top and bottom threads often aren’t the same colour either. Depending on the quilt, I may try to match the bottom thread with the backing fabric. But I find that except for really dark backs, the white Magna Glide Classic pre-wound just disappears into the backing fabric and is hardly noticeable. Then again, I’m not quilting show quilts, so I’m not so fussed about the colours being slightly different.
  • If I’m using a dark thread on top and the top is also dark, I might use a darker bobbin thread (e.g. black Bobbinfil), but only if the bobbin thread starts to show on the top.
  • I ALWAYS drop-test my bobbin thread tension before threading the top of the machine. I use Jamie Wallen’s method and it works every time for me. Once I have the bobbin tension adjusted, I rarely, if ever, have to change it for that bobbin.
  • I thread the machine using 1, 2, or 3 of the holes, depending on the thread. Cottons and trilobal polys seem to do OK through 3 holes, but the rayons mostly do best through just 2 holes. Metallics, monofilaments, or fine threads like 80 wt or 100 wt, seem to do best for me through just one hole.
  • I use a thread net over the cone/spool for fine threads and metallics to help prevent them spooling off too quickly and getting tangled.
  • I brush out the bobbin area at every bobbin change, and put one drop of oil in the bobbin area then too. But with the Magna Glide Classic pre-wounds, there’s not a lot of lint in the bobbin area.
  • I try to change needle with every quilt I do (but if I have a couple of small quilts, I might use the same needle for a while).
  • I mostly use a size 16 or 18 needle. I have 14s but I only use them for very fine thread.
  • I usually have the needle in the 5:30 position – that seems to work best for my machine; 6:30 position sometimes works too, but I don’t have a lot of luck with the 6:00 position.

Once all that’s done (hopefully I didn’t forget anything!), I grab my practice sandwich and:

  1. Stitch a couple of loops and points at the speed I’m likely to use on the quilt.
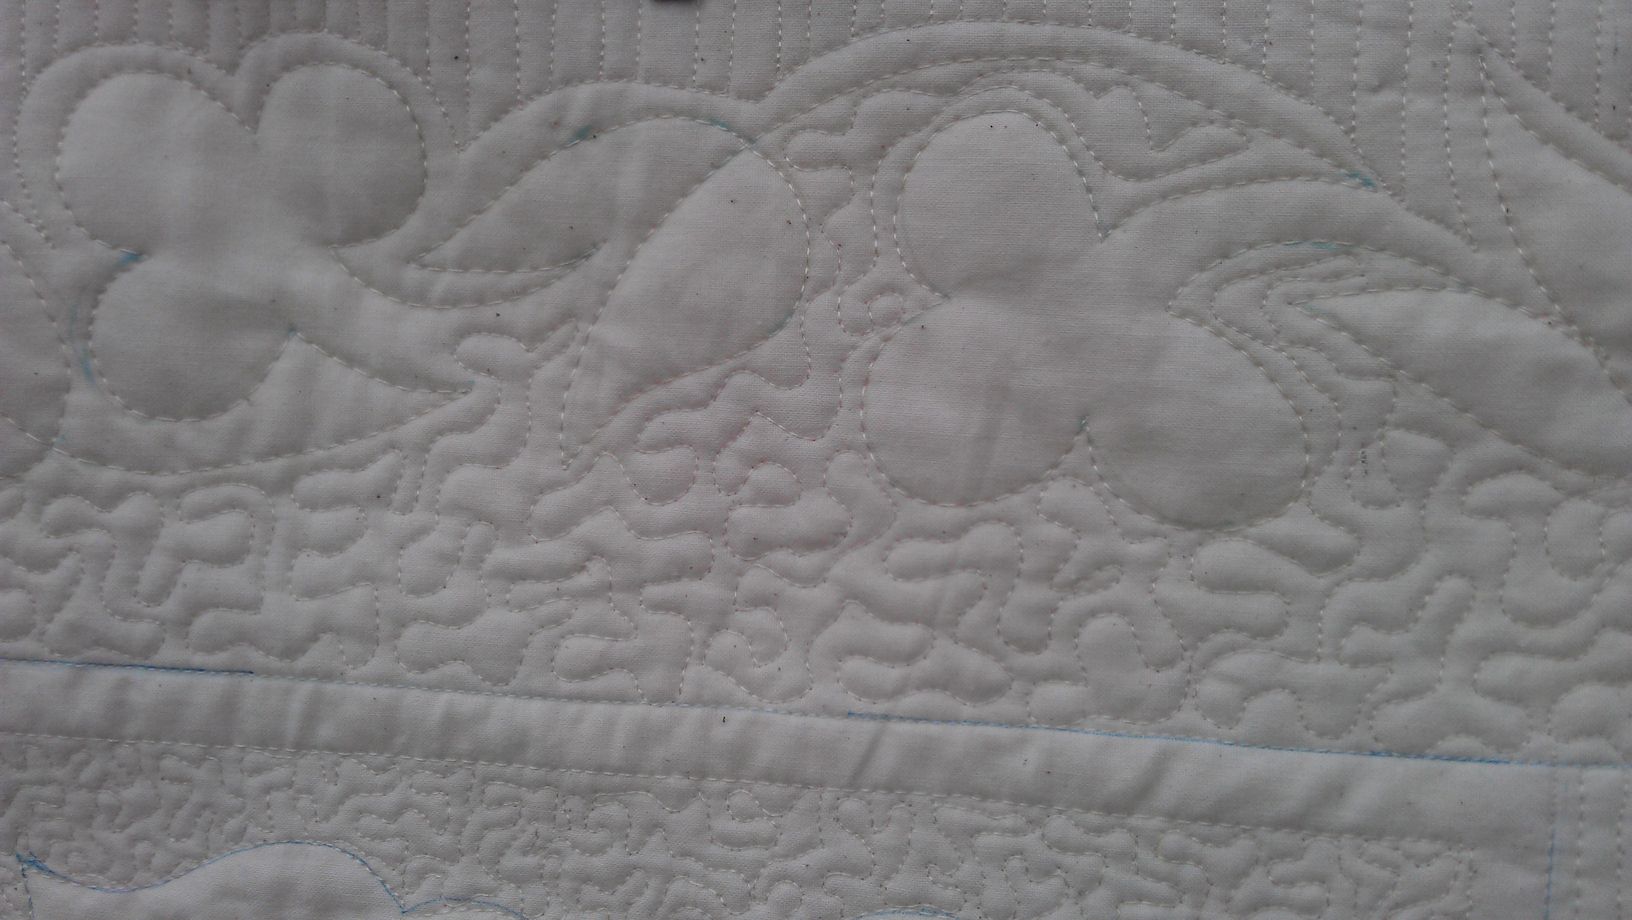
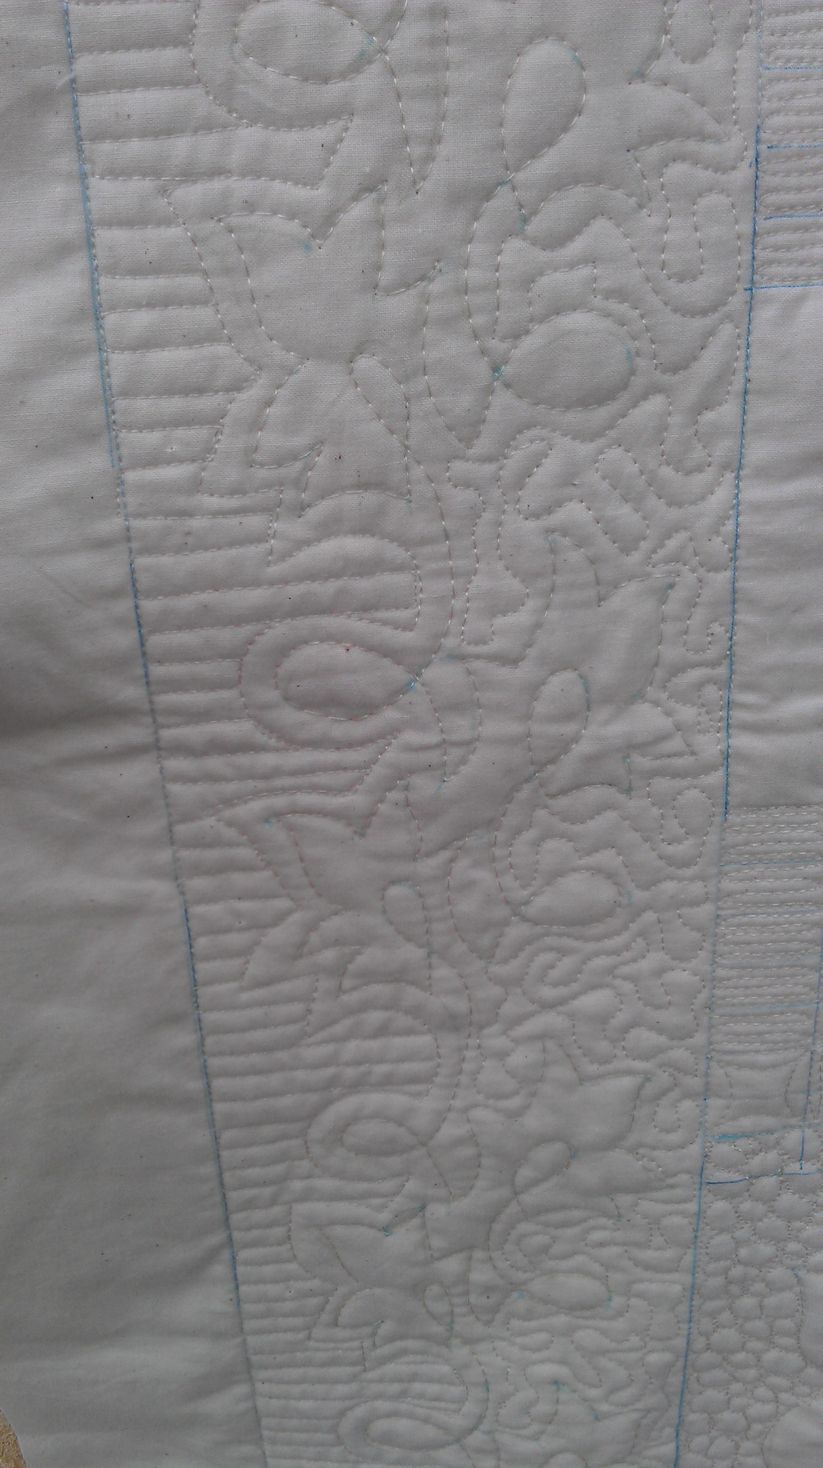
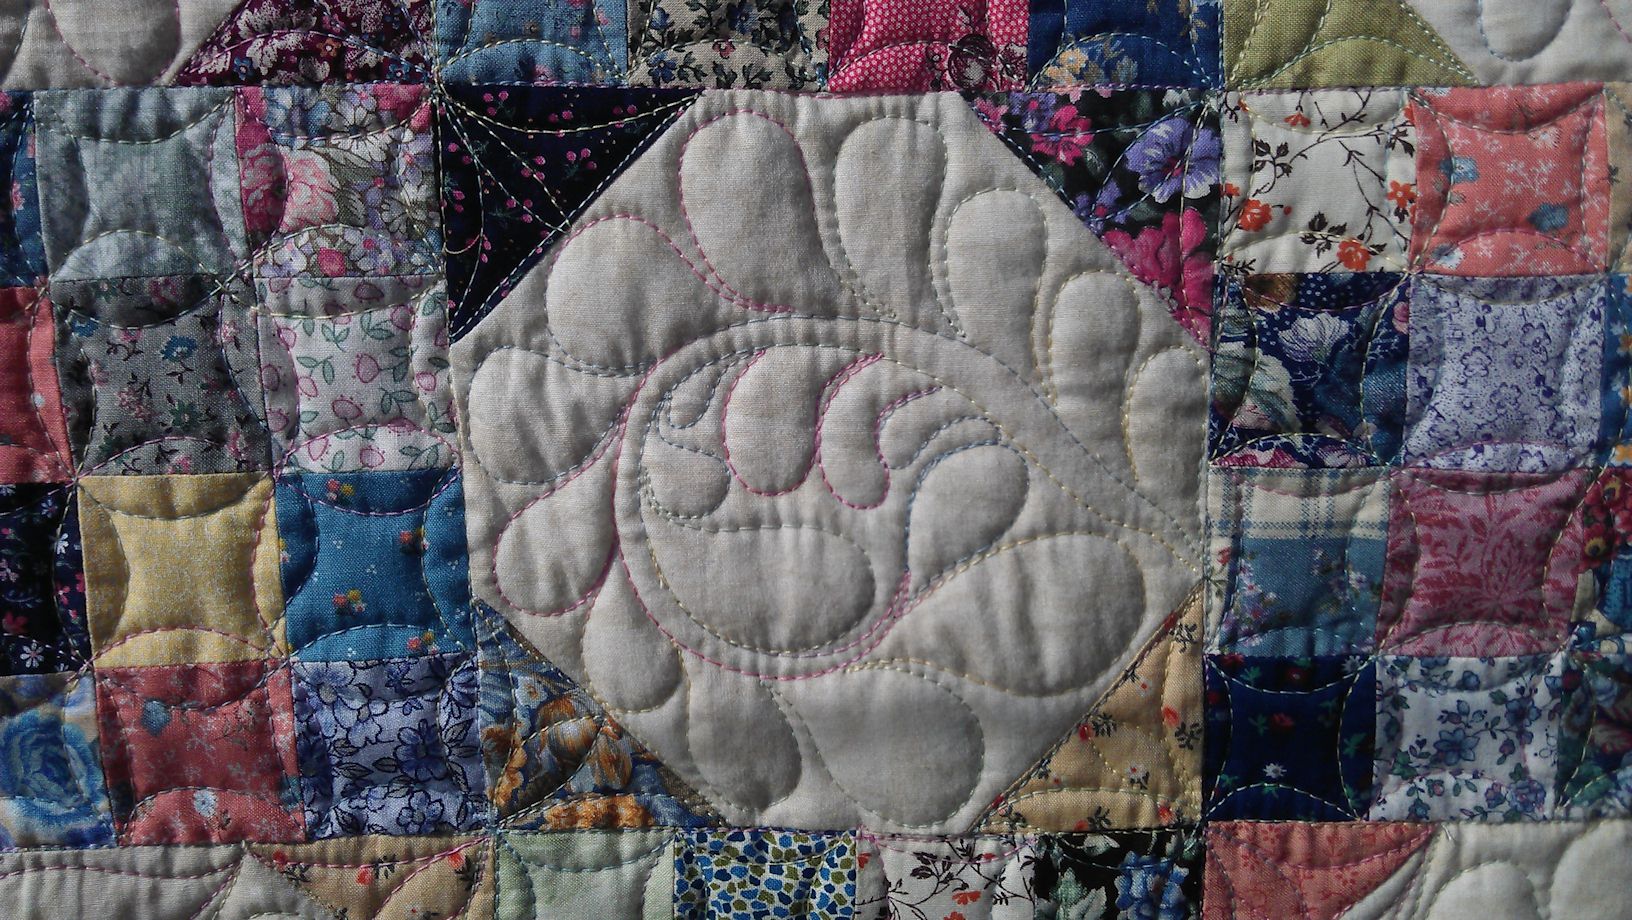
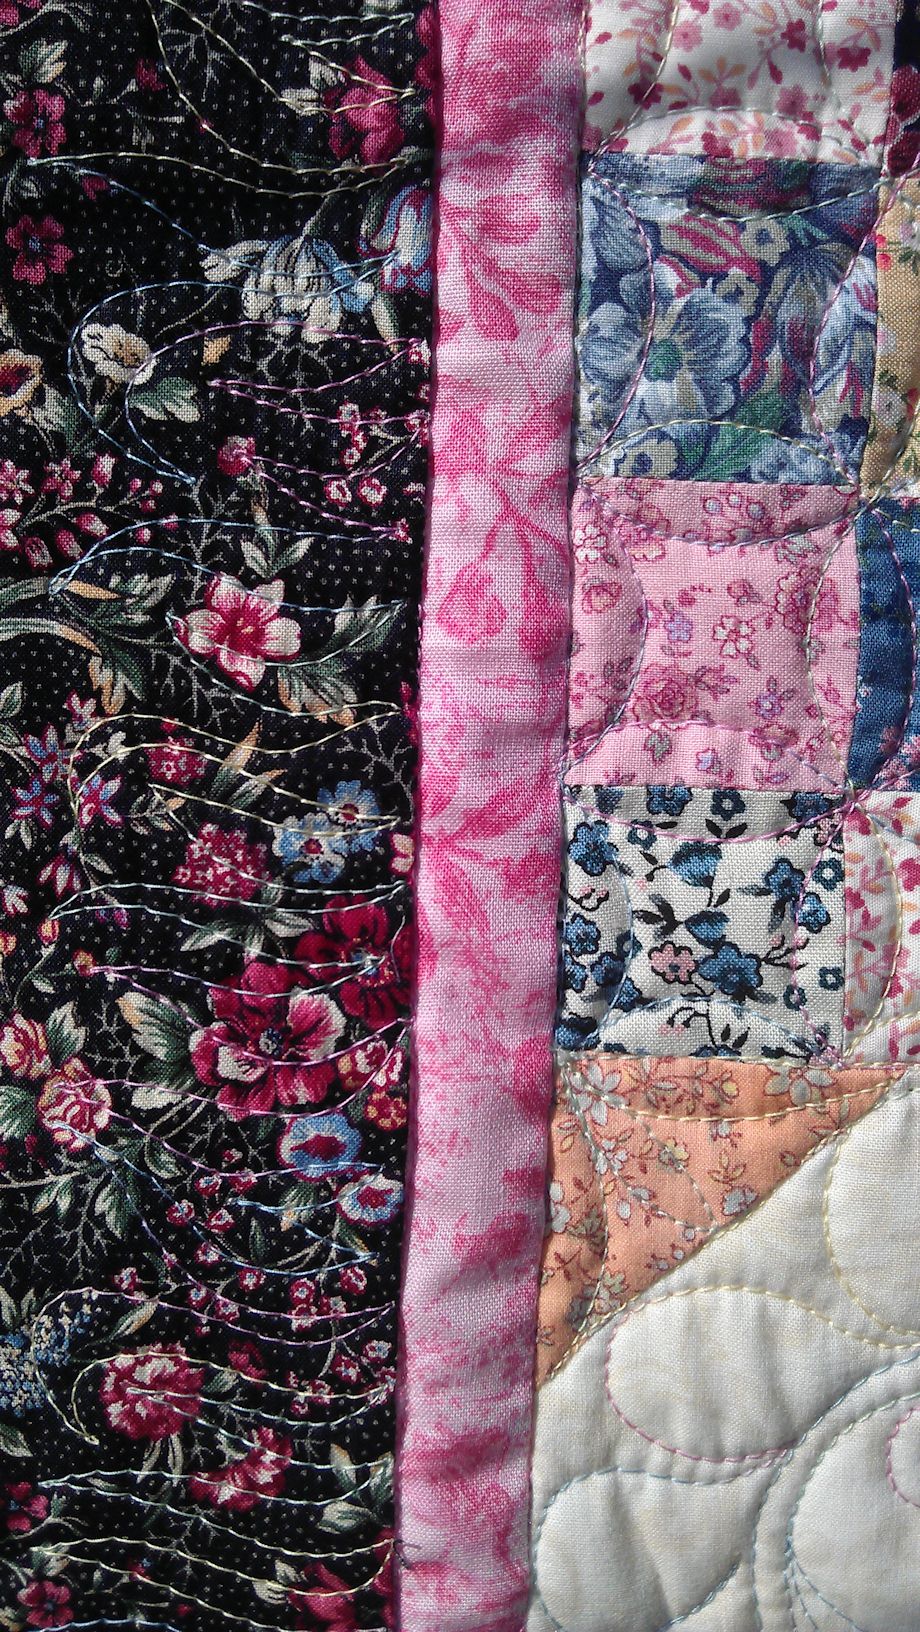
  2. Pull the sandwich away from the needle and turn it over to see the back – I’m looking for looping thread and eyelashes at this stage. Looping thread (see 2 and 3 in the photo below) and eyelashes (1 in the photo below) mean my top tension is too loose, so I turn the top tension knob at least one turn (depending on how much loopiness/eyelashes) to the right (away from me) and test again. And repeat until I can’t see any top thread on the back (actually, that’s not quite true – I use a cream practice sandwich mostly, so if I see tiny pinpricks of the top colour, I’m OK with that as my practice sandwich is a usually a little thinner than the actual quilt)
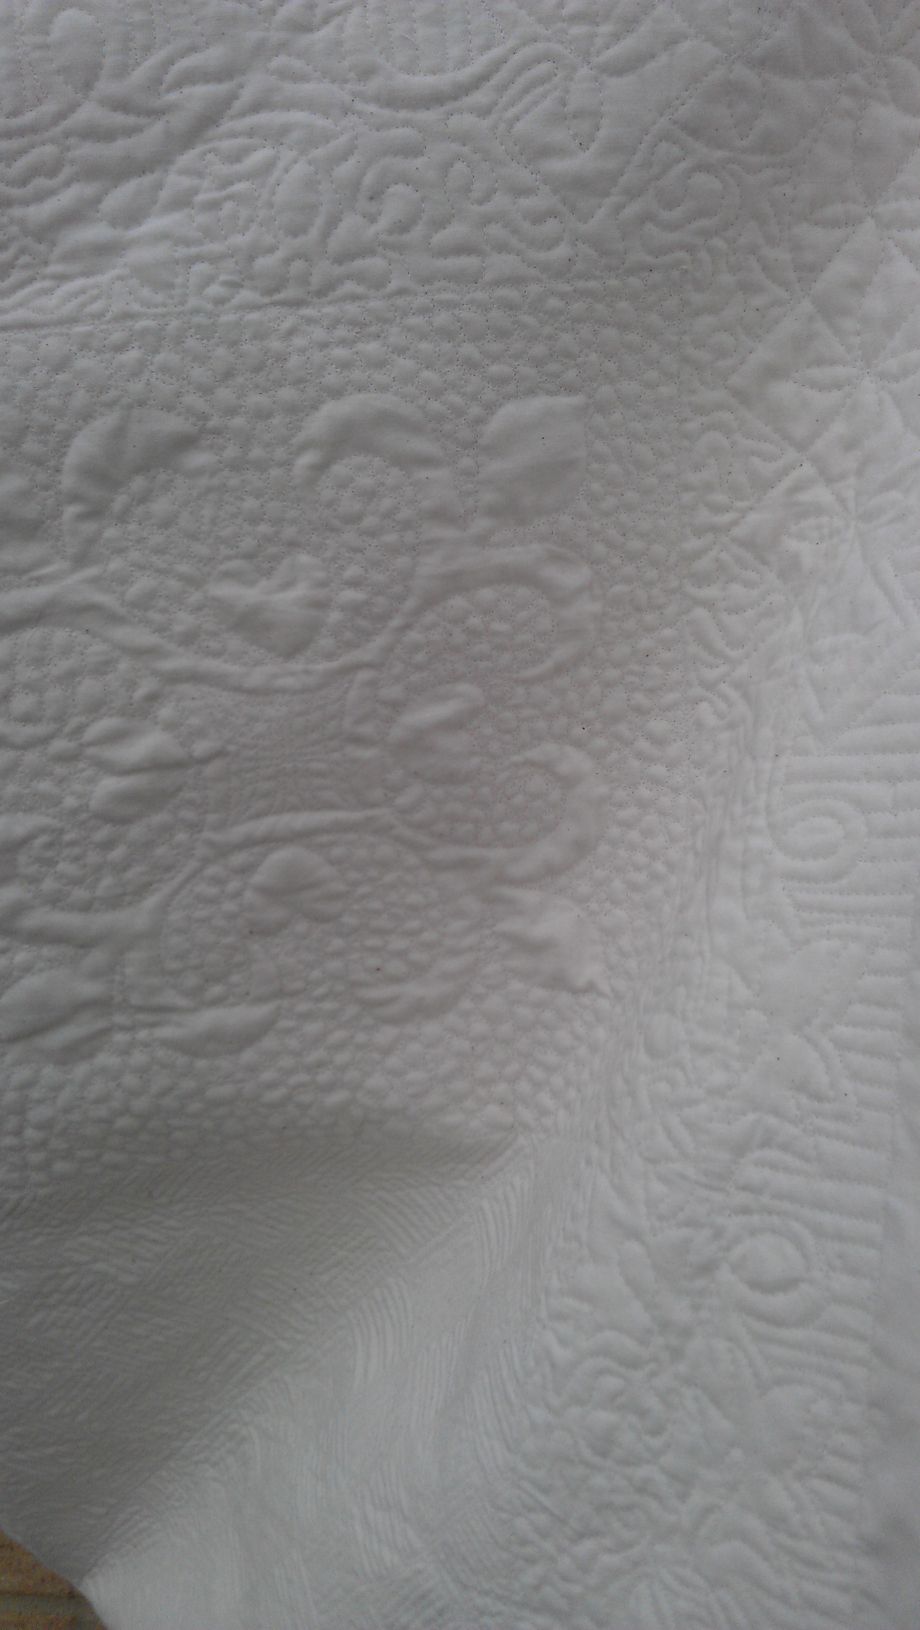
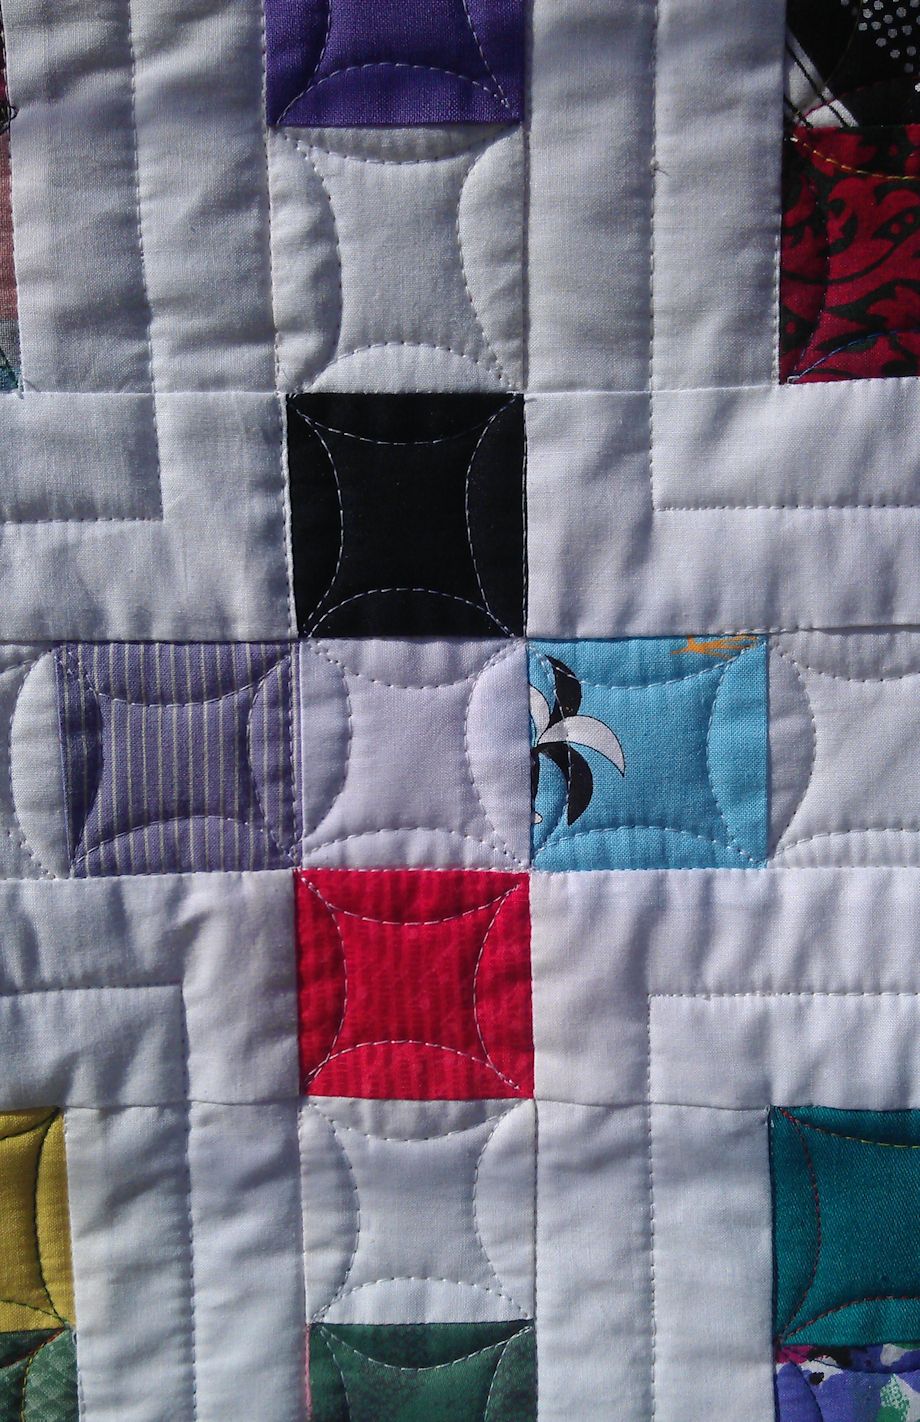
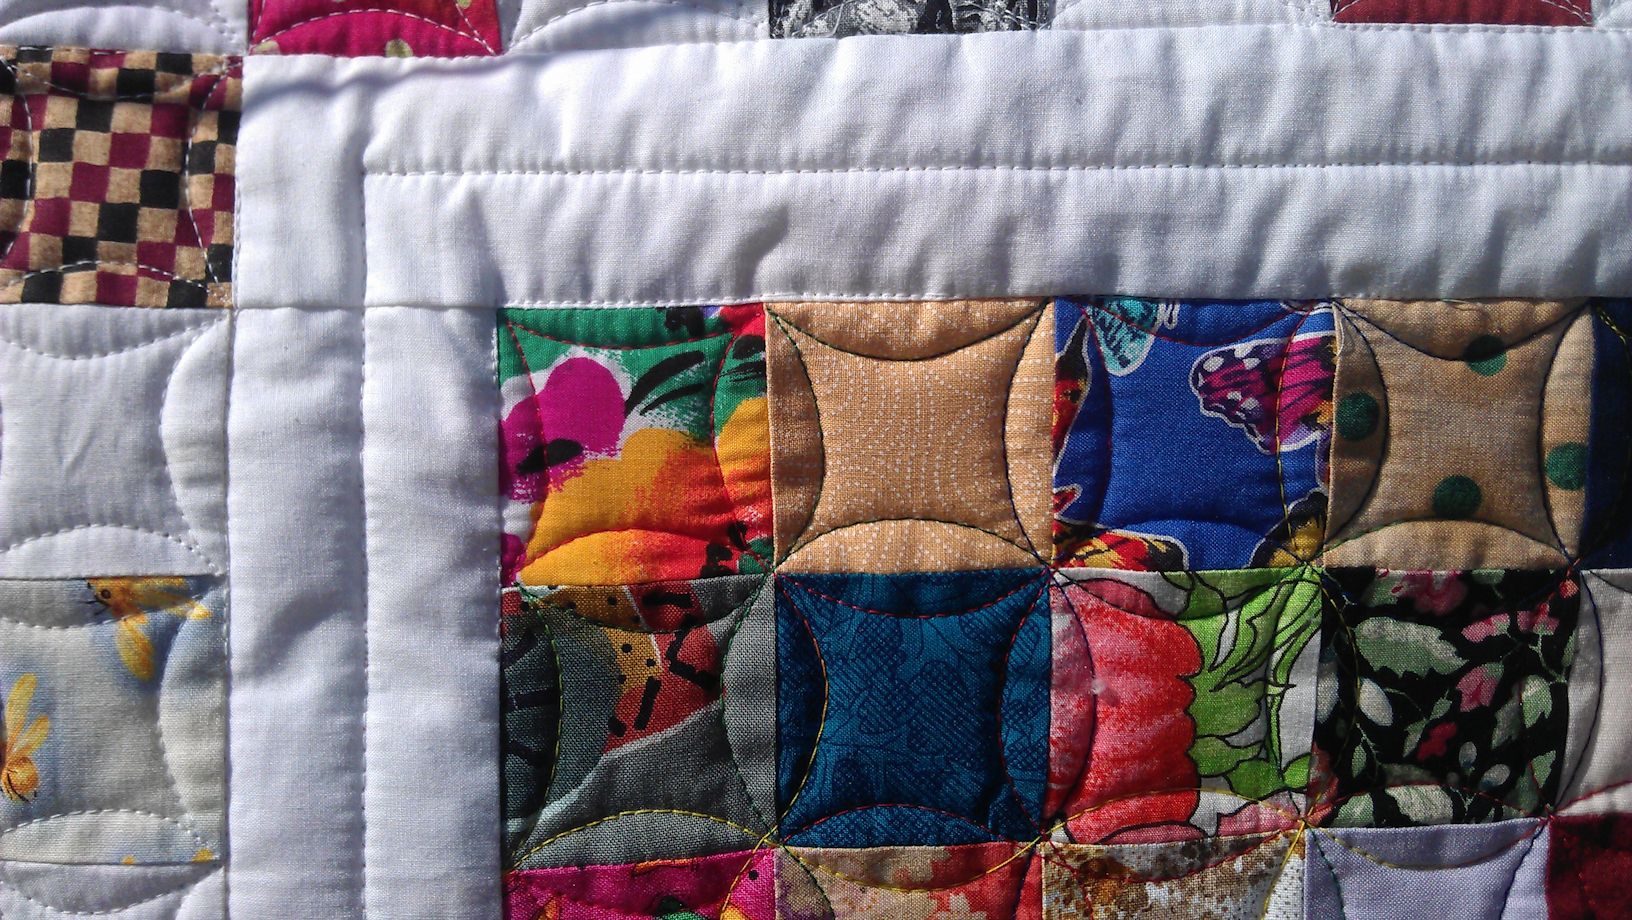
  3. Once I can’t see top thread on the back, I’m pretty sure that everything on the top will be OK, but I look at it anyway. If the top is puckering or I can see more than a dot of bobbin thread at the points, there’s a good chance that my top thread is too tight, so I turn the knob a little to the left (towards me) to lighten off a little. And test stitch again. And loosen. And stitch. And look at the front and back. And adjust the top tension knob in smaller increments until I have stitches that lay flat on both top and bottom and that don’t pucker the quilt.

And then I’m ready to put the quilt under the needle. Even so, I start stitching on the quilt and after a few inches, I stop, lift the quilt to see the back and check my stitches (it helps if you have excess border fabric etc. to do this test stitching in). If the top thread is looping/eyelashing on the back, then I tighten the tension knob (and if it’s bad, I pick out the stitches and start again), and start stitching again. And then I check the back and front again to make sure it’s all lying flat. Once I’m happy with my test stitches on the quilt, I’m off and running.

loops_eyelashes

Yes, all this sounds an awful lot to check/test, but in reality it might take me just a minute or so.

That’s not to say that I don’t get frustrated with tension issues at times, but the worst of those have usually been related to something else, like the timing going out as a result of a needle breakage/jam, and thus the machine can’t make a proper stitch.

When nothing seems to work, I try a new needle, different thread top and bottom, and switching the power off and walking away for a while. Wine helps too 😉

If all that doesn’t work for you, can you take your machine back to your dealer and get them to use it (in front of you) and you use it in front of them to see if it’s you or the machine. Sometimes it’s the machine! And it may need a service or the timing adjusted.


Community Quilt 137

21 04 2014

I loved this quilt! If you’d told me about a quilt in aqua/teal blue and tans, I’d have said ‘Yuck!’, but I just loved how these colours played so well together.

It was a big quilt, with lots of rectangles of various sizes, and multiple coordinating fabrics, some of which were curvy lines with dots/circles in them. That became my overall theme for quilting this quilt.

Because the edges were all so straight, I decided NOT to use any rulers for any of the quilting. Even the so-called ‘straight’ lines in the sashing strips are wonky free motion lines. That was a deliberate choice. I wanted the quilting on this quilt to be organic and not to rigidly follow the straight lines of the blocks. I quilted a different motif in each block — some with wonky lines, some with circles, some curvy lines, some with a combination… I repeated some motifs (e.g. the rectangular spiral), but avoided two motifs the same in any one block or two the same next to each other. I used the same soft blue thread throughout.

For the border, I did big loopy things, sort of like figures of eight/infinity symbols, but without any crossing lines.

It took me about 10 hours to quilt this quilt, running at 50% speed on my Sweet Sixteen for all the stitching (and with very few thread breakages – that might be because I used a new size 18 needle). Had I been using rulers, it would’ve taken much longer.

(Click on a photo to view it larger)

quilt137_02

quilt137_03

quilt137_04

quilt137_05

quilt137_01

Threads used:

  • Top: Robison-Anton (40 wt, rayon, colour: ‘Sprite’)
  • Bottom: Fil-Tec Glide pre-wound in white


Community Quilt 136

13 04 2014

This small dark quilt was a challenge. How to quilt it to enhance the depth of the colours, while not overpowering the quilt with the quilting?

The first decision was what thread to use. I didn’t want a very dark thread as that would’ve hidden the quilting, so I opted for a variegated thread in rich orange, copper, ginger, red, and peach tones.

I started by doing straight line quilting from the piano key border into the adjoining row of blocks, following the existing seam lines of those blocks. But when I looked at the other side’s piano key border, it didn’t marry up with the seam lines of those blocks, so I had to abandon that idea for the other side. What to do?

I’d seen quilts that blended one motif into another but hadn’t tried it myself, so I sort of did that. The motif I used for the blocks next to the straight line blocks was a curved open headband motif with squared off edges, and then the one for the blocks and piano key border adjacent to that was a full circular spiral design, thus varying the quilting from one edge to the other from straight lines to circular lines.

(Click on a photo to view it larger)

quilt136_04 quilt136_03

quilt136_02

quilt136_01


Community Quilt 135

13 04 2014

I loved the colours in this quilt! And as soon as I pulled it out of the bag, the cream centre just screamed ‘McTavishing!’ to me, so that’s what I did. I also stitched around the main parts of the appliqued flowers in the centre to make them ‘pop’ even more.

I left the dark green borders unquilted, and did my quick and easy cathedral windows motif in the checkerboard borders using a variegated orange/copper/pink/ginger/peach rayon thread.

I was really pleased with how this quilt looked after I’d quilted it.

(Click on a photo to view it larger)

quilt135_01

quilt135_03

quilt135_02  quilt135_05

quilt135_04

Threads used:

  • Top: Fil-Tec Glide ‘Cream’ (40 wt, trilobal polyester, colour 20001) and Wonderfil Mirage (30 wt, rayon, colour SD31)
  • Bottom: Fil-Tec Glide pre-wound bobbin (white)


Community Quilt 134

13 04 2014

I thought this very geometric quilt top needed something to soften the edges a bit, so I quilted it in a squared-off variation of the ‘open headband‘ motif I’ve used many times before. I stitched this design all over the quilt, using a cream thread.

(Click on a photo to view it larger)

quilt134_01

quilt134_03

quilt134_02

Threads used:

  • Top: Fil-Tec Glide ‘Cream’ (40 wt trilobal polyester, colour 20001)
  • Bottom: Fil-Tec Glide pre-wound bobbin (white)


Community Quilt 133

29 03 2014

I’ve never done a ‘whole cloth’ quilt before, though I’ve admired those I’ve seen. For those not familiar with the term, a whole cloth quilt is created from one piece of fabric for the top — no piecing, no blocks sewn together, no applique. Typically, the single piece of fabric is one colour with no pattern in it, often a light colour like cream or white, though I have seen some stunning whole cloth quilts done in black. The decoration comes from the quilting.

My challenge with this quilt was to take someone’s whole cloth top that they had carefully marked (the blue lines) in 12″ squares and a 4″ (?) border, and make something of it. Instead of trying to reinvent the wheel, I followed the markings the creator had made, then added fills where I thought they were necessary. I didn’t do ANY ruler work in this piece — all the ‘straight’ lines are either deliberately wonky, or are done by ‘eyeballing’ an imaginary straight line.

The centre square was the only one that didn’t have any markings, so I found a picture of a square Celtic knot and printed it out then marked it up with orange chalk.

The person who marked up this quilt did an awesome job in the ‘borders’ as she segued from one design to another in a seamless manner.

I REALLY REALLY hope that when this quilt gets washed before it gets given away that the marks come out! That said, the back looks pretty stunning too! 😉

(Some of the photos weren’t as good as I’d like — it was pretty windy outside and rain was threatening)

(Click on a photo to view it larger)

quilt133_06

Some of the designs after I had only stitched the marked lines:

quilt133_04

quilt133_05

And then I quilted each square….

I started with this one, as I figured that 1/8″ straight lines creating a checkerboard effect of about 1″ diamonds would suit the markings:

quilt133_19

quilt133_15

quilt133_16

quilt133_18

quilt133_09

quilt133_22

quilt133_07

quilt133_02

With the central Celtic knot design, I did some very tight scribble stitching inside the background areas, then less and less tight stitching heading out to the edge to the 12″ square. I was really pleased with how it came out, as my original intention was to do tight scribble stitching for the entire square. However, I thought it might pull the quilt out of shape if I did that, so I changed tack and made the outer areas far less tight, though it’s still scribble stitching.

quilt133_17

Detail of some of the border designs:

quilt133_10

quilt133_11

quilt133_12

quilt133_13

quilt133_14

And this is the back:

quilt133_21

Time taken: About 6 hours or so (maybe 10??? — I wasn’t keeping track…)

Threads used:

  • Top: Fil-Tec ‘Glide’ (40 wt trilobal polyester, Cream, colour 20001)
  • Bottom: Fil-Tec Glide pre-wound bobbin (white)


Community Quilt 132

23 03 2014

This was quite a traditional snowball block quilt, with lots of small floral fabrics used in all the scrappy squares.

I stitched in the ditch around all the blocks first, then did the cathedral windows/orange peel motif in all the blocks of little squares (each scrap square was about 1.5 inches square),with a half flower in the half square triangles setting off the snowballs. In each snowball, I did a single loopy spine and bulbous feathers. All stitching was done in the same variegated pastels (pink, yellow, green, blue, and cream) thread. In the black floral border, I did flames all the way along. I didn’t stitch the pink border.

(Click on a photo to view it larger)

quilt132_01

quilt132_02  quilt132_04

quilt132_03

Threads used:

  • Top: Fil-Tec ‘Harmony’ (‘Spring’, colour 14062; 40 wt cotton)
  • Bottom: Fil-Tec ‘Glide’ pre-wound bobbin in white


Community Quilt 131

23 03 2014

I liked this bright scrappy quilt! The crisp white set it off perfectly. I think this pattern was used (http://weddingdressblue.wordpress.com/2012/09/24/tutorial-film-at-five-quilt/) or a variation of it.

How to quilt it? First I stitched in the ditch around all the blocks to stabilise the quilt. My next thought was ‘modern’ with lots of straight lines, but then I decided to just do the straight lines in the centres of the sashing and border strips, using white thread. Once that was all stitched, I tackled the small squares. This time I decided to do the cathedral windows/orange peel motif as it’s quick, easy, and gives a great effect of circles and/or flowers. I used a variegated red, yellow, blue, and green thread for these sections. And I finished off the sashing/borders with the scrappy squares using the cathedral windows motif, but in white thread.

(Click on a photo to view it larger)

quilt131_01

quilt131_03

quilt131_02

Threads used:

  • Top: Confession: ANCIENT cotton overlocker thread in both white and a variegated red, yellow, blue and green! Using up my thread stash…
  • Bottom: Fil-Tec Glide pre-wound bobbin in white


Empty Spools at Asilomar: Friday 28 February 2014

2 03 2014

Our last day today. Well, half day.

When we got to the room after breakfast some ladies had already packed up and gone, especially those with long drives ahead of them, such as the lovely Marilyn from St George in Utah. Others had partly packed.

I wanted to get the background of my 3rd piece completed before they came to pick up the rental sewing machines from our room, and got most of it stitched.

IMG_4315

My body of work for the week

Pam had a final Q&A with us, then it really was time to pack up and vacate the classroom.

I got a couple of lovely cards from the ladies and a small gift from Donna, as well as a thank you card from the whole group. That was very unexpected and it was lovely reading all their nice comments.

IMG_4403

The ‘another’ reference is to the fact that I was an Australian taking a fellow Australian’s class… in the US!

IMG_4400

Those left in our group had our final lunch together and then it was time to say goodbye.

Would I do another class with Pam? ABSOLUTELY! she’s a great teacher and an enormous amount of fun (and she wears the greatest colours!). I’m privileged to know her and to have been taught by her. And the great thing is that have three almost finished pieces to take home with me — at previous workshops, I’ve finished maybe half the work, so it was gratifying to get so much done.

PamHolland_MarilynBadger_IMG_4297

As I said yesterday, it’s been a great experience and I’ve learned a lot, made new friends, and enjoyed the tranquility of this gorgeous part of the world.

See also:


Empty Spools at Asilomar: Thursday 27 February 2014

28 02 2014

Another great work day today.  Well into my THIRD piece! (progress photos below)

After 4 pm it was time to visit the other classrooms and see what everyone else had been working on. Some fabulous and very creative work!

We sure got the pick of the classrooms (‘Sand’), with our glass walls on three sides. Some of the other rooms were like dungeons.

IMG_4248

IMG_4254

IMG_4255

My workstation is on the left; Donna was opposite me, and Marilyn was at the end with her back facing the fireplace.

We had the final show and tell presentations tonight, and the last presentations from the teachers. Tomorrow is the lady (half) day, and then it will all be over.
It’s been a great experience and I’ve learned a lot, made new friends, and enjoyed the tranquility of this gorgeous part of the world.

Meals today: breakfast: scrambled eggs and sausage links; lunch: pumpkin soup, meat or vegetarian lasagne Or Cobb salad; dinner: choice of roasted beef, pork loin, or a vegetarian Moroccan dish.

My third piece

My third piece was another Cassie, this time my friend Char’s dog Cassie (my first and only dog was also called Cassie!). As with the other pieces, I started with the eyes and all the black bits, adding progressively lighter colours as I went. Again, I used about 15 or so different thread colours in this piece.

The first photo below is the original sent to me by Char; the rest of the photos are of my progress.

cassie

Cassie02_IMG_4304

Cassie03_IMG_4305

Cassie04_IMG_4311

Cassie05_IMG_4312

Cassie07_IMG_4314

See also: