In the group of photos I had printed onto fabric during the Quilting Adventures workshop I took in March 2015 with Lura Schwarz Smith and Kerby Smith was a gorgeous photo of a fox that I’d found on Flickr. Prior to the workshop, I’d emailed the owner of the photo to get permission to use it for printing on fabric and then ‘painting’ with thread, which he gave.
On my annual quilting retreat this past weekend I finally got around to thread painting ‘Fabulous Mr Fox!’. The techniques for putting this piece together are detailed below the photos.
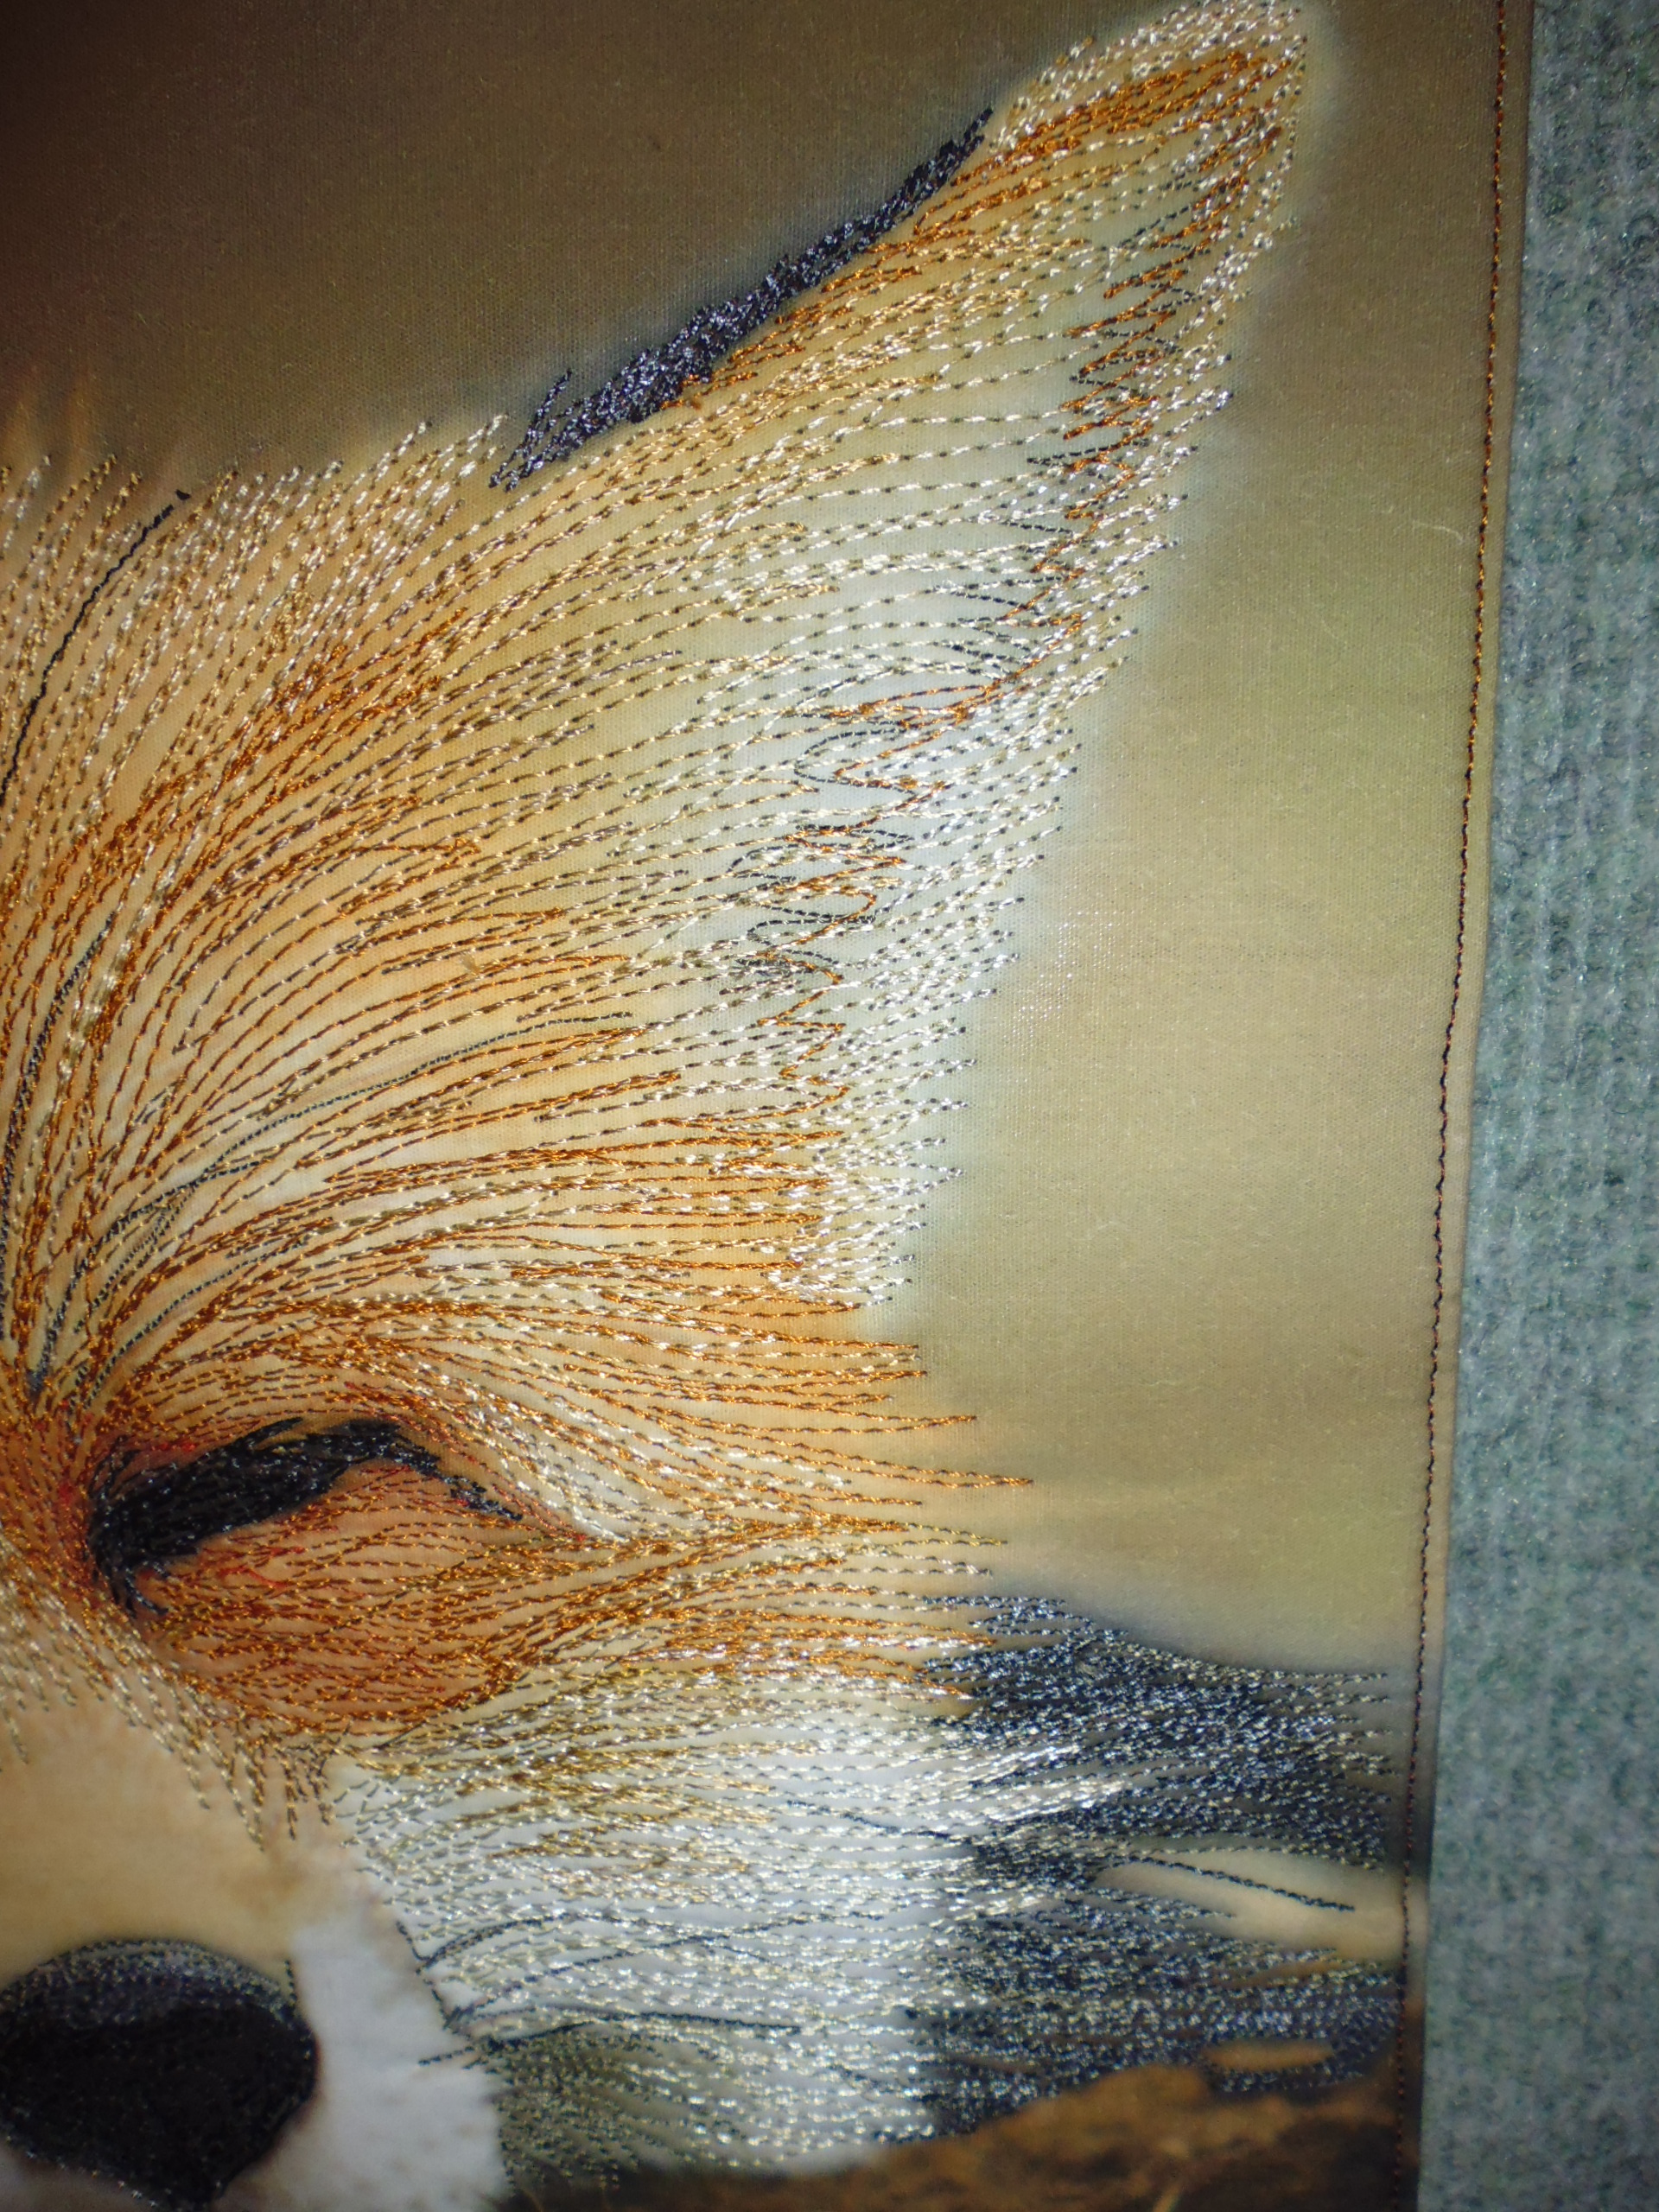
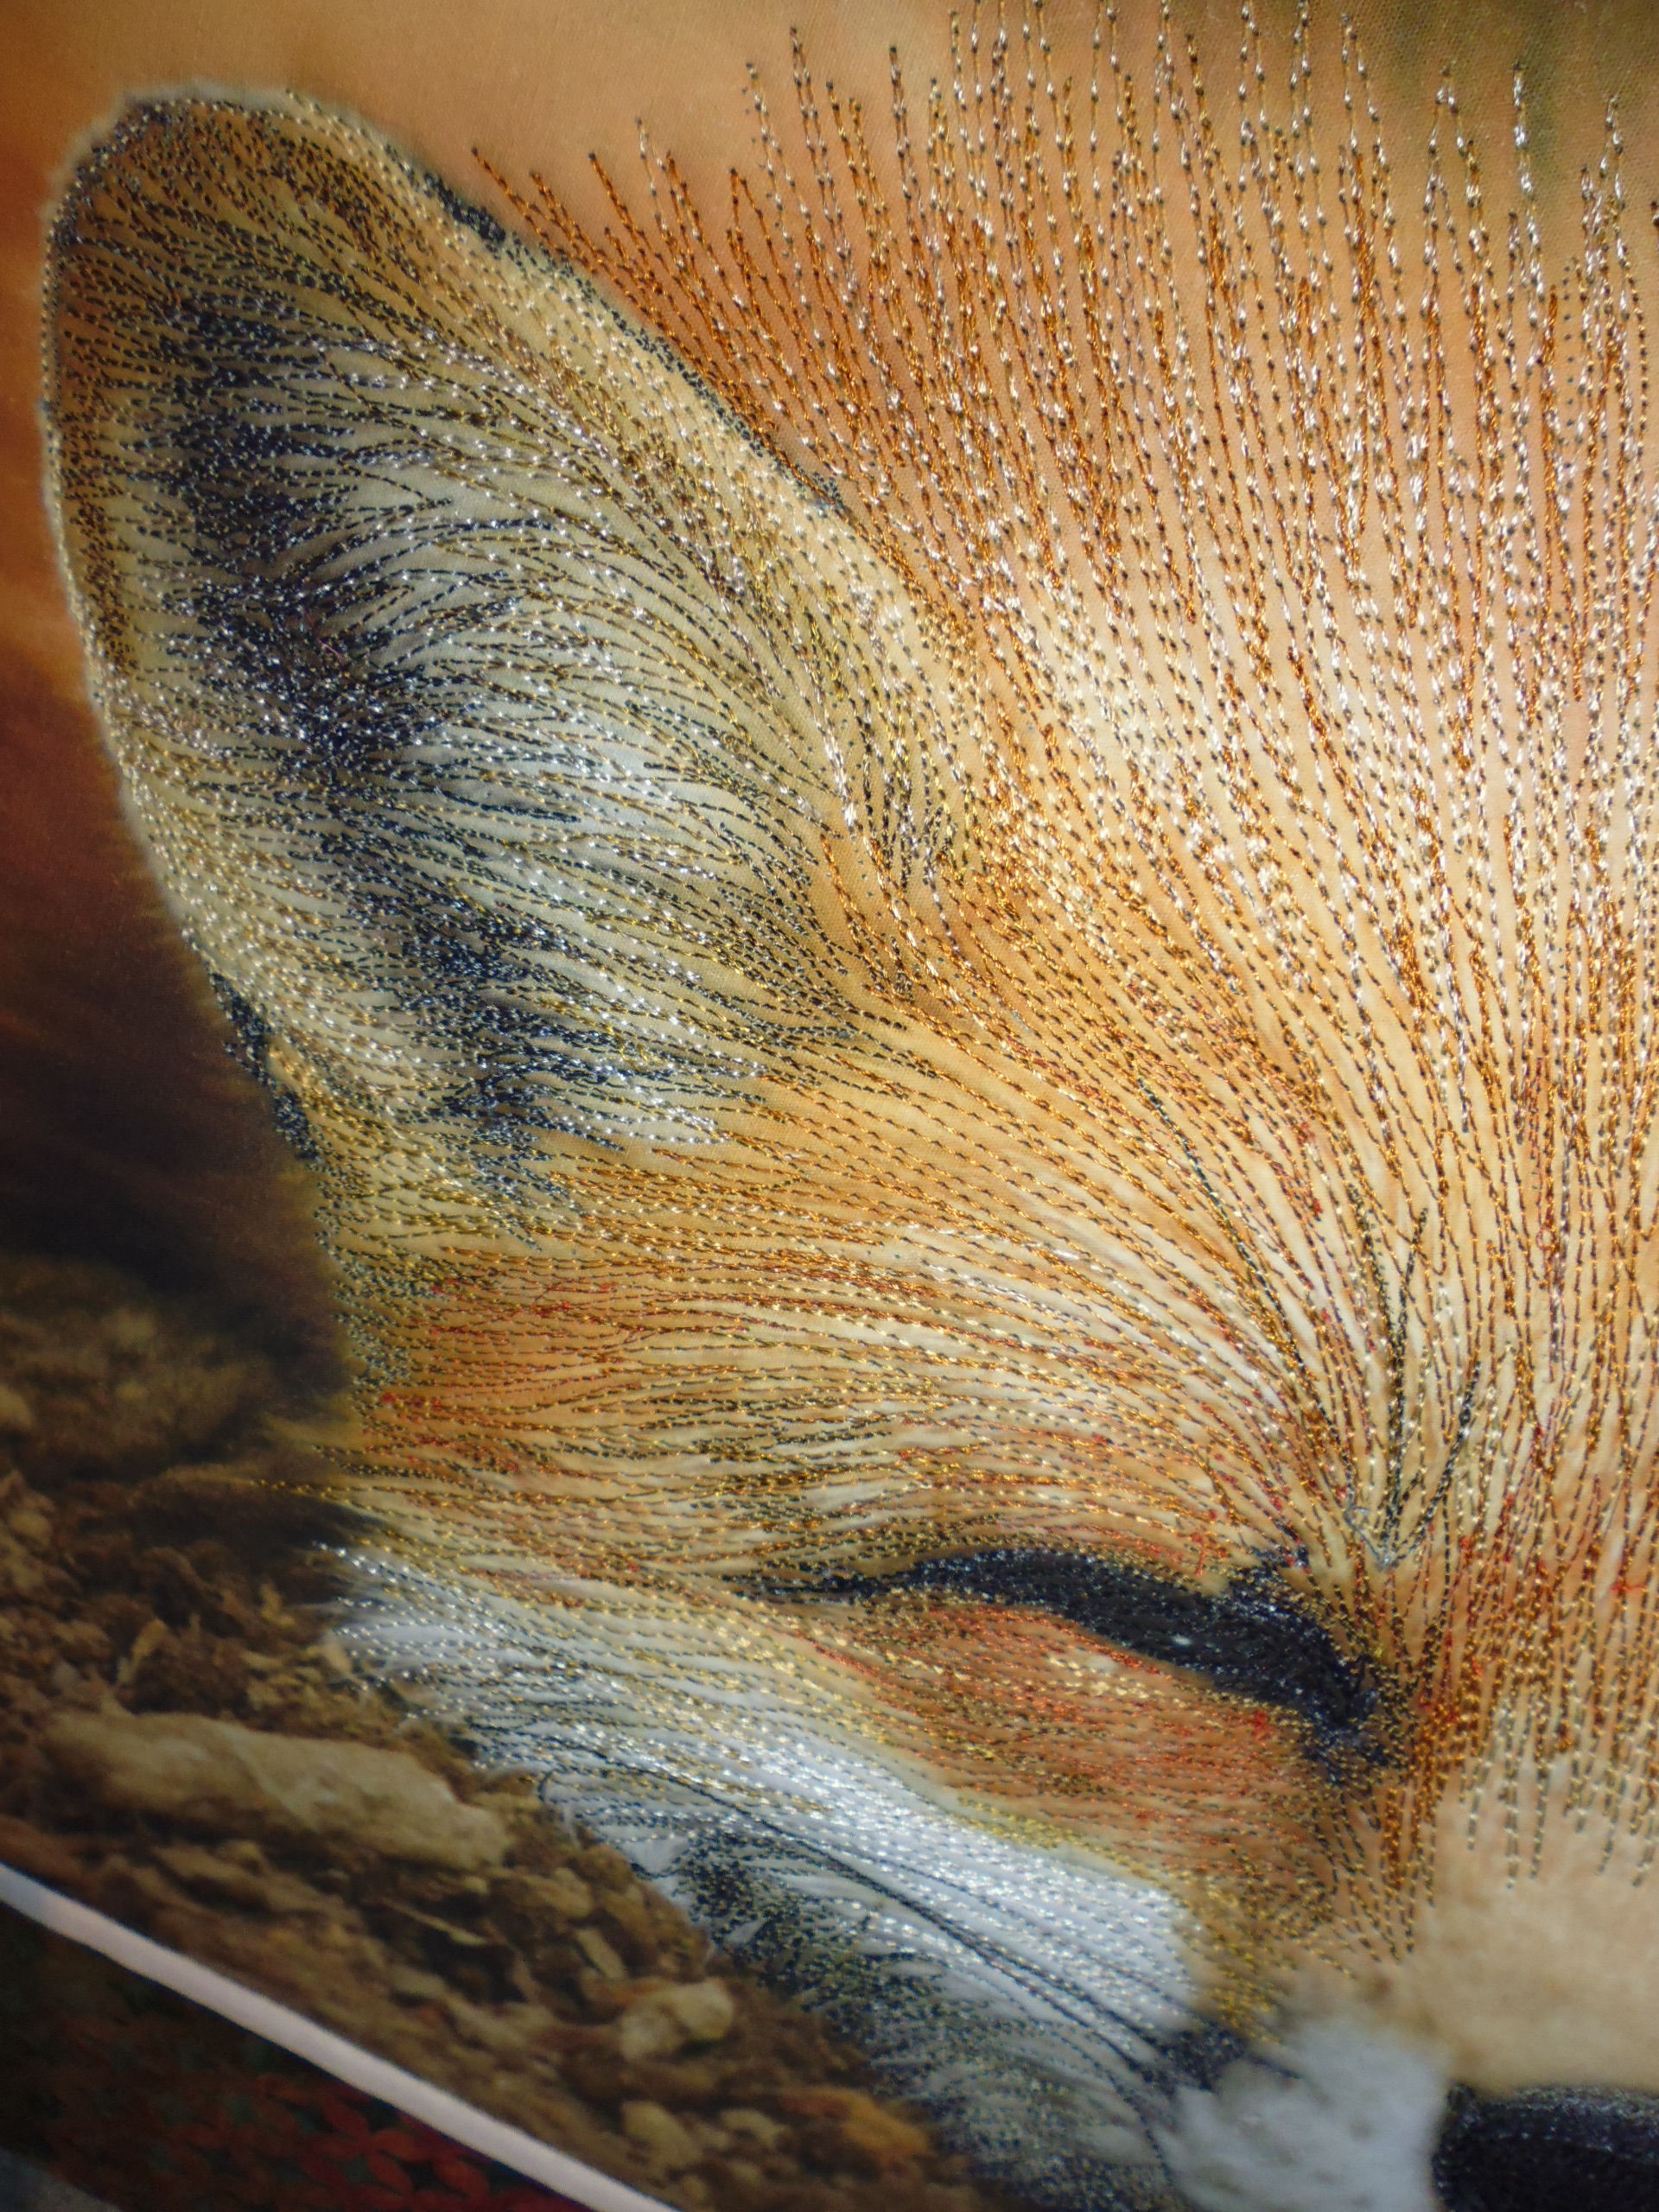
I had a lot of fun playing with various threads (about 20 different ones) and free motion stitching (on my domestic sewing machine) to get the effect of the fur, and the life in his eyes (no, I don’t know if the fox is a male or female, but I’m calling him ‘Fabulous Mr Fox!’). I used the knowledge I’d gained from Pam Holland’s workshop I’d attended in February 2014 at Empty Spools at Asilomar to do the thread work — starting with the eyes and dark areas first, then adding lighter and lighter threads as I went along. I decided not to stitch the ground, the background, or the body of the fox in the distance, instead concentrating on the face. I also didn’t stitch the muzzle as I wanted it to puff a bit.
I really love how Fabulous Mr Fox! turned out, and I was especially pleased with how I captured his ear on the left side of the photo.
Oh, I got an email from the photographer after I notified him of the completion of this piece and linked to my in progress photos on Flickr. Here’s what he said: “VERY VERY NICE WORK!! I am glad to see your work! I think your friend is happy person. Thank you for using my photo!”
(Click on a photo to view it larger; Note: These photos are big and may take a while to download on a slow connection)


Back:

Threads used:

How I put this piece together
To make this piece I used:
- Floriani Stitch ‘n’ Shape as the heavy duty stabiliser
- a piece of batting to go between the stabiliser and the top of the piece
- a piece of batik that I wrapped around the stabiliser and batting, creating the ‘border’ fabric
- another piece of batik on the back (I only had a fat quarter of the front piece of batik and it wasn’t enough to fully wrap around the piece)
- approx 20 different threads of various weights and types (trilobal polyesters, silks, rayons, cottons, invisible threads etc.)
- MistyFuse to fuse the photo in place
- Elmer’s School Glue to help wrap the batik tightly around the stabiliser
I started with the Stitch ‘n’ Shape cut to the final size, then layered a piece of batting on top of it and cut that to the same size as the stabiliser.
Next, I took the top batik fat quarter and covered the front of the piece, wrapping the top and bottom edges to the back and fusing them in place. Then I wrapped the side edges of fabric to the back and held them in place with a bead of Elmer’s School Glue before heat pressing the glued edges to make them stick.
Back on the front, I trimmed the photo printed on the fabric to the size I wanted, leaving a quarter inch of white fabric surrounding the photo as a framing border top and bottom, and leaving the sides uncut so that I could wrap them to the back (I didn’t want raw edges at the edges of the piece). I applied MistyFuse to the back of the photo, then fused the photo into place on the front, being careful to make sure I had the photo centred vertically on the piece (i.e. same width of the top and bottom ‘border’ fabric). Next, I wrapped the overhanging side edges of the photo to the back, and heat pressed them to seal them to the back with the MistyFuse.
I cut a piece of toning batik fabric the size of the finished piece, then turned and pressed about a half inch hem around each side. I placed this fabric on the back of the piece, ran a bead of glue on each turned-over hem (one at a time), then pressed the backing in place, heat sealing the glue to make sure the backing piece was secure.
Now I was almost ready to start stitching! But before I did, I used invisible thread to stitch a line between the photo and the white framing border, top and bottom. Then I top-stitched the whole piece with some variegated brown/gold thread. The reason for these two lots of stitching was to prevent (as far as possible) warping associated with heavy thread work. That said, I still got some warping, which I fixed at the end with both dry and steam pressing, followed by placing the piece under some heavy books immediately after steam pressing.
The stitching was fairly basic — I started with the black areas (the eyes first), and then added lighter and lighter colours as I went. I mostly free-motion stitched in straight and slightly curved lines as the fur and most other elements in the photo were straight lines.
All told, this piece took about 8 hours to make from start to finish (not including getting the photo onto the fabric). Sizes: Photo: approx. 27 x 40 cm (10.5 x 16 inches); entire piece: approx. 37 x 38 cm (14.5 x 14.75 inches)
See also:
- Thread painting the beach: https://rhondabracey.com/2015/06/16/thread-painting-the-beach/
- Thread painting the corn: https://rhondabracey.com/2015/06/27/thread-painting-the-corn/


Absolutely fabulous!
[…] Thread painting Fabulous Mr Fox!: https://rhondabracey.com/2015/07/08/thread-painting-fabulous-mr-fox/ […]
[…] Thread painting Fabulous Mr Fox!: https://rhondabracey.com/2015/07/08/thread-painting-fabulous-mr-fox/ […]
I love looking at your work! You inspire me to practice and try new things.
Vickie Craddock
Oh Mr. Fox is soooo cute! Lots of work in that. The back is as interesting as the front. The front is fab but very “photo” looking, (think it’s more from the brown bark he’s laying on) whereas the back looks organic and freestyle. Love, Love, Love it.