Community Quilt 215

27 06 2015

This geometric disappearing 9-patch quilt cried out for geometric quilting, so that’s what I did. I did a square ‘stipple’ all over the main quilt top, then ‘skyscrapers’ in the borders (yes, I made up that name!).

(Click on a photo to view it larger)

quilt215_04


quilt215_01

quilt215_02


quilt215_03

Threads used:

  • Top: Wonderfil Mirage (30 wt, rayon?, colour SD29)
  • Bottom: Fil-Tec Magna Glide Classic pre-wound bobbin (grey)


Thread painting the beach

16 06 2015

Back in March 2015, I attended Quilting Adventures’ Spring Seminars in New Braunfels, Texas. The workshop I did was on digital photos for quilts (run by Lura Schwarz Smith and Kerby Smith). Kerby printed off several of my photos using his printer and special fabric ‘paper’ and it’s only now I’ve got around to doing anything with these fabric photos.

Here are the printed photos on fabric, plus some of the other exercises I did in class:

P1030583

The first photo I decided to tackle was one I took in December 2014 of Buffalo Beach, near Bunbury, Western Australia.

I covered a piece of Floriani Stitch ‘n’ Shape with the background fabric, then fused on the fabric photo. I used several threads of various blues and browns to thread paint the sky, the ocean, the rocks, the sand, and the water.

The photo is approx. 20 x 25 cm (8 x 10 inches) and the finished piece is approx. 30 x 36 cm (12 x 14 inches).

(Click on a photo to view it larger)

P1040787

P1040638

P1040641

P1040640

P1040642


P1040639

P1040637

Update: That raw edge butted up to the background fabric bothered me, so I added a quarter-inch silver bias binding to it to separate it. I’m happier with it now.

See also:


Community Quilt 214

7 06 2015

Even after working with it for some hours, I still couldn’t figure out the ‘theme’ of this quilt — the closest I could some to it was the sky, as it seemed to be the only element that linked the various blocks.

Anyhow, how to quilt it? As usual, I started by stitching in the ditch around all the blocks and appliqued pieces. In some blocks I followed the cloud pattern to stitch the sky; in others, I just did something more random.

I echo stitched about half an inch outside the blocks. In the wide checked border I stitched large ‘U’ shapes, alternating their height and repeating on the other side. For the striped border, I free-motion stitched lines about one inch apart (no rulers).

(Click on a photo to view it larger)

quilt214_06

quilt214_01
quilt214_05

quilt214_04

quilt214_03

quilt214_02


Threads used:

  • Top: Various threads: Robison-Anton ‘Evergreen’ (40 wt, rayon, colour 2315) and ‘Paris Blue’ (colour 2283); Madeira Rayon (40 wt, colour 1169); Floriani (40 wt, rayon, colour PF546); Wonderfil Silco (4o wt, colour SC03)
  • Bottom: Fil-Tec Magna Glide Classic pre-wound bobbin (white)


New oven ordered

6 06 2015

Did you know that if you don’t use your grill tray and put it (or anything else) on the base of your electric oven, small amounts of condensation get under it and rust out the enamelled bottom of your oven?? Nope. Me neither.

But that’s what’s happened, as I discovered when I cleaned the oven last week then spoke to the manufacturers about the rough stuff on the base of the oven that I couldn’t remove.

It’s not rusted all the way through yet. I could wait until it got worse, but decided to bite the bullet and get a new oven now.

So, if you never use your grill tray, either store it on the lowest level of the oven, or in a cupboard. NEVER store anything on the bottom of the oven. Even if your oven doesn’t have a heating element in the base (mine doesn’t), the ‘metal on metal’ thing isn’t good in the long term.

Lesson learned and reinforced by various people in the appliance stores I visited.

(Aside: When we moved into this house, the previous owners didn’t leave the manuals for the oven, the hotplates, or the dishwasher. I’d downloaded those manuals a while back and printed them off, but only ‘cos I needed to know how the controls worked (back in the day, you used to turn on an oven by turning one knob… now you have to turn at least two!). But I either hadn’t read the entire thing or had totally forgotten about not putting anything on the bottom of the oven. My bad. But in my defence, this was my first electric oven in DECADES — I’ve only used gas in the past 25+ years.


Community Quilt 213

1 06 2015

Birdies! This BIG single-bed quilt was done in traditional heritage colours, with stylised birds appliqued into every alternate block. (It was so big, I had to hang it sideways on the clothes line to take a picture of it without it falling onto the ground.)

I started by stitching in the ditch around all the blocks, sashing strips, and borders. Then around the appliqued birds.

I then filled the background of each bird block with McTavishing, and stitched cathedral windows in the other 9-patch blocks. I left the sashing strips unstitched, but added a small cathedral window in each cornerstone.

In the green border I followed the pattern of the fabric and free-motion stitched through the centres of the little flowers, giving an overall diagonal effect.

Because the outer border was so dark, I just did a large meandering stipple in it to hold the layers together.

(Click on a photo to view it larger)

quilt213_01

quilt213_02

quilt213_03

quilt213_04

Threads used:

  • Top: Robison-Anton (40 wt, rayon, burgundy colour); Rasant (40 wt, cotton, beige/tan colour)
  • Bottom: Fil-Tec Magna Glide Classic pre-wound bobbin (black and light tan)


Xylem

24 05 2015

I’ll be submitting this one to the OMG (Organic Modern Graphic) quilt movement (https://www.facebook.com/groups/OMGQuilts/) for acceptance as my second OMG quilt. If accepted, it will get an OMG #, but until then, I’ve called it ‘Xylem’.

My interpretation of ‘organic’ for this one was at the cellular level and beyond, as per ‘Synapse‘ that I created a week ago. It’s a 7×10 piece, and represents xylem cells that are in plants and trees. The dark green base is cheesecloth that I painted with a mix of blue and yellow fabric paints.

How I made it is described below the photos (click on a photo to view it larger); I go into all the steps (with photos) for those interested in finding out how I do my pieces on a very stiff interfacing.

But first, the finished piece! (This art quilt is now available for sale from my Etsy store: https://www.etsy.com/au/listing/605097136/xylem-art-quilt)

xylem05

xylem04

xylem03

xylem02

Threads used:

  • Fil-Tec Affinity ‘Forest’ (40 wt, trilobal polyester [variegated], colour 60293)
  • Isacord neon yellow/ lime(40 wt, trilobal polyester, colour Fb6010/A2941)

xylem06

Process

Preparing the cheesecloth

(No photos for this bit)

I roughly cut some white cheesecloth, then made some holes by pulling apart the threads. I mixed together some blue and yellow fabric paint to make green. I was aiming for a blue/lime colour, but that didn’t happen! I then lightly mist sprayed the cheesecloth with water and applied the paint with a sponge applicator. I left it outside to dry.

Making the front

Next, I made the base that the cheesecloth would be stitched to. The steps below describe the whole process (with photos). You can deviate from these steps at various stages, if you want, and I’ve indicated where these options are most likely to occur.

  1. Cut a 7×10 inch rectangle of Floriani Stich ‘n’ Shape (or Timtex or any other similar stiff interfacing). Preferably use a non-fusible for this, but if you only have fusible, make sure it’s just fusible on one side, not both.
  2. Cut a rectangular piece of batting slightly smaller than 7×10 measurements — you want the batting to fit on the 7×10 interfacing but not go over the edges. Cut it about an eighth of an inch smaller on each side.
  3. Cut two pieces of fabric about a half inch more on EACH side than the interfacing (i.e. about 8×11 each). You can use different colours — one for the front, one for the back — or the same colour (I’ve used the same colour in the steps below).
  4. Cut four 2″ pieces of hook-side Velcro for hanging.
    7x10_making01
  5. Lay the batting over one side of the interfacing (if the interfacing is fusible on one side, lay it on the fusible side). Do not go over the edges — the batting has to fit within the dimensions of the interfacing.
    7x10_making02
  6. Lay this combined piece (interfacing + batting) on the wrong side of the top fabric, making sure that there’s some top fabric overhang on all sides sufficient to wrap over the edges and onto the back. Flip the piece over and check the placement of the top fabric.
    7x10_making03
  7. Finger press and then press (with an iron) the edges of the top fabric to the back, keeping the fabric taut.
    7x10_making04
  8. If your edges won’t stay in position, run a bead of Elmer’s School Glue under the fabric and heat set it into position with an iron. This glue is a boon for quilters as it will hold things in place that would normally shift.
    7x10_making05
    7x10_making06
    7x10_making077x10_making08
  9. The top part of the base is now complete. Set it aside.

Making the back

You’ll make a ‘hemmed’ piece with the backing fabric.

  1. Place the backing fabric right side down. Turn over and finger press one ‘hem’, then iron it.
    7x10_making09
  2. Place the backing fabric over the back of the main piece to see how much hem you need to turn over on the opposite side. Make sure you keep the final size of the backing fabric slightly smaller (about an eighth of an inch on each side) than the 7×10 main piece.
    7x10_making10
  3. Repeat for the other sides, testing the placement as you go.
    7x10_making11
  4. Again, use Elmer’s School Glue to hold the hems (especially the corners) down once they are the correct size. Heat set the glue with the iron.
  5. Test the whole backing piece against the back of the main piece, making sure all edges are smaller than the dimensions of the main piece.
    7x10_making12
  6. At this point you have several choices — you can set the backing piece aside and do any applique, quilting etc. on the top piece, then add the backing piece and then the Velcro; OR you can add the Velcro to the backing piece now (which is what I did so that the stitching used to hold down the Velcro didn’t show through on the front of the main piece) and then either set the backing piece aside and do the applique/quilting, then add the backing piece; OR you can topstitch/glue the backing piece (with or without the Velcro) to the main piece and then do the applique/quilting, stitching the Velcro on when you’re finished if you didn’t add it earlier. Much will depend on whether you want your quilt stitching to show through on the back, whether you’re OK with the Velcro stitching showing through on the front (not such a big deal for very dark and/or busy fabrics), and/or whether you want topstitching (I didn’t on this piece). Whatever you do, at some point you have to add the Velcro to the right side of the backing fabric, and at some point you have to stitch and/or glue the backing fabric to the main piece.

    7x10_making13

    I made the backing piece separately and added the Velcro BEFORE I attached the backing fabric to the main piece.

  7. Because I chose to add the backing later, I now placed the cheesecloth on the main piece and did all my quilting stitches.
    xylem01
  8. Once that was done, I glued the backing fabric to the back. The backing fabric covered up the mess of stitching on the back of the interfacing, giving a much cleaner look to the piece.
  9. Don’t forget to add a label!


Lawn – before and after

24 05 2015

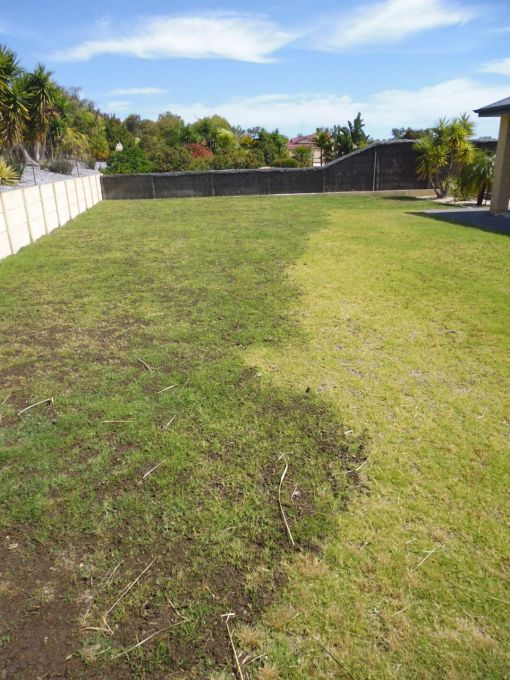
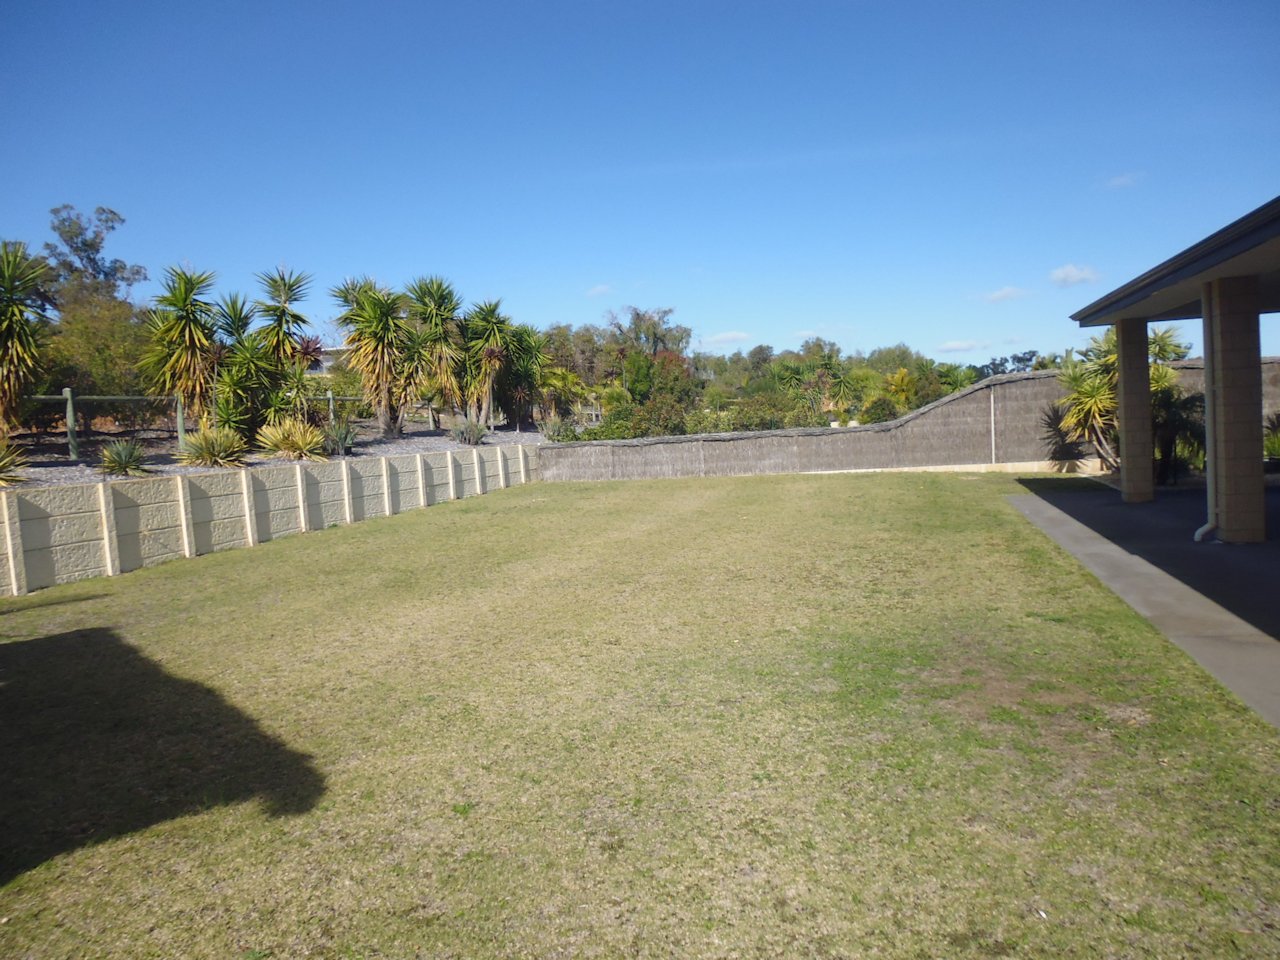
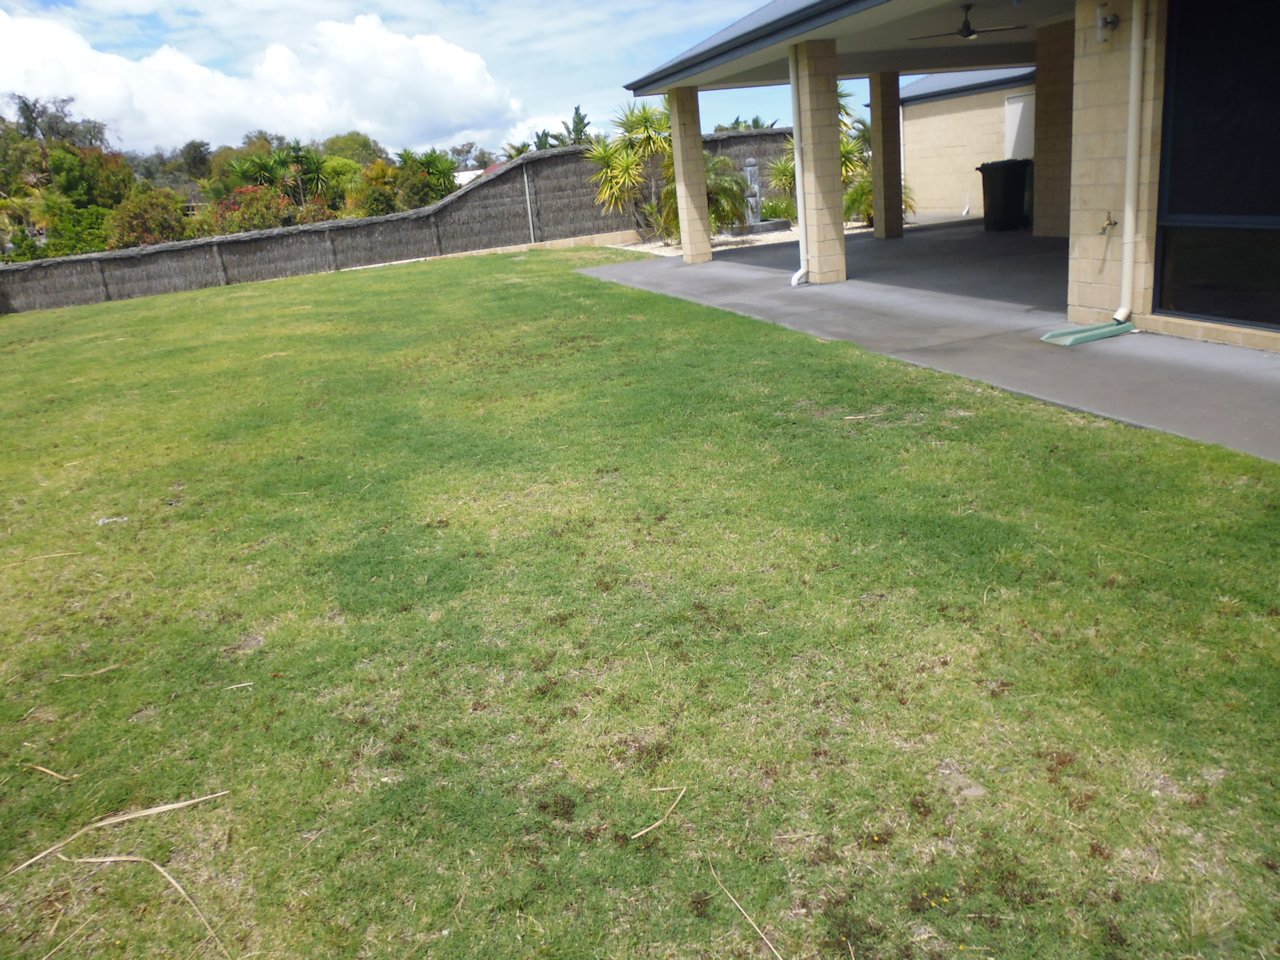
I’ve had a chap (Simon) come out and advise me on some treatments for our lawn, which is a bit patchy and never really seems green. He was here earlier this week applying the chicken poo pellets (yes, there’s a distinct odour….), and the lawn feeding solutions (Power Feed and SeaSol). He advised me to NOT get the lawn mowed for a couple of months, and reckoned that after another application of the Power Feed and SeaSol in 2 weeks, and perhaps one more application, the lawn should be looking much healthier.

He also suggested I take a photo of the lawn ‘before’, so I did. However, I forgot to take the photo before he came, so this photo is of the back lawn about 3 days after the application of the goodies, and so there’s a slight brown tinge on the lawn from the chook pellets.

Let’s see how it looks in a few weeks…

lawn_before

Update 14 June 2015

This is how the lawn looks 3 weeks after the initial application of the goodies. Some of the dead patches are starting to show signs of life and the weeds are loving the fertiliser… (click the photo to view it larger)
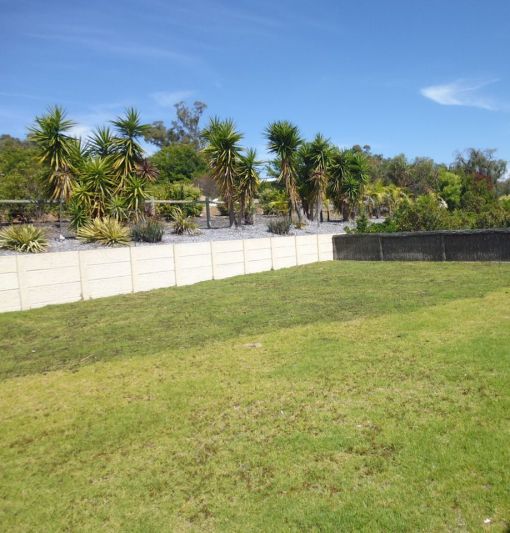
P1040645

Late October 2015

Wow! Look at it now. He said it would take several months, but promised that it WOULD come back. And come back it has!

P1050055

P1050051

P1050052

P1050054

Early December 2015

A week ago, Simon partially top dressed the back lawn with an organic soil improver/mulch. I took these photos one week later — the difference is dramatic! Even though you can still see the dark brown of the organic material, the new growth is a much richer, darker green than previously. I’m very pleased, especially as we’re coming into summer when the heat and relentless sun takes its toll on gardens. When I compare these photos to those I took back in May when we started the treatments, it’s hard to believe it’s the same lawn. In addition to the healthy colour, the lawn is now spongy, not crackling, underfoot and there are very few spots for the weeds to take hold.

lawn_20151202c

lawn_20151202b

lawn_20151202a


Batch cooking

24 05 2015

I cooked up a storm for 3 hours on Friday afternoon — the aim was to fill the freezer with prepared meals so that on the nights I don’t feel like cooking, I can always grab something and heat it up for our dinner. I’ve been doing this for decades, and it works well.

In that 3 hours I made:

  • about 4 litres of chicken stock (chicken carcasses, celery tops, carrots, onions, mushrooms, chillis, etc.), strained so that I only have the stock and none of the bits
  • 8 servings of my Mexican Chicken
  • 8 servings of Chicken Madras
  • about 3 litres of pumpkin soup (butternut pumpkin, sweet potato, chicken stock [from the freezer from an earlier batch cooking episode], chilli, mushrooms, etc. — I don’t add coconut cream and yoghurt until I heat it up ready for serving)

And yes, we ate the crusty loaf of bread (in the foreground of the photo) that night with some of the pumpkin soup!

batch_cooking


Community Quilt 212

24 05 2015

This was a HUGE scrappy quit, done in a fairly traditional style. In fact, I think a lot of the top was hand stitched. What an effort!

How to quilt it? Well, the obvious first step was to stitch in the ditch around ALL the blocks and borders, and the coloured fabrics in those blocks. This took a few hours, even with my favourite Line Tamer ruler.

I decided to leave the coloured blocks unstitched, except for the ditch stitching, so they’d ‘pop’. In the white space, I echo quilted about a half inch from the seams, then free-motion stitched large ribbon candy in the remaining spaces.

I did a similar treatment in the final white borders, leaving the inner white border and the coloured border unstitched (except for stitch in the ditch).

In total, this quilt took about 6 hours to quilt on my Handi Quilter Sweet Sixteen. It was big!

One of the photos below shows the quilting in progress — the area on the left is fully quilted; the area on the right is just pinned ready for stitching. You can see what a difference quilting makes.

(Click on a photo to view it larger)

quilt212_03

quilt212_04

quilt212_01


quilt212_02

Threads used:

  • Top: Fil-Tec Glide ‘Cream’ (40 wt trilobal polyester, colour 20001)
  • Bottom: Fil-Tec Magna Glide Classic pre-wound bobbin (white)


Synapse

17 05 2015

I’ve submitted this one to the OMG (Organic Modern Graphic) quilt movement (https://www.facebook.com/groups/OMGQuilts/) for acceptance as an OMG quilt. If accepted, it will get an OMG #, but until then, I’ve called it ‘Synapse’. Update:  Accepted! This is now ‘OMG #31: Synapse’. This art quilt is now available for sale from my Etsy store: https://www.etsy.com/au/listing/605096612/synapse-art-quilt

My interpretation of ‘organic’ for this one was at the cellular level and beyond. It’s a 7×10 piece. How I made it is described below the photo (click on the photo to view it larger).

P1040571_02

The background fabric is some old navy linen I had from my dressmaking days, and the synapses are some old pink poplin (or similar) from one of the first quilts I made in the late 1980s.

The base of the quilt is a 7×10 piece of Floriani ‘Stitch n Shape’, layered with some batting, and covered with the navy fabric. I turned over the edges and glued them down (Elmer’s School Glue). Then I used another piece of navy fabric to cover the back, turning under the edges, gluing it to the back, and then topstitching the layers to hold them together. Next, I added Velcro hook pieces on the back as per the OMG guidelines (NOTE: If I did another like this, I’d add the Velcro to the backing piece BEFORE gluing and stitching it to the back).

Next I fused Mistyfuse to the back of the pink fabric, drew the free-form synapse shapes on the back, then cut them out and placed and fused them to the top, making a couple of them wrap around the edges.

I stitched some background DNA-like ladder structures in navy thread (Fil-Tec Glide ‘Navy’, colour 32965), then the synapse applique pieces and their tendrils in a bright pink thread (Mettler Poly Sheen, colour 1950).

The end result is a nice stiff enclosed piece, with some texture and puffiness from stitching on the top and leaving certain areas unstitched to allow them to ‘pop’.