2012 FMQ Challenge: December

2 12 2012

The last free motion quilting challenge for 2012 (ever?) was announced today. It was another by Patsy Thompson, and this time she focused on various treatments for borders — narrow and wide and all sizes in between. I had some spare time today, so I got to and did it!

Here’s my piece (click the photo to view it larger — it looks MUCH better larger). Unfortunately, reds, oranges, and yellows don’t photograph well on my camera. The fabric is a deep/dark maroon and I used a bright fluoro yellow on the inner border, a fluoro orange for the next one, followed by a fluoro lime green, and a variegated King Tut thread that combines yellow, green, and purple (‘Passionfruit’, colour #931) in the outer border. I wanted the stitching to stand out 😉

Dec_2012_finished

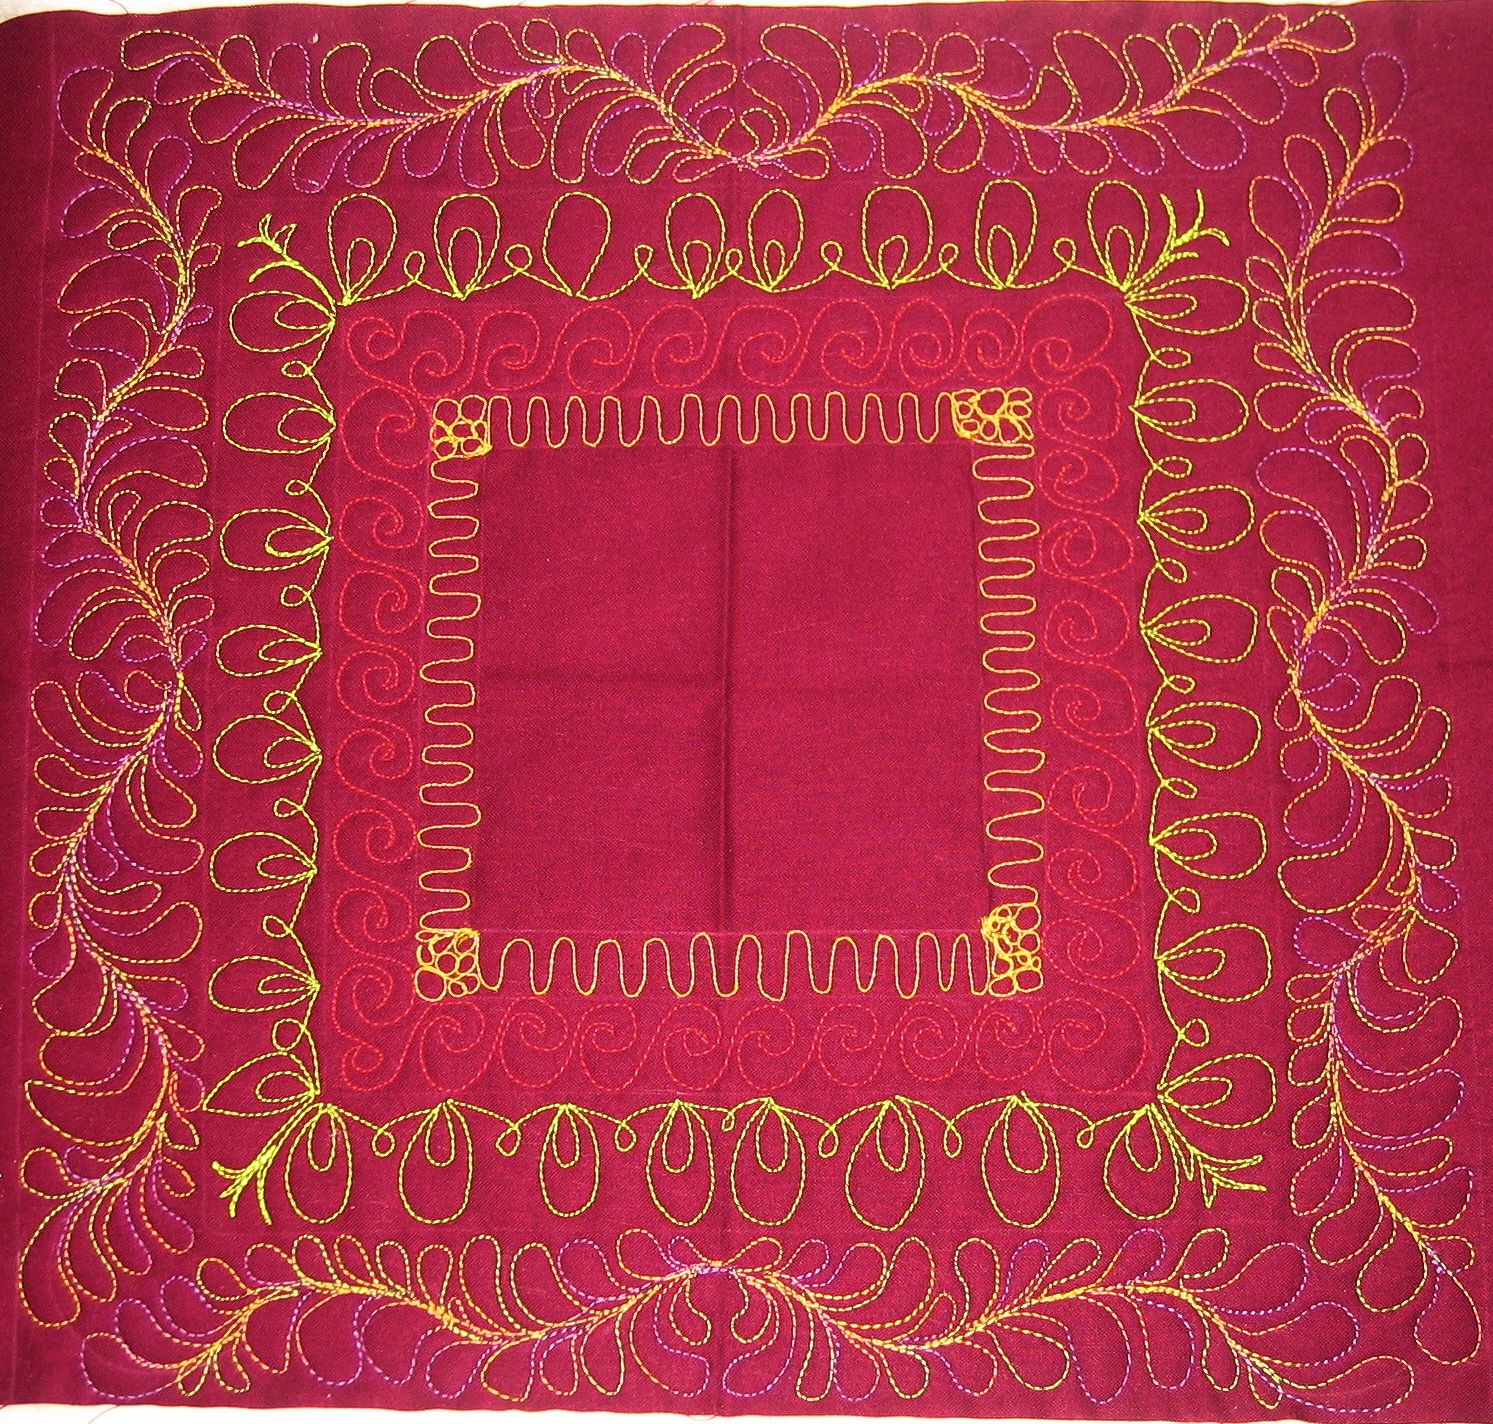
I enjoyed doing this one — thanks for your excellent instructions, Patsy — though I wasn’t happy with the inner loops (especially when I practised them going back the other way to make ovals — they looked really horrible!). I quite liked the shell variation (the lime green one on this piece) and intend practising that one some more. I did the feathers without a curved ruler — I just used the base of a thread spool to mark the curves 😉

So that’s it. The 2012 FMQ Challenge is over. The last step is to post a summary, which I’ll do in the next few days. Meantime, I’d like to thank SewCalGal for all her efforts in making this happen, the 2000 or so other quilters worldwide who participated, and the sponsors who donated prizes. I’ve had fun and I know I’ve improved my FMQ skills and increased my confidence. I tried some things outside my comfort zone that I enjoyed, and others that I didn’t — but it was all about expanding my knowledge and skills and if there’s a technique I’ll never use again, at least I’ll know why.


Oiling the bobbin area on the Handi Quilter Sweet Sixteen

2 12 2012

I couldn’t find any videos on where to place the SINGLE drop of oil when oiling the bobbin area on the HQ Sweet 16, so I decided to take some photos to share.

Firstly, HQ recommend you clean and oil the bobbin area after every two bobbins, but I do it after every bobbin change as I tend to use 80 wt bobbin thread, so I stitch for a much longer time with a single bobbin than if I was using 40 wt thread.

I also only put ONE drop of oil in the bobbin area, then I stitch on my scrap sandwich to make sure the tension is OK and to get rid of any oil residue that may occur (it rarely does, but sometimes I’ll get a patch of oil for about 10 stitches on my scrap sandwich).

  1. Remove the bobbin case and bobbin from the bobbin area.
  2. Use the brush to brush out any fluff, lint, etc. from the bobbin area and from the bobbin case.
  3. Pull the nozzle end of the oil bottle to extend the nozzle fully.
    Oil bottle as stored

    Oil bottle as stored

    Oil bottle with nozzle fully extended

    Oil bottle with nozzle fully extended

  4. Remove the nozzle cap and carefully place it where you won’t lose it.
  5. Squat down (or bend or kneel) and look under the table at the bobbin area. (Easier alternative: Unscrew and remove the needle plate and go in from the top.)
  6. Place the nozzle at about 7 o’clock on the first groove of the bobbin area.

    Squeeze ONE drop of oil at the 8 o'clock position

    Squeeze ONE drop of oil at the 7 o’clock position

  7. Squeeze gently so that only ONE drop of oil goes into that area.
  8. Put the cap back on the nozzle and push the extended nozzle back into the oil bottle. (See the update for Feb 2020, below, for alternatives)
  9. Replace the bobbin in the bobbin case (remember, the thread goes over the top of the bobbin and hangs to the right as you place the bobbin into the open side of the bobbin case).
  10. Test and adjust the bobbin tension, as required.
  11. Gently push the bobbin case into the bobbin area until you hear it click in place.
  12. Do some stitching on your scrap sandwich to test the tension and to get rid of any excess oil (there shouldn’t be much).
  13. Start quilting!

See also this 6-minute video from Jamie Wallen on oiling the bobbin area of a long-arm quilting machine: http://www.youtube.com/watch?v=xNH06ILNPpU

Update Feb 2020: Helen Godden recently did a Handi Tip video for Handi Quilter (https://www.youtube.com/watch?v=YCfCMU1bRDQ) where she advises to leave the tip extended, keep the bottle in a cup so it doesn’t tip over, and to get a new bottle of oil when the oil becomes yellow. As you can see in my photos above, my oil was always yellow, right from when I bought my machine in 2012—eight years on, and it’s still the same colour.