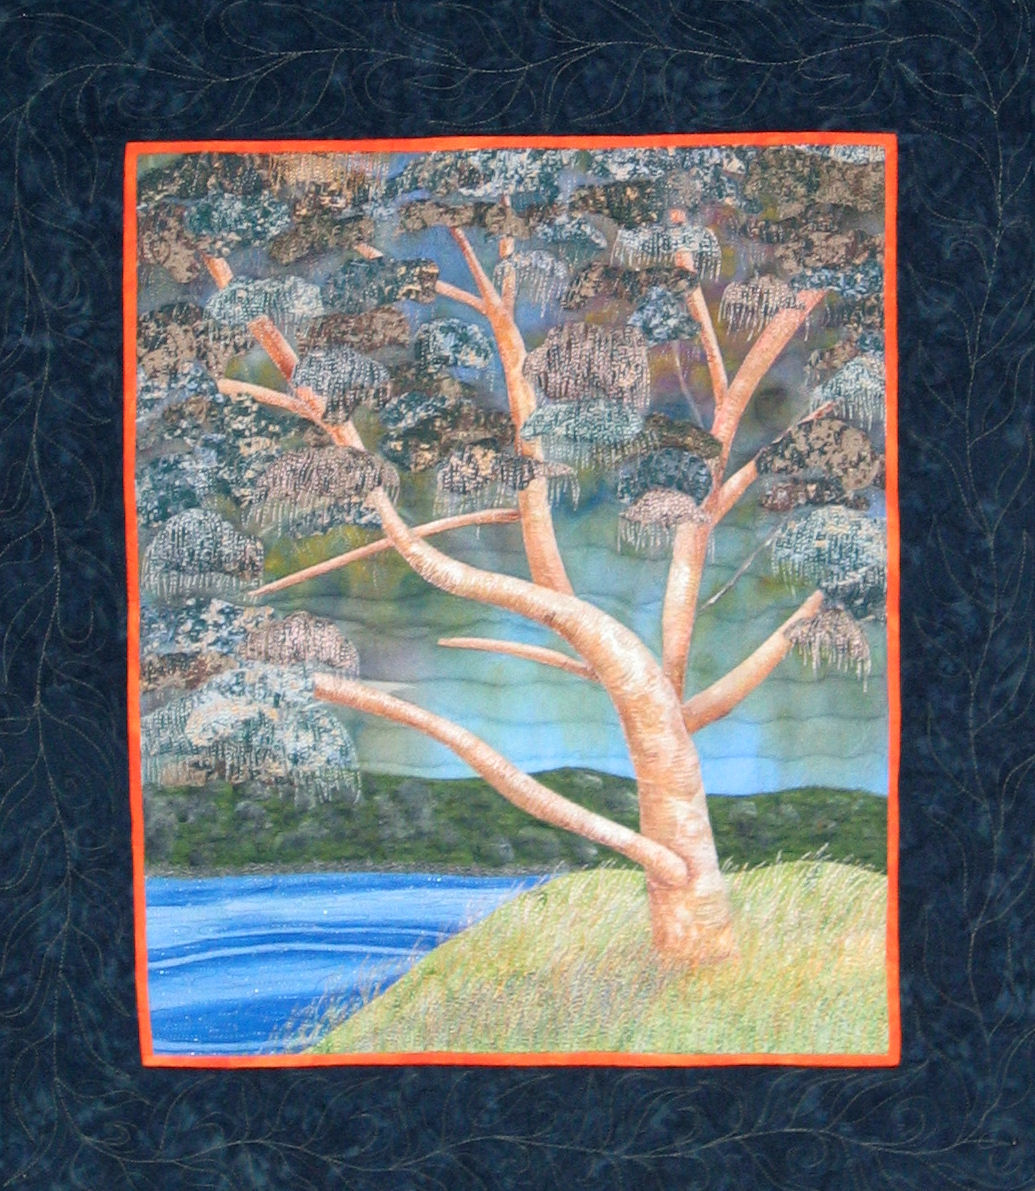
The finished quilt
Susan, a work colleague, commissioned me to make a quilt for her friend, who is pregnant with her first child. The original thought was for me to make a cot quilt a little bigger than usual that could carry through to the child’s toddler years. However, my friend Bobbie, who used to be an infant health nurse and lactation counsellor before she retired, insisted that quilts for babies are NOT good. It seems babies get too hot under them and, as they can’t kick off the quilt like children and adults can, that can affect the baby’s core temperature. She strongly cautioned me against making a cot quilt, and instead suggested I turn the piece I’d already started into a wall hanging for the baby’s room.
Susan had told me that her friend was going with a maritime theme, with aquas and greens predominant. So I decided to make a fishy art quilt.
This blog post details the steps I took to make this quilt. To see a photo at full size (especially if you’re interested in the stitching), click it, then click it again in the window that opens to show it full size.
Step 1: Design the background
I decided to use various fabrics in a wavy pattern to emulate the layers of colour in the water, with some sea floor at the bottom of the quilt.
The first step was to create the master design: I taped some sheets of white paper together and drew the wavy lines with a Sharpie, adding sequential numbers to each shape.
Next, I taped some ‘tearaway’ on top of the white paper master design and traced the outlines and added the same numbers. The tearaway is what you pin the fabric too and what stabilises the fabric as you do the surface stitching. Hint: Use pencil or ballpoint pen on the tearaway, NOT a Sharpie — Sharpie ink will show through any light fabrics. I learned this the hard way and had to remove the tearaway and replace it with unmarked tearaway — fortunately, I caught it early in the process, so it wasn’t too disastrous.
Finally, I taped freezer paper on top of the tearaway/master design sheet (shiny side down) and traced the shapes again and added the same numbers again. I also added little arrows to indicate the edges that would be covered by another piece of fabric.

Master design traced onto tearaway and freezer paper
Step 2: Cut out the freezer paper pieces
The next step was to separate the design sheet layers — the master design on the white paper got folded up and put away in case I need to make something similar again some day; I put the tearaway to one side as it’s what I’ll use to pin the fabrics to and to stitch over; and I cut the freezer paper into all 19 background shapes.

Freezer paper shapes
Step 3: Audition the fabrics
The next step was to audition the fabrics. I’d already pulled out a heap of potential blue/green fabrics from my stash, but until I put them next to each other (‘auditioning’), I didn’t know what would and wouldn’t work. Some fabrics that looked fine in the sewing room ended up being way too dark when laid out, which is why auditioning is so important. Remember, this quilt is for a child’s/nursery room, so I wanted to use bright, clear fabrics.

Audition potential fabrics
Step 4: Iron the freezer paper to the fabrics
I’d never used freezer paper before, so I followed the instructions in Gloria Loughman’s Luminous Landscapes book.
I ironed the freezer paper pieces (shiny side down) to the FRONT of each piece of fabric. Then I cut around each piece, leaving about 1/2 inch (1 cm) of fabric showing.

Iron freezer paper to fabrics then cut out fabric pieces
Step 5: Turn under the top fabric edge and pin the fabric pieces to the tearaway
Remember I marked with arrows all the edges that would be hidden by other pieces of fabric? Here’s why… Find the edge with NO arrows, and turn it under so that the turned edge is lined up with the freezer paper edge. Press. Leave the other edges ‘free’ and hanging out from the freezer paper pattern.
Starting from the top, place each numbered pattern piece on top of the tearaway, making sure that the pattern piece and the outline on the tearaway match. There will be some overlap where the ‘free’ edge of the fabric covers part of the next piece below it. That’s OK. Pin the top (turned under) edge to the tearaway only.
(Why did I start from the top? I wanted each piece to overlap from the bottom up, giving some illusion of depth. That meant I had to lay the pieces out from the top down. Make sense? 😉 )

Pinned freezer paper pieces
Step 6: Sew the fabric pieces to the tearaway
Next, I sewed the turned fabric edges to the tearaway. Again, I started from the top and worked down the numbers to the bottom.
DON’T take off the freezer paper until you’re finished — I initially tore off the freezer paper of the first two pieces (see photo above), but in doing so I realised that I was warping the fabric out of shape. So instead, I just lifted the edge of the freezer paper where I was to sew and sewed the stitching line about 1/8 inch (or less) from the turned under edge of the fabric.
After sewing all the pieces down, I removed the freezer paper and discarded it (I believe freezer paper can be used a couple of times, but as it’s unlikely I’ll ever make this quilt again, I didn’t see any need to keep it).
Finally, I pressed the completed background piece.

Background fabrics stitched to tearaway
Step 7: Stitch the water and sand
I free motion stitched the water effects and the sand effects using my my HQ Sweet Sixteen quilting machine. This helped hold the background in place on the tearaway.
Step 8: Applique the marine creatures to the background
I chose some bright fabrics from my scrap stash for the fish and other marine creatures, then hand drew some fish shapes on to fusible web.
I cut out the shapes from the fusible web, leaving about 1/4 inch spare all round, then fused these shapes to the BACK of the fabrics I’d chosen for the fish and the crab.
Next, I cut out the fused fish/crab/starfish shapes from the fabrics, using the outlines as my cutting guide. Then I placed the marine creatures on the background in a way that pleased me, before removing the fusible web from each shape and pressing it to the background fabric.
Once the shapes were fused down, I used the blanket stitch on my sewing machine to stitch down the raw edges of each appliqued piece, matching the threads to the colours of each creature. Some fish had different tails and fins — tails and top/bottom fins were fused down first, then the fish body, then the body fins last.

Appliqued fish

More appliqued marine creatures
Step 9: Surface stitching
Next, I decorated the fish and other marine creatures with a lot more free motion stitching in various colours and added some seaweed plants in a variegated dark green thread. I added eyes to the fish and the crab with both fabric and thread. And added a couple of spiky sea urchins with thread to balance the life on the sea floor.
As this quilt is for a child, I didn’t want to use embellishments such as beads and buttons as these are dangerous to young children if swallowed.
Step 10: Remove the tearaway
Such a simple step — such a LONG time!
I wanted to remove the tearaway from the back of the fabric so that it became soft again (with tearaway behind it, fabric is fairly stiff, as the tearaway is a stabiliser that is very much like interfacing). Easier said than done. I’d done a LOT of stitching, so tearing away the tearaway wasn’t easy as there were no big patches to be torn. So over three nights, I sat in front of TV with my piece, some tweezers, and a garbage bin and slowly took out very last skerrick of tearaway from the back of the fabric.
Step 11: Add the borders
Time to audition fabrics again, this time for the borders. I wanted a thinnish framing border, and a larger outer border. I decided on a beige/sand toned batik for the inner border and a blue/purple batik with lime green leafy/seaweed shapes for the outer border.
I thoroughly pressed the quilt top before squaring it up, then I added the borders, pressing them flat as I went.
Step 12: Make the quilt sandwich
I found a large piece of batik fabric in my stash that had lots of blues and greens and decided that would be good for the backing. And I used bamboo batting in between the top and the backing fabric. I pin basted the entire quilt then started on my favourite part of the process — the quilting!
Step 13: Quilt the quilt
Now that I have my own HandiQuilter Sweet Sixteen (woohoo!), this part of the process has become my favourite. I just get into a zone and off I go. It’s very meditative!
I wanted to make the fish stand out, so I made sure that I quilted around them, not over them. This forces the fabric around the fish to flatten, thus creating a certain puffiness in the fish. I added more water stitching, sand stitching, and some bright green seaweed plants/fronds to the main quilt top.
In the framing border, I stitched some wavy lines and filled the area outside them with bubbles or pebbles.
In the large border, I stitched more lime green seaweed fronds starting from each corner and moving to the centre of each side, then filled the areas between the fronds with a dark filler stitch.

Stitching detail

Stitching detail

Stitching detail

Stitching detail
My Sweet Sixteen machine records the number of stitches. I forgot to reset it to zero when I did the surface stitching, so I don’t know how many stitches I did in that step. But I remembered to reset it when I started the quilting step… I did 110,769 stitches JUST in the quilting stage. I suspect the surface stitching stage was about 60 to 80,000 stitches, so all told, this quilt has between 150,000 and 200,000 stitches in it! Not bad for a piece that’s only 26 x 30 inches! (66 x 76 cm)
And here’s what some of those 110,000 stitches look like from the back:

Stitching on the back

Stitching on the back
As far as possible, I used a variegated blue thread in the bobbin, but for the bubbles in the framing border, I had to use a beige bobbin thread as the dark blue bobbin thread showed through too much on the front of the quilt. That’s why the bubbles on the back are in a different colour.
Step 14: Add the binding and the finishing touches
The final step of any quilt is to press it thoroughly, square it up and trim it, then add the binding and a label.
I decided to use the same fabric for the binding that I used in the large border. That way there was no further visual distraction that moved the eye away from the marine life in the main section of the quilt.
After some 40 hours of work, this quilt is finished! The commission price I will get for this quilt in no way reflects the number of hours of work or the creative process of designing and making a quilt from scratch (no pattern!) — but it’s for a good friend and it was fun to do! 😉
The finished quilt