Community Quilt 77

26 04 2013

And then there are the wonky quilts… This one was the wonkiest I’ve tackled so far. All those bias edges were wonky when sewn into the blocks, and the border was wonky.

So how to quilt a wonky quilt with fabric that bunched up in many places? You beat it into submission with lots of fairly dense quilting! 😉

I chose a matching variegated thread in blues, greens and purples, using a rounded spiral morphing into spikes, then echoed with rounded hops. I have no idea what this design is called but it achieved the end result of flattening this very wonky quilt top.

(Click on a photo to view it larger)

quilt77_01

quilt77_02

Back (still with some loose threads caught):


quilt77_03

Threads used:

  • Top: Superior King Tut ‘Cairo’ (40 wt cotton, colour 932)
  • Bobbin: Wonderfil Invisifil (100 wt, red)


Community Quilt 76

26 04 2013

Some quilts just sing. And this one had a whole choir going on 😉

I love batiks, and I especially likes how the maker combined shades of batiks I’d never have thought to put together to make this HUGE quilt top (I think this is the biggest I’ve done on my Sweet Sixteen). With the colour and the chevrons, and the overall linear movement of the quilt, I just had to stitch it with straight lines, a la modern quilting. I used a variegated thread with purples, greens, and browns/tans. And I used my Line Tamer ruler for the straight lines.

(Click on a photo to view it larger)

quilt76_01

quilt76_02

Update Sept 2014: This quilt became a raffle quilt, raising $1850 for a charitable organisation and going to a lovely family: http://waquilters.com/2014/09/30/friends-of-larche-raffle-quilt/

Threads used:

  • Top: Wonderfil Mirage (30 wt, polyester?, colour SD 29)
  • Bobbin: Wonderfil Inivisifil ( 100 wt, polyester, navy)


Handi Quilter under table storage solution

26 04 2013

I’d been using a temporary tray for storing my brush, oil etc. for my Handi Quilter Sweet Sixteen. I didn’t realise it was temporary until it started to split apart! So it was time for a different solution. The real problem with the shelf underneath the Sweet Sixteen table is that it’s narrow and shallow — 9.75 x 2 inches (24.5 x 5 cm) MAXIMUM internal dimensions. It’s deep, so length isn’t an issue, but the height and width of whatever you put under there are critical. And you still need to leave enough space for your fingers to grab the storage tray too.

I was in KMart (in Australia) and saw a neat little bamboo tray in the kitchen aisles. But as I wasn’t sure of the width of the shelf, I called my husband and got him to measure it. Unfortunately, the tray was too wide for the space. So I went looking a little more… And in the same KMart store, but in the stationery area, I found what I was looking for in the scrapbooking section — a tray with lots of fixed and removable dividers with lid that snaps closed.

I only added a couple of removable dividers — I sure didn’t need the 30 (!) removable dividers that were included in the box (though if you’re a beader or scrapbooker, then maybe they’d be super useful).

It’s a PERFECT tray for storing my oil, brush, small tools, spare fuse for the bobbin winder, and needles. And it cost me the princely sum of $5! Gotta be happy with that!

storage


17% mortgage interest

24 04 2013

I was going through some old files the other day, weeding out stuff that was no longer relevant, when I came across this letter from my bank regarding my mortgage. It’s dated 1989 and took me straight back to the time when struggling to pay the mortgage was a grim reality.

bank_interest_redacted

I’d sold my first house and had really extended myself for my second place. When I took out the mortgage on the second property in April 1988, interest rates were around 13.5% and I budgeted my payments for 15%. The creeping rates became a real concern when they went past 15% and just didn’t stop.

The only good thing about those rising interest rates was that they forced me into taking in a rent-paying roommate. I was more than content to live by myself, but my killer mortgage forced me into sharing my house with a total stranger who happened to be a good friend (and later wife) of an old friend of mine. Well, that stranger — a young girl from Minnesota — became a really good friend, someone whom I still keep in touch with today.

So good things can come out of dark days.


Oh no!

22 04 2013

There I was on Sunday afternoon — happily in my quilting zone, when all of a sudden something happened with my machine. I’ve learnt to listen to the ‘hum and purr’ of my Handi Quilter Sweet Sixteen and to stop immediately if anything sounds different.

This time it was a snapped needle — my second in a couple of weeks. In hindsight, I wonder if the first needle breakage put the timing out a tad and this caused the second one to go. Since the first needle snap (the first needle to break in 7.5+ million stitches), I’ve had all sorts of little issues — tension issues, skipped stitches etc. Nothing too bad, but annoying and time-consuming to fiddle with and fix. I’m also wondering if it’s the needle — this one was a Schmetz size 16, and I’m pretty sure the previous one that broke was a Schmetz too (I normally use the Groz-Beckert needles, but the only 16s I had were the Schmetzs supplied when I purchased the machine).

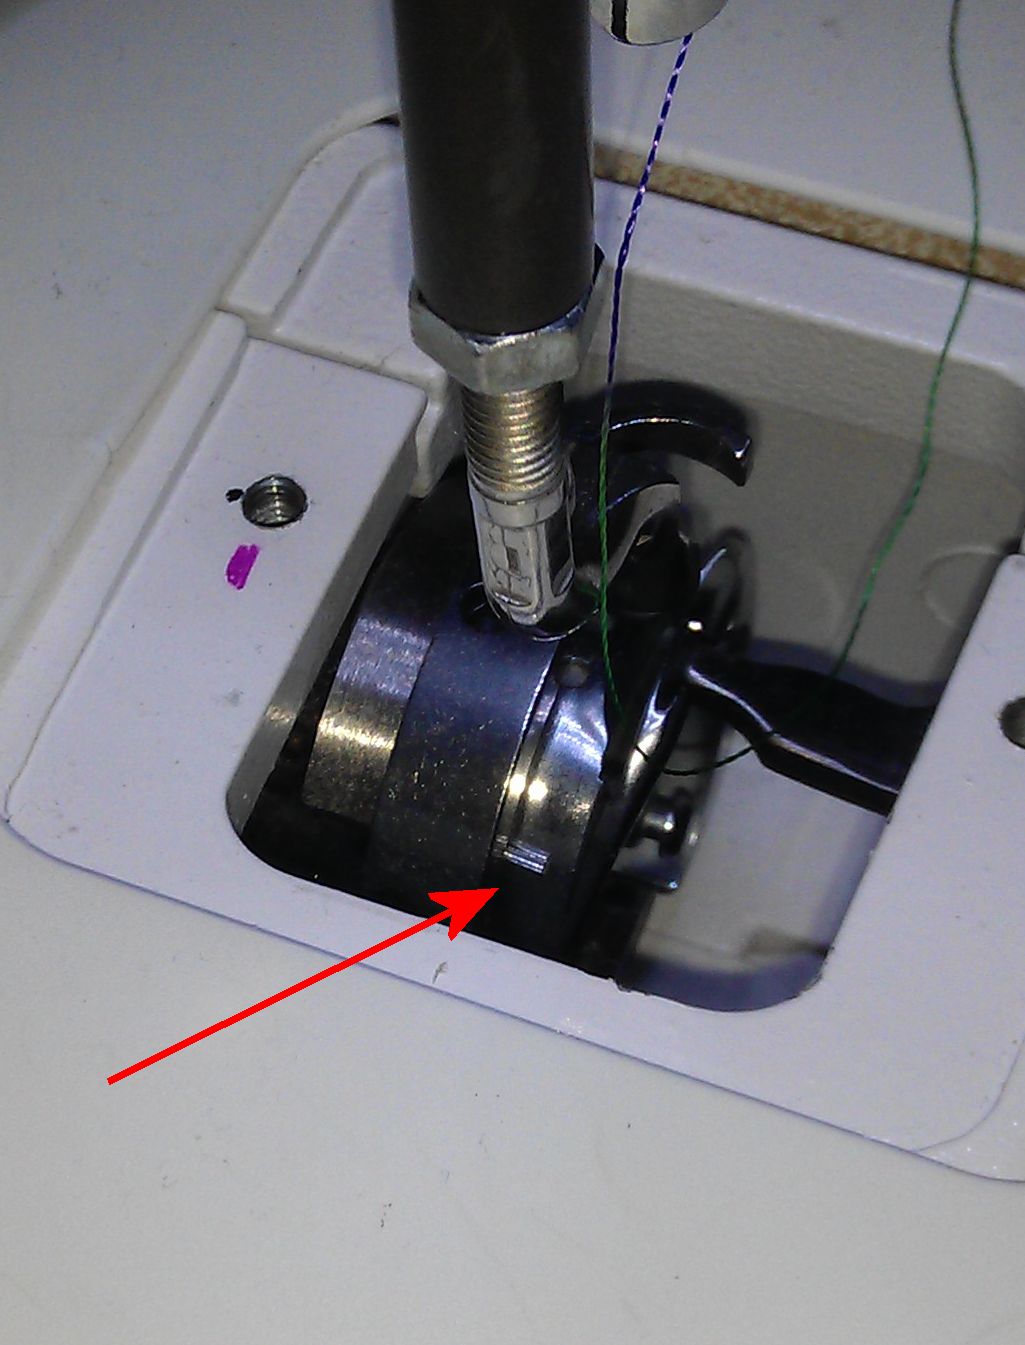
Anyhow, this needle is stuck firm in the bobbin case housing. No amount of pulling by me or my husband using needle-nose pliers, tweezers etc. would budge it.

needle_stuck01

Today I called the local sewing machine repair guy, but he can’t look at it for another two weeks at least. So I called my dealer in Perth and found out that her technician is in tomorrow and only has one machine scheduled for service etc. So I drove to Perth and back today to drop off my machine — of my 6+ hours out of the house today, 4+ were driving hours. At least the weather was great for driving!

With luck, the technician will be able to remove the needle tip tomorrow and reset the timing (which will be well and truly out) and that will be it and my husband can drive up to collect my ‘Bee’. The worst-case scenario is that I have to have the whole hook assembly replaced, which will entail not only an expense I wasn’t expecting, but also a longer wait for the part to come from Sydney or, even worse, from the US.

I’m sensing withdrawal symptoms already… 😉

Update 23 April 2013: The technician called. She was able to remove the needle tip and reset the timing, all for just under $50 (it seems a replacement assembly is about $500 [!], so I was lucky no further damage was caused). And there’s a bonus too — she’s heading down south for a few days, and so will bring the machine with her and I will pick it up from where she’s staying about 40 mins from here, so I don’t have to drive to Perth and back again.


Basting table

22 04 2013

After watching Cindy Needham’s excellent Craftsy class (Design it, quilt it), I decided to try her method of basting a quilt, using a taped down pin to mark the centre of the table and quartering the backing, batting, and top. But as I’ve only been using an angled kitchen counter top for basting, that method wasn’t going to work.

So I combined three things to create myself a great basting and/or cutting table! A fold-up table from Bunnings (if in the US, try your Home Depot, Lowes or similar) with straight legs ($35), a length of PVC pipe (I think I got two metres) that slips over the legs without being too loose or too tight (cut into four equal lengths for free by the staff at the Bunnings trade counter; ~$6 for two 1-metre lengths), and four rubber feet to fit over one end of each of the four pieces of PVC (~$2 each).

It’s a PERFECT height for basting! I don’t have any clamps (yet), so I’ve been using strong masking tape to stretch and hold the backing fabric in place while I place the batting and top. Update: I’ve now purchased 8 hand clamps from Bunnings (at $2.10 each, so ultimately cheaper than using lots of tape).

All up, the cost of my table and its accessories was less than $60.

Here’s my table with a really big quilt on it that I’m basting:

basting_table

basting_table_clamps03

basting_table_clamps02

basting_table_clamps01


Community Quilt 75

22 04 2013

There are some Community Quilt tops I get that I just love. And some I like a lot. Some others — not so much… This was one that I actually disliked (with no offence to the person who put the top together). I didn’t like the colours, I didn’t like the prints (Holly Hobby [!] and cow udders combined with tropical leaves and pastel flowers, anyone?), and I didn’t like the fabrics (cheap poplin, some linen, some curtain fabric, as well as some older cottons with no redeeming features at all). And it was wonky.

To beat the wonkiness into submission and to not overpower the quilt with any more ‘busyness’, I just decided to do a reasonably close meandering stipple in a variegated thread in mauve, olive, and khaki that sort of matched some of the colours. Unfortunately, the thread was a 12 wt thread that I hadn’t used before, so it had a few breakages along the way and caused me a bit of grief.

(Click on a photo to view it larger)

quilt75_02

quilt75_01

Threads used:

  • Top: Wonderfil Fruitti (12 wt; Egyptian cotton; colour # FT 14)
  • Bobbin: Bobbinfil (white)


My first doctor

21 04 2013

The things you find on the internet…

This article (http://www.harveyoralhistory.com/site/history.php?ID=64) is about the doctor who delivered me and my sister and the hospital he delivered us in. I was a feet-first breech, which was a pretty dangerous thing for a small country practice doctor to deal with at the time, and went blue within hours — his matron was passing the nursery (mothers were separated from their babies then) and saw me and resuscitated me, otherwise I wouldn’t be here today.

I even remember him making up pills etc. and putting them in little round cardboard pill boxes!

He was our family doctor until I was 13 and we moved to another town.


Community Quilt 74

16 04 2013

Another quilt using yellow thread! I’m on a roll…

This one was a cute bee and honey quilt. Not only were there bees on the front, there were bees all over the back too. But how to quilt it?

I could have gone for stylised bees or flowers, but having never done bees before, I thought that would be a bit much. Flowers? Meh. And then I saw the little hives. They gave me inspiration for doing my geometric, ‘flat end’ version of the ‘open headband‘ motif. I was pleased with how it turned out.

Again, this was an all-over, edge-to-edge design that puts me into that ‘zen zone’ 😉

(Click on a photo to view it larger)

quilt74_01

quilt74_03

quilt74_02

Back:

quilt74_04

Threads used:

  • Top: Fil-Tec Glide ‘Mango’ (40 wt, trilobal polyester, colour #80116)
  • Bobbin: Bobbinfil (white)


Community Quilt 73

16 04 2013

This quilt had little tiny leaf motif fabrics, and a small floral print in the border, along with the tiny aqua squares. I decided to use my ‘open headband‘ variation of adding a petal-like sweep to one of the ‘headbands’, emulating the petals of the flowers in the border.

Again, this was an all-over, edge-to-edge quilting design.

(Click on a photo to view it larger)

quilt73_01

quilt73_02

Threads used:

  • Top: Fil-Tec Glide ‘Mango’ (40 wt, trilobal polyester, colour #80116)
  • Bobbin: Bobbinfil (white)