Jelly Roll Race

20 01 2013

I keep looking this up on YouTube, so figured I’d link to it on my blog so I don’t have to remember where to find it 😉

I might sew one of these today…

The main part starts at about 2 minutes in.

Later the same day…

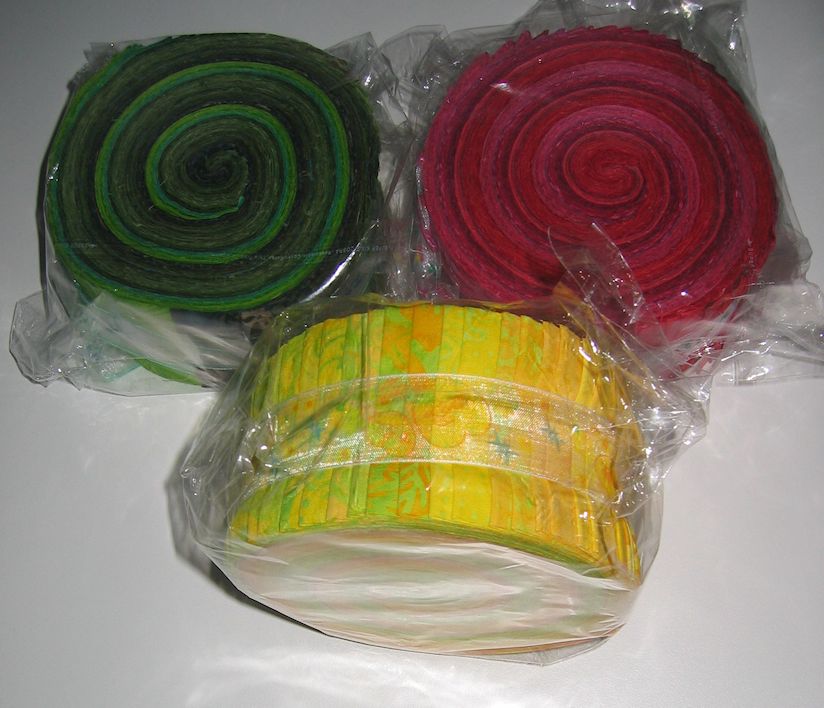
I had a green batik jelly roll I picked up in Bali last September. I have three baby quilts to make, so thought I’d use this technique and that jelly roll for the quilt tops.

batiks07


Here’s all those strips sewn into one long 1600″ strip:

green_jelly_roll01

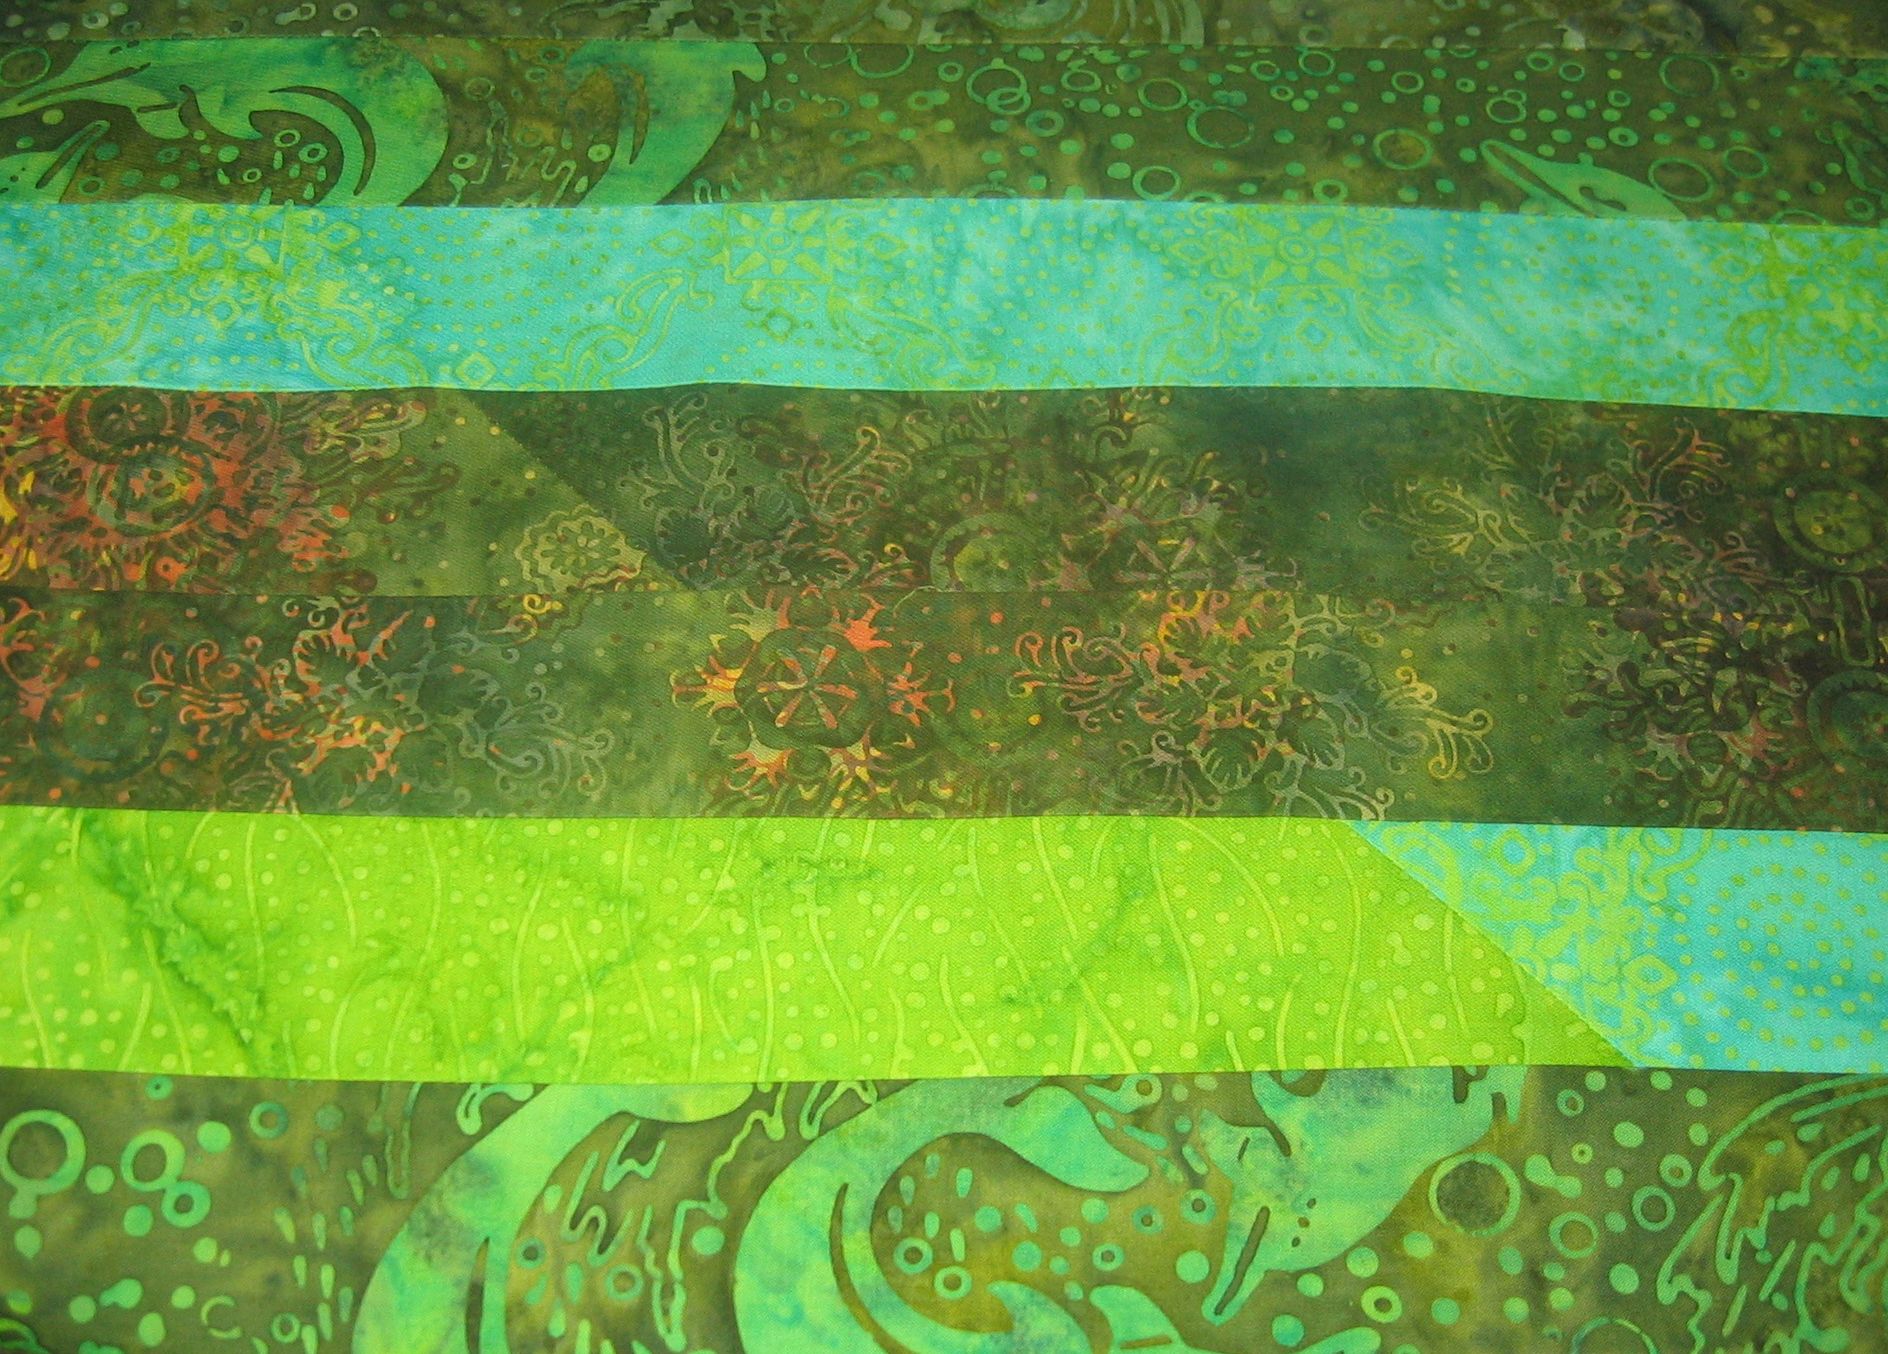
However, I was disappointed in the final result.

I think there were a couple of reasons — the jelly roll seemed to have a lot of medium and dark fabrics and not many lights, and the technique of just grabbing them off the roll in the order they were in meant that like colours were stitched together giving double strips of the same fabric; even where different fabrics were joined, the contrast wasn’t enough to be noticeable (see picture below where there are two strips that have joins).

green_jelly_roll02

Had I realised this earlier, I might have started again and mixed in the pink jelly roll strips with the green (the yellow is to be used for something else) or deliberately picked a light, then medium, then dark, the light again etc. instead of stitching them straight off the roll as per the instructions in the video.

While this took me longer than an hour (probably about two hours), it was a very quick way to make a quilt top. I have enough to make four baby quilt tops, but as I’m not happy with the effect (I just got stripes, not that slashing effect that you see in the video), I may well use what I made as the backs for the baby quilts. And as I’ve sewn and cut down the finished top to about 25″ wide, I’ll use one of the clever techniques for backs that Elizabeth Hartman shares on her free Craftsy lesson to make the backs a bit bigger: http://www.craftsy.com/class/creative-quilt-backs/117

I was glad I tried this technique and would use it again, but next time I’ll be more careful about the fabric contrasts in the jelly roll and perhaps pick and choose what fabric goes with what, instead of just doing them in the order they are on the roll.

Update: There’s a new Jelly Roll Race video, showing how to add little squares between the ends of each jelly roll strip:


Using the Handi Quilter Sweet 16 cuTex Bobbin Winder

13 01 2013

I bought my Handi Quilter Sweet Sixteen just under two years ago. With it came a bobbin winder, which my dealer showed me how to use. The instructions that came with the machine were next to useless…

So here are some instructions for THIS bobbin winder (see picture below). I believe Handi Quilter now supplies a different style bobbin winder with the Sweet Sixteen, so only use these instructions if your bobbin winder is made by cuTex and looks like this:

bobbin_winder01

bobbin_winder02

How to thread the cuTex bobbin winder

See the diagram below for the thread path; you can thread either side of the bobbin winder, just don’t cross thread over from one side to the other.

bobbin_winder03

  1. Pull the thread off the spool and up and through the thread mast.
  2. Poke the end of the thread into the little hole above the tension knob (circled in yellow in the photo above).
  3. Pull the thread you’ve just poked through the hole back towards the spool and ‘floss’ it between the tension disks (the silver part of the tension knob area)
  4. Pull the thread towards the silver spindle (far left in photo above — NOTE: there is no bobbin on this spindle). If you have a bobbin with a slot, poke the thread through the slot, then push the bobbin onto the spindle. If you don’t have a slot on the bobbin, wind the thread around the bobbin several times before pushing it on the spindle – it needs to have a decent grip so the rest of the thread can ‘catch’ on it when you switch the bobbin winder on.
  5. Press the On switch.
  6. Adjust the timer (how much time will depend on how thick the thread is – I tend to have mine set between 9 and 15, but thicker threads will require less as they fill up quicker). You can always restart if the timer stops before the bobbin is full.
  7. Press the Start button and make sure the thread ‘catches’ on the bobbin and starts to fill.
  8. Use your fingers or the back of your hand to feel the tension of the thread coming from the tension disk to the bobbin – it shouldn’t be too tight, but equally it shouldn’t be totally slack either. There should be some ‘bounce’ in the thread tension. If the tension is too tight or loose, turn the tension knob – retest the ‘bounce’ and adjust the tension as required.
  9. Do NOT overfill the bobbin – only fill it to about 80% full, not all the way. If you overfill the bobbin, it will not work correctly in your machine.
  10. Turn the bobbin winder off when you’ve finished, cut the thread near the full bobbin, and remove the bobbin — sometimes the bobbin will be quite tight, so you may need to use a bit of brute force to get it off!

As I tend to use similar weight threads for my bobbins, I only need to tweak the tension a little every so often; otherwise, it’s set and forget.

Other hints:

  • I use the back metal holder on the bobbin winder for some of my spare bobbins — it holds about six (see the top photo).
  •  To stop thread from spooling off the bobbin once it’s wound, I wrap it was a child’s ponytail elastic (see picture below) — I can get a pack of 20 or so from the supermarket for just a few dollars.
  • I keep my already-wound bobbins in a zip-lock bag suspended by a ribbon from the unused thread mast on my Sweet Sixteen — I find it’s easier to keep them there as they are only an arm’s length away (see picture below). Unfortunately, the metal spool holders on the Sweet Sixteen are just a tad too thick for the bobbins — I wonder if they’ll change that in a future design? So many thread spools have different thicknesses in their central cores, I’m surprised HQ didn’t just go for a versatile spool holder thickness that would suit thread spools AND M-size bobbins.
bobbin_winder04

And yes, my Bling Bear (a present from my friend Glenys) watches over me while I quilt 😉


Great video on thread tension for long- and mid-arm quilting machines

10 01 2013

This great YouTube video from Jamie Wallen is a clear explanation on getting the tension right for long-arm quilting machines. It also applies equally to mid-arm machines, like the HQ Sweet Sixteen.


Domestic sewing machine needles vs industrial sewing machine needles

6 01 2013

Update June 2019: This Handi Quilter Blog article clearly explains the type of needles you need to buy for your longarm or Sweet Sixteen machine: https://handiquilter.com/all-about-needles/

On the Handi Quilter sit-down model Yahoo! group someone asked about whether they could use their domestic sewing machine needles in their HQ Sweet Sixteen (or Babylock Tiara) machine.

In a word, NO!

The needles are made differently, with the prime difference being the shape of the shank. On a domestic sewing machine needle, the shank is flat at the back. On an industrial machine needle, the shank is fully rounded.

sewing-machine-needle-parts

Image of a domestic sewing machine needles’ parts. Industrial machine needles have the same parts except for the shape of the shank. (From http://www.sewingmantra.com/index.php/needles/parts-of-sewing-needles/)

The needles used in the Sweet Sixteen are industrial needles and do not have this flat piece on the shank. In the diagram below, A represents an industrial sewing machine needle looking down from the top, whereas B is a domestic sewing machine needle from the same angle — note the flat part on the shank.

needles_tops

needles_front

The fronts of industrial (A) and domestic (B) sewing machine needles look just the same.

needles_back

However, the backs are different. The industrial machine’s needle (A) is fully rounded at the back; whereas the domestic sewing machine’s needle (B) has a flat back on the shank.

Domestic sewing machine needles have the flat side on the shank to make it easy for you to insert the needle correctly into the needle holder on the machine. However, with the industrial needles, you have no guide as to where to place the needle. Thus you need to be careful when inserting the needle in your Sweet Sixteen to make sure the long groove is facing you, and the scarf (the notch on the back) is away from you.

One way to do this successfully is to take the old needle and place its point into the eye of the new needle (with the long groove facing towards you), then insert the needle so that the old needle is at the 6 o’clock position, perpendicular to the new needle. Some people position the needle just off centre, at the 5:30 position (this is what I do) and that’s fine. But don’t position it too far away from the 6 o’clock position otherwise the bobbin thread won’t be picked up correctly and you will not be able to form a stitch correctly.

needles_position

For more information about sewing machine needles and how they work, check out the excellent videos on needles (videos 16 and 17) from Superior Threads: https://www.superiorthreads.com/videos/thread-therapy-with-dr-bob-educational-videos/. Note: These videos focus on domestic machine needles (particularly topstitch needles), but much also applies to industrial machine needles, especially the information on needle sizes. As an aside, I mostly use 40 wt threads for my quilting and a size 100/16 134 R Groz-Beckert needle in my Sweet Sixteen (the 134 is important).

For more information on needles suitable for Handi Quilter machines, see this free video: http://www.qnntv.com/videos/tnt-threads-needles-tension-with-handi-quilter/ or http://www.youtube.com/watch?v=dZBNUKsCyxg (needles and their relationship to thread is discussed in the first 10 minutes).

Update: R versus MR needles: A further question from the group was about whether we can use MR needles instead of R needles in the Sweet Sixteen. Handi Quilter is quite clear on that — NO! See https://www.handiquilter.com/forums/discussion/1375/needle-confusion (To quote from that 2015 forum post response by the Handi Quilter Educator: “Handi Quilter recommends the R needles for the Sweet Sixteen, the Avante and Fusion machines and the MR needles for the Infinity machine.”)

There’s a picture of an MR needle here: http://www.schmetzneedles.com/category/Long-Arm-Needles-27 — you can see the difference in the shape of the needle, so I can see why HQ says NOT to use them in the S16.

Groz-Beckert describes the tips of the needles (which give the letter designation such as ‘R’) in the ‘Cloth points’ article here: https://dev.groz-beckert.com/mm/media/en/web/pdf/Cloth_points_from_Groz-Beckert.pdf . And Superior Threads has more information on the codes on Groz-Beckert needles here: https://www.superiorthreads.com/education/groz-beckert-needle-package-numbers.

These are the main needles I buy (in sizes 12 to 20, though mostly 14 and 16):

Two final hints:

  • Hint 1: Use the groove on the front of the needle to help thread your needle easily every time. Instead of trying to get the end of the thread into the eye of the needle, run it down the groove and it will pop into the eye without a problem almost every time (assuming the end of the thread is snipped, of course, and not frayed).
  • Hint 2: Discard your old sewing machine needles, pins etc. into a safe, sealed container. I use an old glass spice jar as I couldn’t justify the expense of an official ‘sharps’ container from the drugstore. It will take a long time to fill this jar, and once full, I’ll throw out the sealed jar take this jar to my local pharmacy for correct disposal and grab another one for my dead needles.

needles_dead


Threads I’ve used in my Sweet Sixteen

13 12 2012

Someone on the Handi Quilter Sweet Sixteen Yahoo! Group (HQ_Sit_down_model) asked about thread recommendations. Here’s my response in case it helps anyone else.

My experience with my Sweet Sixteen (remember the tension is fully adjustable, and needle size affects breakages too):

  • Superior King Tut – Can get a bit linty/fluffy, especially if you’re going fast. Rarely breaks.
  • Superior Rainbows – Shreds/breaks occasionally; no fluff.
  • Isacord 40 wt polyester – I LOVE this thread in my S16 – it goes through the machine like a hot knife through butter. Never breaks or shreds and no fluff and looks good on the quilt. Big colour range too.
  • Fil-Tec Glide – Similar to Isacord
  • Fil-Tec Harmony – similar to King Tut as it’s also a cotton; can be very fluffy/linty especially when you’re going fast so clean out the bobbin area and the tension disks often.
  • Madeira Rayon – shreds/breaks occasionally; I only ever thread this through no more than two top holes (sometimes only one) otherwise it breaks more often. No fluff.
  • Robison-Anton rayon – as for Madeira Rayon
  • Floriani (embroidery thread?) – as for Madeira Rayon; not sure if this is a rayon or polyester – it’s definitely not cotton.

For bobbin thread, I tend to use lightweight threads, such as Wonderfil’s Deco-Bob (80 wt) or Invisifil (100 wt), or Bobbinfil (70 wt). Update: ALso Fil-Tec Magna Glide Classic pre-wound bobbins (60 wt) — love those!! I have used normal 40 wt thread in the bobbin, but I hate having to change bobbins so often with that 😉 On one lap quilt, I used King Tut in the bobbin and the top – I had more than 10 bobbin changes (I think it was about 12) for that quilt, whereas when I use Deco-Bob or Bobbinfil, I can often get a lap quilt done with just two bobbin changes. And with Invisifil, even fewer (though I think Invisifil is a little thin for a quilt that’s going to be used a lot – it’s good for art quilts, though).

Remember, this is MY experience with MY machine. Your experience with these threads differ. Always test on a scrap sandwich and adjust tension and needle size if you can’t seem to work with the thread.

See also:

threads_catalog02


Oiling the bobbin area on the Handi Quilter Sweet Sixteen

2 12 2012

I couldn’t find any videos on where to place the SINGLE drop of oil when oiling the bobbin area on the HQ Sweet 16, so I decided to take some photos to share.

Firstly, HQ recommend you clean and oil the bobbin area after every two bobbins, but I do it after every bobbin change as I tend to use 80 wt bobbin thread, so I stitch for a much longer time with a single bobbin than if I was using 40 wt thread.

I also only put ONE drop of oil in the bobbin area, then I stitch on my scrap sandwich to make sure the tension is OK and to get rid of any oil residue that may occur (it rarely does, but sometimes I’ll get a patch of oil for about 10 stitches on my scrap sandwich).

  1. Remove the bobbin case and bobbin from the bobbin area.
  2. Use the brush to brush out any fluff, lint, etc. from the bobbin area and from the bobbin case.
  3. Pull the nozzle end of the oil bottle to extend the nozzle fully.
    Oil bottle as stored

    Oil bottle as stored

    Oil bottle with nozzle fully extended

    Oil bottle with nozzle fully extended

  4. Remove the nozzle cap and carefully place it where you won’t lose it.
  5. Squat down (or bend or kneel) and look under the table at the bobbin area. (Easier alternative: Unscrew and remove the needle plate and go in from the top.)
  6. Place the nozzle at about 7 o’clock on the first groove of the bobbin area.

    Squeeze ONE drop of oil at the 8 o'clock position

    Squeeze ONE drop of oil at the 7 o’clock position

  7. Squeeze gently so that only ONE drop of oil goes into that area.
  8. Put the cap back on the nozzle and push the extended nozzle back into the oil bottle. (See the update for Feb 2020, below, for alternatives)
  9. Replace the bobbin in the bobbin case (remember, the thread goes over the top of the bobbin and hangs to the right as you place the bobbin into the open side of the bobbin case).
  10. Test and adjust the bobbin tension, as required.
  11. Gently push the bobbin case into the bobbin area until you hear it click in place.
  12. Do some stitching on your scrap sandwich to test the tension and to get rid of any excess oil (there shouldn’t be much).
  13. Start quilting!

See also this 6-minute video from Jamie Wallen on oiling the bobbin area of a long-arm quilting machine: http://www.youtube.com/watch?v=xNH06ILNPpU

Update Feb 2020: Helen Godden recently did a Handi Tip video for Handi Quilter (https://www.youtube.com/watch?v=YCfCMU1bRDQ) where she advises to leave the tip extended, keep the bottle in a cup so it doesn’t tip over, and to get a new bottle of oil when the oil becomes yellow. As you can see in my photos above, my oil was always yellow, right from when I bought my machine in 2012—eight years on, and it’s still the same colour.


Changing the light ring on the Handi Quilter Sweet Sixteen

19 11 2012

I wrote these instructions for me, in case I ever have to do this again.

DISCLAIMER and NOTES:

  • I’m not a HQ dealer or service person — just a user of their Sweet Sixteen quilting machine. So while these instructions suit ME and MY machine, if you follow them on your own machine, you do so AT YOUR OWN RISK.
  • Only do this if you have explicit permission to do so from your dealer and/or Handi Quilter, as you may void your warranty.
  • This is a FIDDLY procedure, so if you live reasonably close to your dealer, get your dealer to do this for you as they have all the specialist tools for the job, and will have experience in doing it. The only reason I did it myself was that it’s a 3+ hour round trip to my dealer.
  • If you do it yourself, you may find it easier to access the relevant parts of the machine if you take it out of the table and CAREFULLY lay it down on its side or its back end. I did it with the machine in situ — i.e. in the table — and found it very awkward to get to all the places. Update: Another light ring went… This time I replaced it by lying the machine on its side with the left side uppermost. It was much easier to change out the light ring than doing it in situ. Further update: Here’s a photo of how my dealer does it — she lays the machine on its back:
    hq_light_ring_back
  • If your machine is still in its warranty period, you may find that the replacement light ring is at no cost. However, you may incur labour charges, depending on where you live.

You will need:

  • a replacement Handi Quilter Sweet Sixteen light ring (not available commercially, as far as I know — only available from your dealer or perhaps direct from HQ)
  • one small Philips head screwdriver, preferably with a magnetised head (the screwdrivers that come in a small pack for computers/electronics are ideal)
  • several types of tweezers; needle-nose tweezers (like surgical tweezers) are ideal
  • about 15 to 30 minutes of spare time
  • lots of patience and the ability to sit/squat on the floor for several minutes at a time and do things by touch (if you don’t take the machine out of the table)

First things first — this is what the original light ring looks like (front and back views); the red arrows indicate the screw holes and the green arrow shows the connector. (NOTE: As at May 2013, Handi Quilter source their light rings from a different manufacturer. These newer light rings look slightly different to the pictures below, but the screw holes, connector pieces, and these instructions remain the same.)

Front view of light ring

Back view of light ring

To swap out a faulty light ring with a new one (these instructions assume you’re changing the light ring with the machine in the table):

  1. TURN OFF YOUR MACHINE and move your chair out of the way.
  2. Remove the needle.
  3. Sit on the floor where your chair normally goes. (If you’re lying the machine on its side or back, you don’t have to do this, obviously.)
  4. Using the small Philips head screwdriver, unscrew the two small screws on each side of the light ring.

    Side screws (left and right arrows) and front and back screws

  5. Now unscrew the two small screws at the front and back of the light ring. These are longer screws and hold the plastic cover in place. The back one is particularly awkward to get to if the machine is in the table — you’ll have to find it and unscrew it by feel alone as you can’t see it.
  6. When you unscrew the last screw, the plastic housing over the light ring and the light ring will drop a little as there’s almost nothing to hold it up. However, it’s still connected to the machine, so DO NOT try to pull it down.

    The loosened light ring and plastic housing

  7. Next, disconnect the connector at the back left of the light ring. Again, this is very fiddly as the connector is very small and the wires that connect to it are VERY short. Use tweezers to grab the top part of the connector and ‘unclick’ it from the housing in the light ring. Be careful that you don’t put any downward pressure on the connector wires/piece as you don’t want to damage these wires.

    Green arrow points to the connector wires

  8. Once the connector has been disconnected, gently lower the plastic housing and light ring to the table. You can see how short those wires are and how small the connector piece is!

    Connector at rear of foot/needle housing

  9. Please check that the faulty light ring’s plastic connector housing is still attached to the light ring. When I did my second change out, the connector piece on the light ring remained attached to the connector on the machine and so I couldn’t reinsert it into the new light ring with that piece still attached. So, look at the light ring that you’ve taken off and make sure that the little plastic connector housing is still attached to it (see the picture of the back view of the light ring before the start of these steps–the plastic connector housing is arrowed in green). If it isn’t attached to the light ring, use tweezers to pull it off the connector on the machine and put it back on the faulty light ring, making sure the pins go in the same direction as those on the new light ring.
  10. You probably can’t get the faulty light ring out from under the foot, so you get your fingers underneath the foot and lift it a tad. Once lifted, slide the faulty light ring out and slide the new one in, leaving the plastic housing where it is. Make sure you put in the new one, not the old one!
  11. Make sure the replacement light ring is facing the correct way — lights facing down and the connector at the back left when looking at the machine from the front. Slot the light ring into the plastic housing and screw in the two side screws (these are the short ones) to connect it to the housing.

    Screw the side screws into the light ring to secure it to the plastic housing

  12. Now here comes the REALLY tricky/fiddly/awkward bit. Lift the plastic housing up almost to where it normally goes. Using tweezers, grab the loose connector piece and slot it into the connector on the light ring (you may have to reach from the right behind the foot/needle housing and go around the back to grab the loose connector piece). Use the tweezers to push it in. Did I say this was fiddly? If you have someone else to hold the plastic housing you may find it easier to connect the light ring to the machine. But there’s no getting away from this step being the most difficult and awkward.
  13. Once the connector is connected, test it before putting the remaining screws back in. Turn on your machine and see if the light comes on as it should. If it does, congratulations — you got the connector properly connected! (NOTE: If the light doesn’t come on, first check that it’s turned on in the control panel — you may well have turned it off when the lights were flickering. Touch More then Options and then the icon for the lit light bulb.) If it still doesn’t come on, the connector hasn’t connected properly so repeat the previous step.
  14. Turn the machine off again and screw in the remaining screws (front and back). Screw in the front one first. The back one is the hardest to screw in as you can’t see what you’re doing and will have to go by touch alone.
  15. And you’re done! Put your needle back in, turn on your machine, and off you go.


‘Open headband’ quilting motif

17 11 2012

I don’t know where I learned to do this quilting motif that I call ‘open headband’ — perhaps Leah Day’s Free Motion Quilting Project, or maybe Diane Gaudynski’s excellent book on free motion quilting, or perhaps Helen Godden’s DVD, or maybe my own variation of techniques learned from all three. Anyhow, I use it often and find it a very relaxing motif that can be quilted large or small and that fits into all sorts of places.

Several people have asked me to share how I do it, so today I got a piece of paper and a Sharpie and took some (very amateur) photos of how the motif goes. I realised I’m much better on the Sweet Sixteen than I am with my drawing! But hopefully this will help you get started.

General tips:

  • Start this motif near the centre of the quilt and move out in an overall circular direction — this flattens out any wonkiness and pushes puckers out to the edge. Don’t be tempted to fill a quarter of the quilt, then move to another quarter — if the quilt is even slightly wonky, you may end up with puckers and pleats in the middle of the quilt.
  • While I mostly do three hops around the arc, sometimes I do four so that I don’t end up with a long streamer of these motifs all going in one direction across the quilt. The fourth hop allows me to go off in a different direction, thus covering the quilt in an apparent random fashion.
  • Use the ‘needle down’ position on your machine. If you have to stop in the middle of an arc or at a point, then you’ll be able to start again without being a stitch or two ‘out’.

So here are my photos with some instructions.

Start by stitching a semi-circle/arc near the centre of the quilt (the arrow shows the direction I use, but go in whatever direction feels comfortable to you):

At the end of the arc, stitch another arc back towards your starting point, but not quite coming even with it. Echo the general semi-circle shape, but don’t try to echo at a specific distance from the original arc (my drawing below shows a VERY uneven second arc!):

Now bounce back with a third arc extending from the end of the second arc. Again, you’re following the arc’s general shape, but you’re NOT trying to get an even distance from it:

You’ve now done what I call ‘three hops’ — the arc and two echo lines. Next, you create a new ‘headband’ by starting a new arc at an angle off from the end of the third arc; I try to put this arc next to the earlier one so that I don’t end up with awkward gaps later — in other words, I fill the empty spaces as I go:

After creating the second arc, stitch two more echoing arcs around it, just like you did for the first one:

At the end of the third echo, bounce out in a different direction to create another small arc and echo it just like the previous two:

To stop you going off in an overall diagonal, this time do a fourth echo (not the three you’ve done previously):

At the end of the fourth echo, bounce out in a different direction to create another small arc and echo it just like you’ve done with the others. You should only need three bounces this time, though there’s no hard and fast rule:

Create the next arc off the end of the third echo point, and keep going creating arcs and three or four echoes until you’ve filled the entire area or the whole quilt!

And here’s an example of it finished (you can see that I’m much more even on the machine than with a pen!):


Overlay taped onto HQ Sweet Sixteen table

15 11 2012

For those who were asking… Here’s a quick photo of my Handi Quilter Sweet Sixteen overlay taped onto the table, using painters tape.

And my thoughts on the overlay and the HQ Sweet Sixteen table height differential:

I have the overlay for my S16 so I feel I can offer some thoughts from a position of having used it as versus looking at pictures on the internet and assuming I know what it does etc.

It’s retail price in Australia was about $100 (I think it was $99). I don’t know what the price is in the US.

Do I regret buying it? Not a bit! Do I use rulers? Hardly at all. Did I use the SupremeSlider? Yes, but I don’t now. Were my quilts getting ‘caught’ occasionally on the table? I didn’t think so, but since having the overlay they move much more smoothly over the surface and therefore under the needle. The overlay is not a laminate or melamine – I don’t know what it is, but it’s very smooth… much smoother than the SupremeSlider. I’ve also sprayed the overlay with silicone spray and that makes it doubly as smooth.

Did I try various methods of lowering the height of the machine? Yes, but with little success (anything paper-based was going to squash down over time), and removing the rubber feet was awkward (though likely a one-off task). Why did I want to lower the machine (or raise the table)? Because there are two issues – one was that the machine base was just a tad too high (and this affects ruler work, but remember, I rarely use rulers); the other was that there’s a slight gap between the table and the machine as there has to be as the machine throat base is slightly curved and table is square. And sometimes a quilt gets caught in that gap. And lint gets caught in that gap. With the overlay, there’s NO GAP for anything to get caught in and the height difference between the machine and table is eliminated.

Could HQ design a better match between the table and the machine? Perhaps. But from what I’ve been reading here, some people say the height is too high by 1/16 or 1/8 or ¼ an inch, while others say it’s too low by similar amounts. How does HQ deal with that? To be honest, I think the real problem that HQ have is with the rubber feet. If those feet come from the manufacturer in slightly different sizes or are screwed in slightly differently from one machine to another, then each machine will sit in the table in a slightly different way. If, for future purchasers, HQ raise the height of the table a tad, will it actually solve the problem if the problem is really with the height and setting of the rubber feet? And don’t forget that the feet may well compress a little over time, and you’d still end up with a height differential between the table and the machine again. Has anyone used one of these sit-down machines for 5 or 10 years – long enough to see if the feet compress over time?

As far as the Tiara is concerned, I’ve only seen the same pictures/videos on the internet that people have shared over the past few days. And as someone who has the overlay, I can categorically state that all the pictures/videos of the Tiara I’ve seen ALL HAVE THE OVERLAY. Babylock have done nothing different with the table that I can see.

One final thing about the overlay… My dealer advised me NOT to secure it permanently with the tape that’s supplied as she said it WILL tear the laminate on the table top if ever I wanted to take the overlay off. I followed her advice and have it secured with about 10 small strips of blue painter’s tape (see above), which I can add/remove at will – cheap, quick, easy. Though having used the overlay now, I would never go back to quilting on the ‘bare’ table.

Remember, I don’t do ruler work but in my opinion the overlay is worth every cent I paid for it. And in my opinion it’s an optional extra (like in a car), just like the TruStitch is an optional extra.


Quilting Adventures Spring Seminar: Day 4: 7 March 2012

8 03 2012

Wednesday 7 March 2012

Lots of progress on our art quilts today! I’m ready for the fabric painting tomorrow and then stitching. If I’m lucky I *might* have it close to completed by Friday when we finish up at noon. But then, I thought I’d be at the painting stage by about noon today.

I’m having heaps of fun! The gals in our group are a great bunch, and I’m getting to know those on my table and those at the next table across quite well. We were in fits of laughter over some silly thing today.

My piece is starting to come together and I’m feeling much happier about it. I changed tack a bit today — I removed the clouds from my piece and replaced them with another range of hills, and I decided to not try to emulate the difficult needle-like casuarina trees, instead opting for a stylised representation of them with overhanging ‘pods’.

Just so I don’t forget the process, here’s a summary of the steps:

  1. Poster-size photo, taped together.
  2. Clear plastic taped over the photo and draw with a fine Sharpie the outlines where the tones and colours change in the photo.
  3. Pull the photo out, flip it over and put it back under the plastic.
  4. Tape together freezer paper (on the back, cut off excess paper where it’s taped together).
  5. Tape freezer paper down over the plastic and draw the outlines again, this time with an ultra fine Sharpie. This is the pattern.
  6. Tape white muslin over the freezer paper and transfer the outlines to the muslin using pencil. This is where the fused pieces will go.
  7. Mark the pattern with color shades (use a color chart of swatches if you want).
  8. Cut out a section of the pattern at a time (using an Exacto knife) and iron it on the front side of the fabric you want to use.
  9. Using an 18 mm rotary cutter, cut loosely around the edge of the pattern piece on the fabric. Leave about 1/2 an inch.
  10. Iron MistyFuse on to the back of that fabric piece — cut the MistyFuse to the size of the fabric so there’s no excess that will gunk up the iron. Iron between two sheets of parchment (baking?) paper — it releases the heat much quicker than a Teflon ironing sheet).
  11. Using the 18 mm rotary cutter, cut closely around the fabric and pattern piece. Peel off the pattern piece.
  12. Place the fabric right side up on the muslin, and, when you’re happy with it, fuse it down with the iron.
  13. Cut out other smaller pieces from that pattern and finish off that section.
  14. Only do one small section at a time, otherwise you’ll get lost and will just have a massive jigsaw puzzle to sort out!
  15. After fusing everything down (this could take a couple of days, depending on the size and complexity of your photo!), you’re ready to use fabric paint to soften edges, add shadows, add highlights, deal with the tiny details you can’t do easily with fabric, etc.
  16. Once you’re done with the paint, you’re ready to stitch. You can either do surface stitching (thread painting) first if it’s likely to be very dense, or go straight to applying the batting and backing and then doing the free motion quilting.
  17. Square up the quilt, add borders and/or binding. (If you’re adding borders, hold off on putting on the batting and backing until after you’ve squared up the quilt and applied the borders!).

Lunch today was tacos, but we made them ourselves from all the supplied ingredients, which means you could eat as healthily or as unhealthily as you wanted to! Also, chicken tortilla soup. I’m impressed with the meals here — they DON’T dress the salads, or add gravy or similar to meals. They leave that for the individual to add. And it’s pretty much all REAL food too — very little that’s processed. Lots of fresh fruit all the time, too, even at the coffee stations outside our rooms.

Dinner is early tonight, then we go to The Quilt Haus for some exclusive shopping 😉

Later… Dinner was Chicken Cordon Bleu with peas and potatoes and a tomato and basil soup; there was something for dessert but I didn’t even look at it.

After buying a few metres of fabric at The Quilt Haus (well, it *is* half the price that we pay in Australia AND there was 10% off!), we returned to the resort and a few of us went back to our workshop room to continue working on our projects. I started my fabric painting and I want to finish that by mid-morning tomorrow so I can start sewing!! No, I haven’t touched a sewing machine, thread etc. the entire time I’ve been here!

Oh, BTW, Kim announced the 2013 faculty for the Quilting Adventures (www.quilting-adventures.com) seminars and retreats after dinner this evening, and it’s an impressive line-up:

  • March 3 to 8, 2013: Gail Garber, Katie Pasquini Masopust, Paula Nadelstern, Cindy needham, and Michelle Watts
  • March 10 to 15, 2013: Robbi Joy Eklow, Rayna Gillman, Lyric Kinard, Velda Newman, and Terry Waldron.
  • June 3 to 6, 2013: Susan Brubaker Knapp (I’d LOVE to attend this one!)
  • September 19 to 22, 2013: Susan Cleveland.

Click on the small photos to see them larger; the first ones (the completed ones!) are some of Lenore’s work — the others are the work of those in my group, and mine: