QV2016: Day 14: NYC to Houston

2 11 2016

Up early this morning to check out of the Millennium Broadway hotel and get on the road to LaGuardia Airport. There’s MAJOR construction going on there, so it was a bit confusing for our poor bus driver, but we got there in the end, got checked in without any hassle, and with plenty of time to spare to grab some (expensive and crappy) breakfast and/or lunch at the airport.

Our flight to Houston left a bit late, and there was a terrible noise in the plane coming from what sounded like a dog barking, but was most likely a pump not working correctly. Obviously the pilot and flight attendants weren’t worrying about it, and once we took off, the noise stopped. It started up in a big way when we landed, though. The flight was uneventful. Some of the girls slept, others chatted, or made hexies, or read. Finally, we were in Houston for the International Quilt Festival (IQF) — the ultimate reason for our trip!

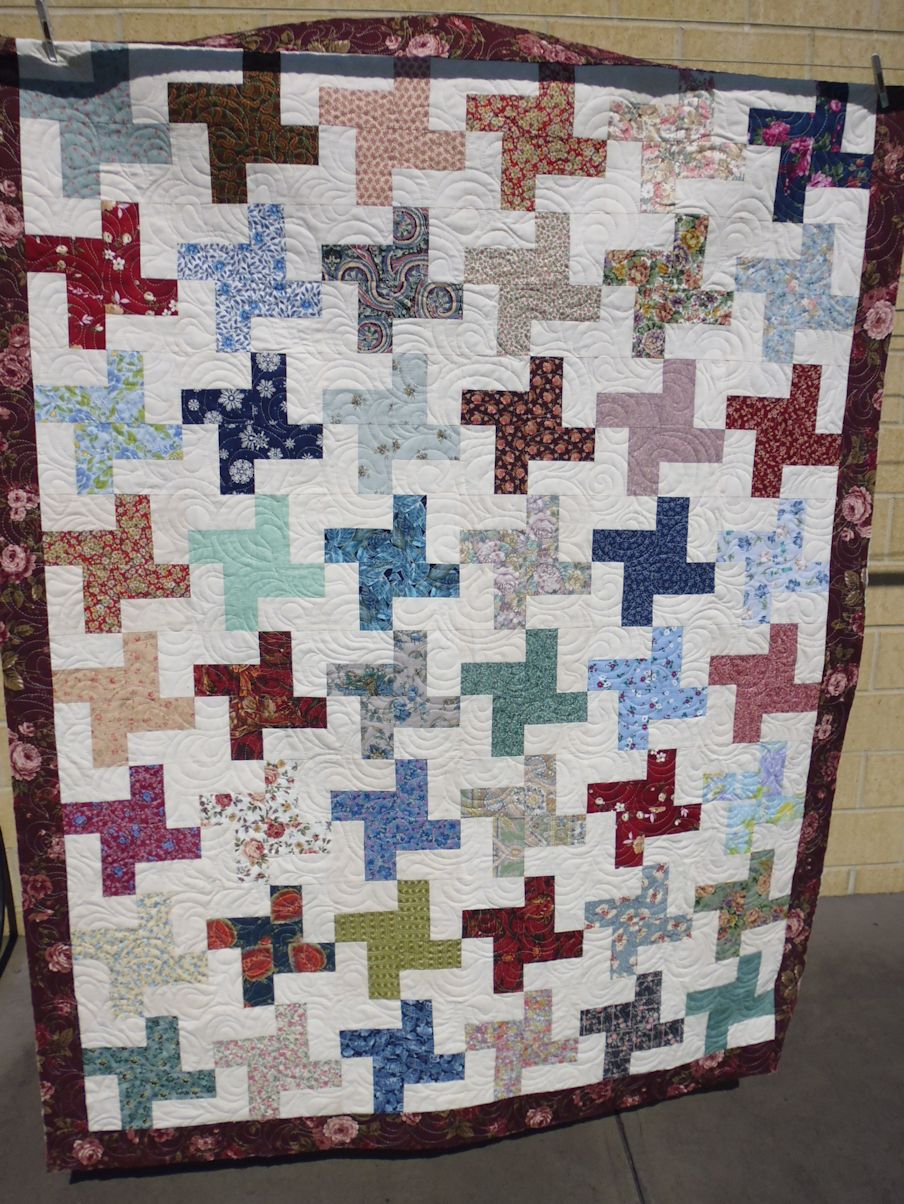
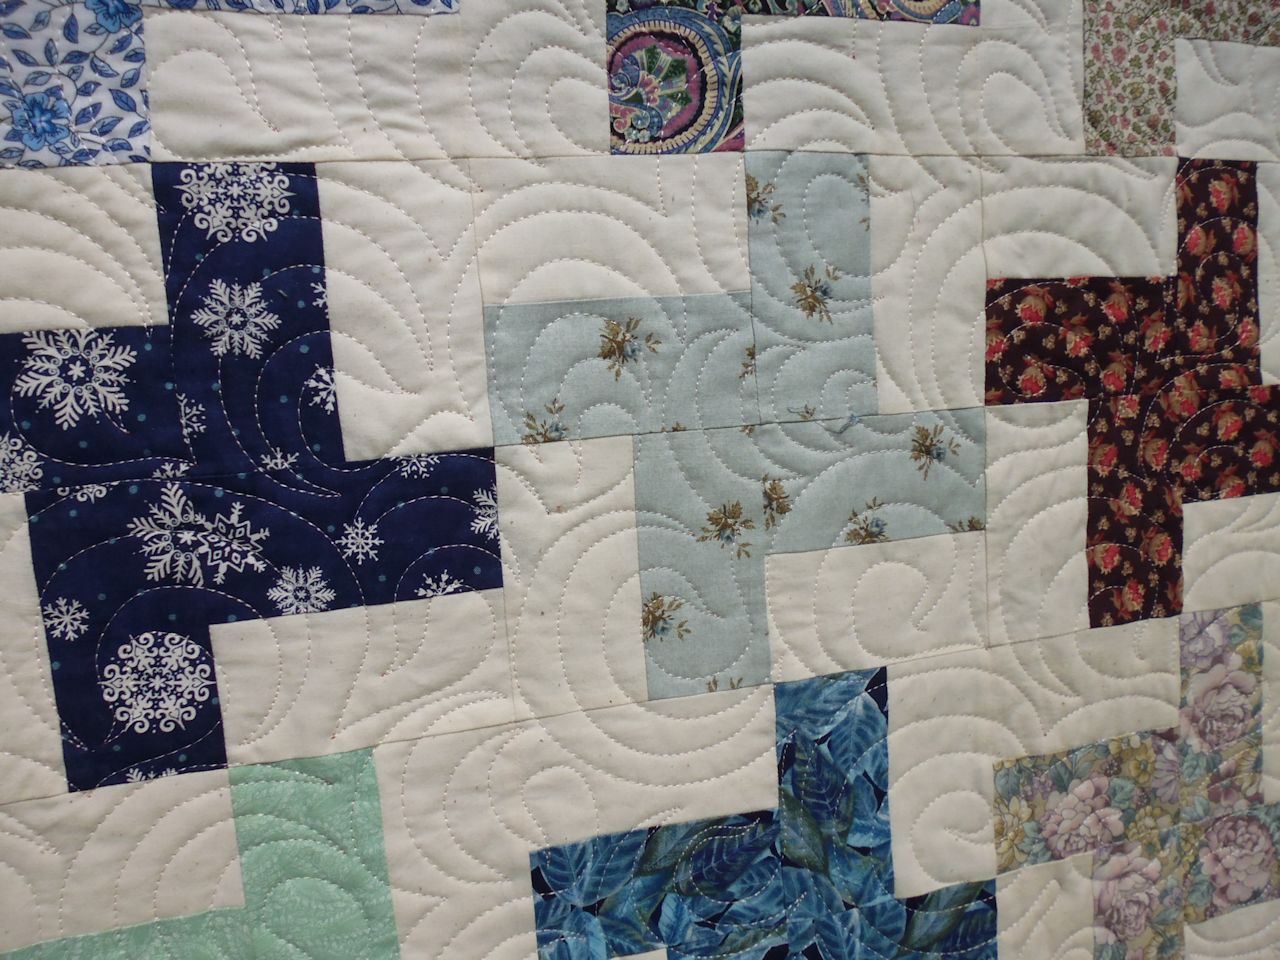
Once we’d checked into our rooms, we headed to the registration desk to pick up totes, pins, etc. then met again early in the evening to get in line for Winners’ Circle, where all the Festival prize winners are announced and the winning quilts in each category are revealed. Wow! What a stunning array of quilts. Some have taken thousands of hours (often years), thousands of pieces of fabric, and many kilometres of thread to make. The skill and artistry has to be seen to be believed. Every one has been made from fabric and thread, and what some of these artists can do with that medium is just phenomenal and truly inspirational.

If you’re a Houston resident and have never been to IQF, do yourself a favour and come along to the convention centre for a couple of hours from Thursday 3 Nov to Sunday 6 Nov 2016. Just come to view the quilts; ignore the vendor mall if you have no interest in it. I think it costs about $12 to enter.

(Oh, and one of our tour leaders, Helen Godden from Canberra, won first prize in the ‘Art – Painted Surface’ category, for her work [in collaboration with batik artist Jonathan S Evans of Colorado] — ‘Faces of India’. Way to go, Helen!!!!)

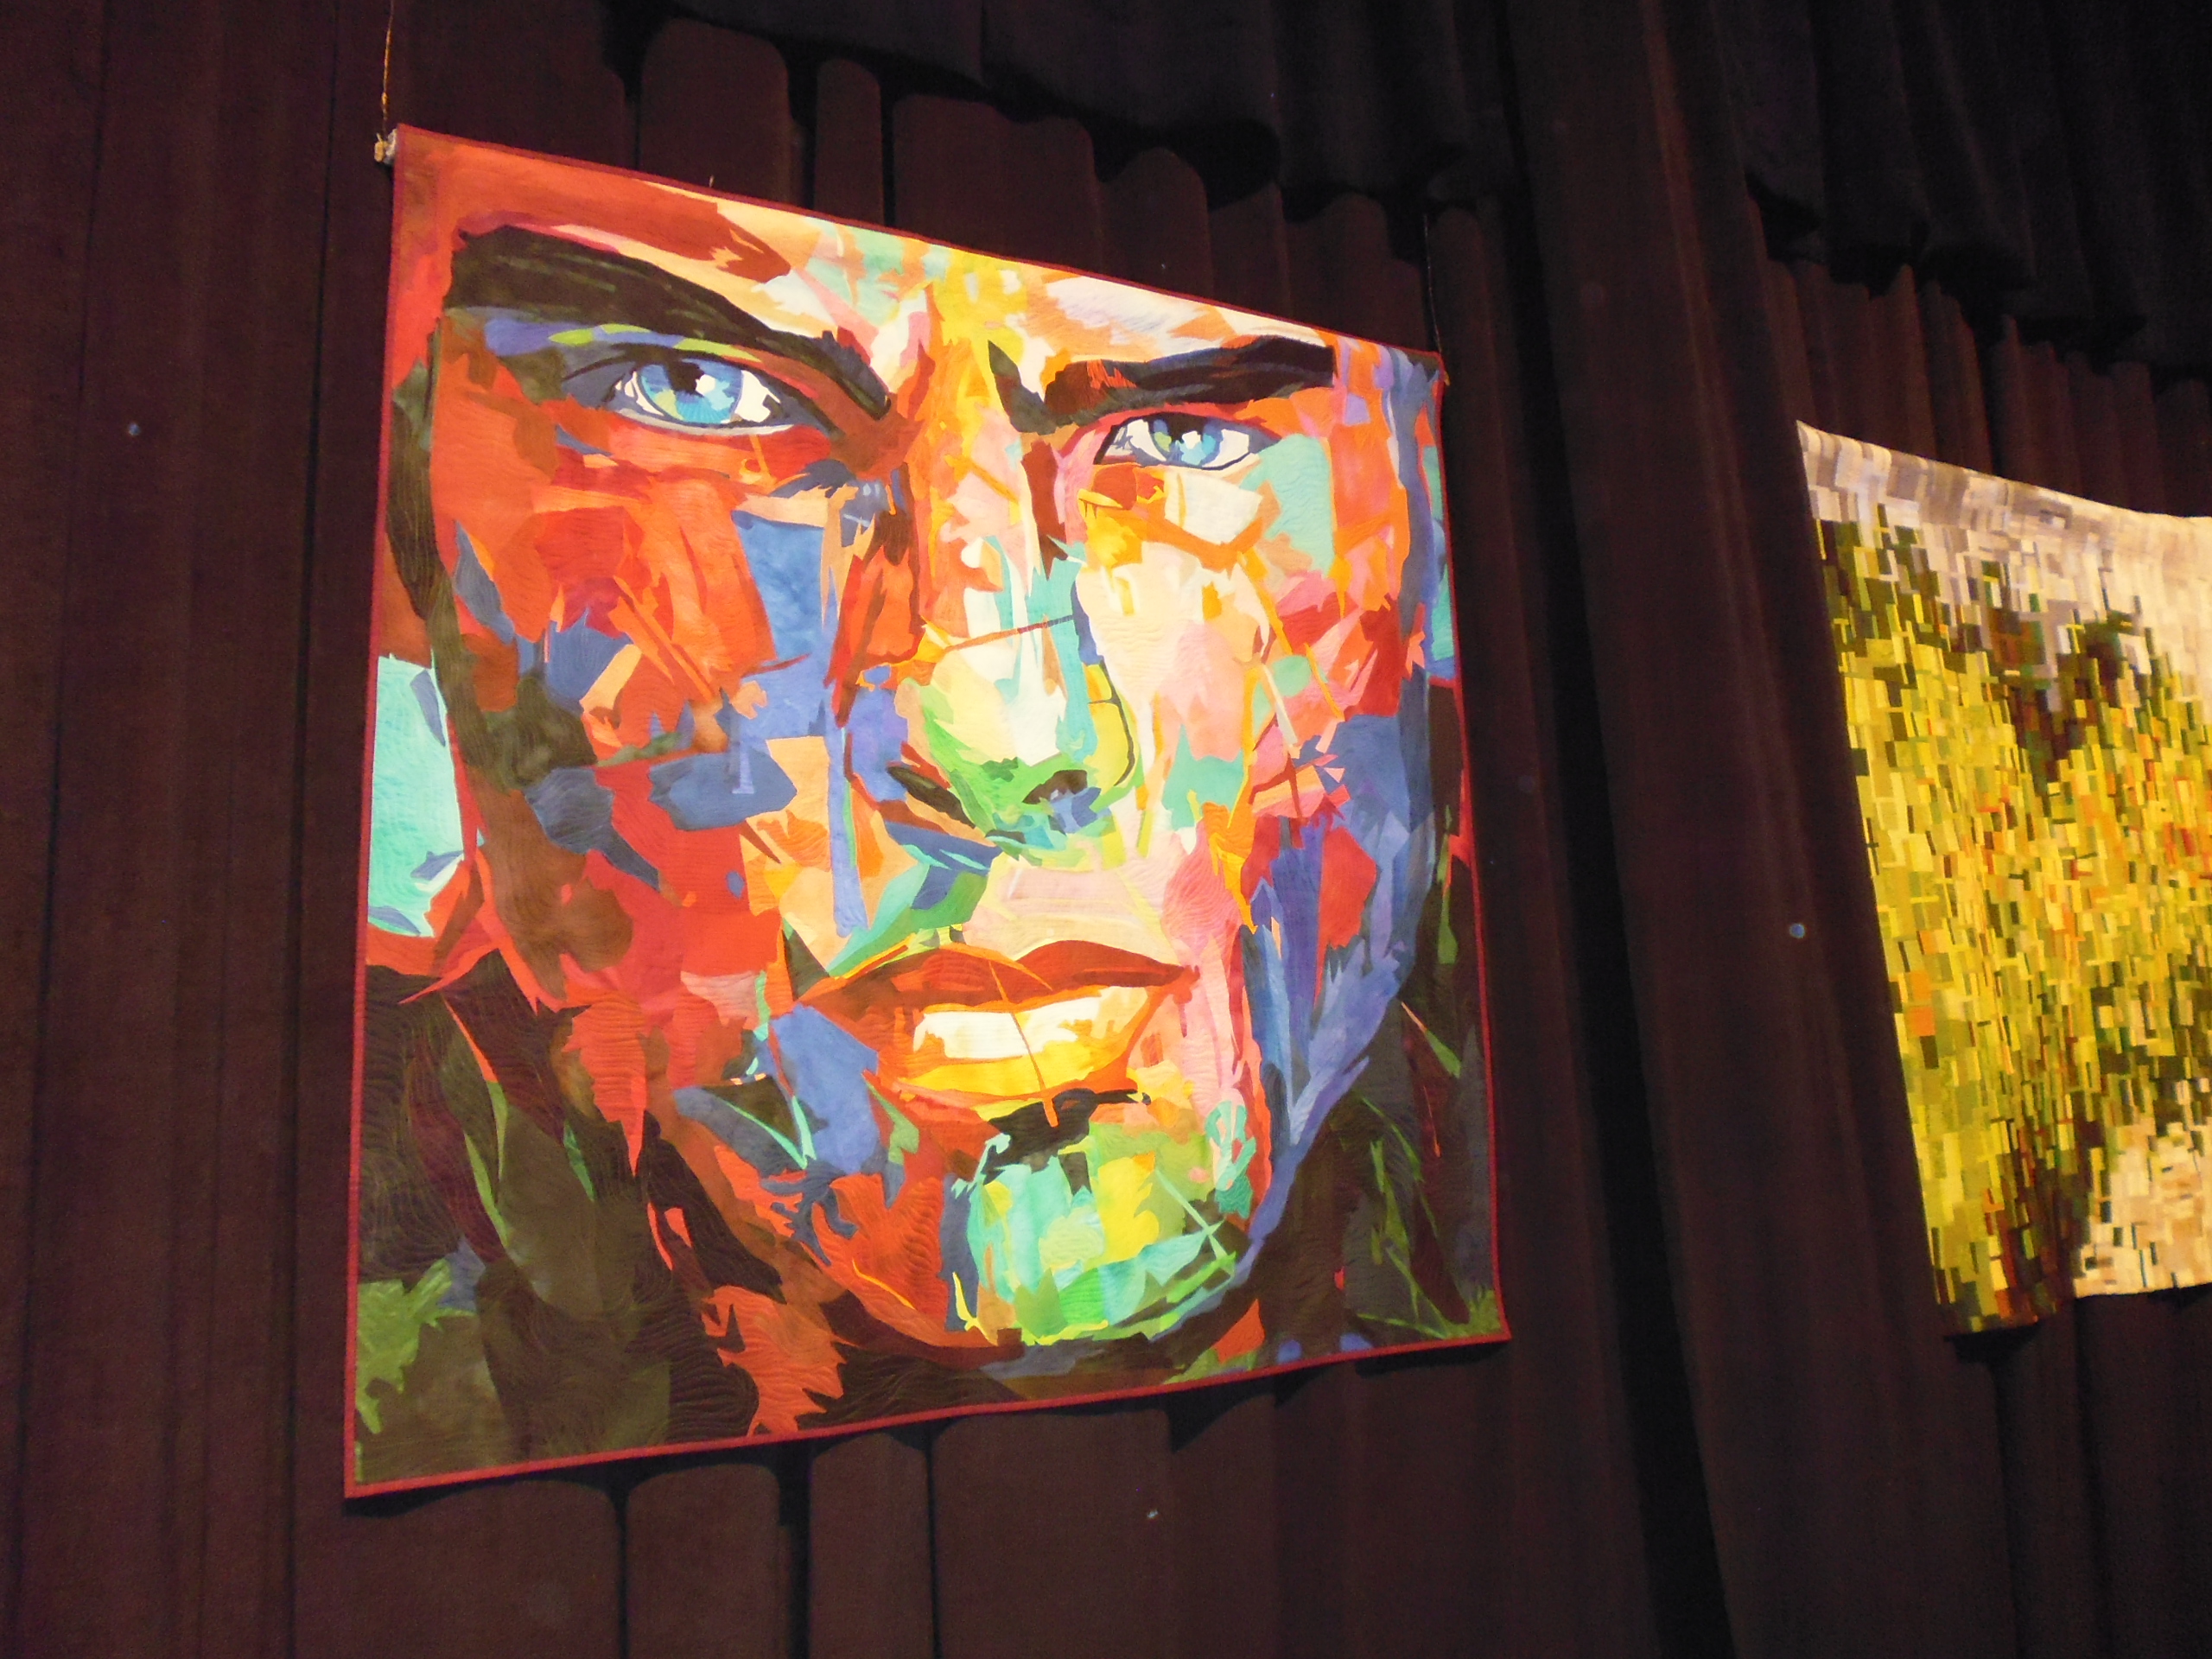
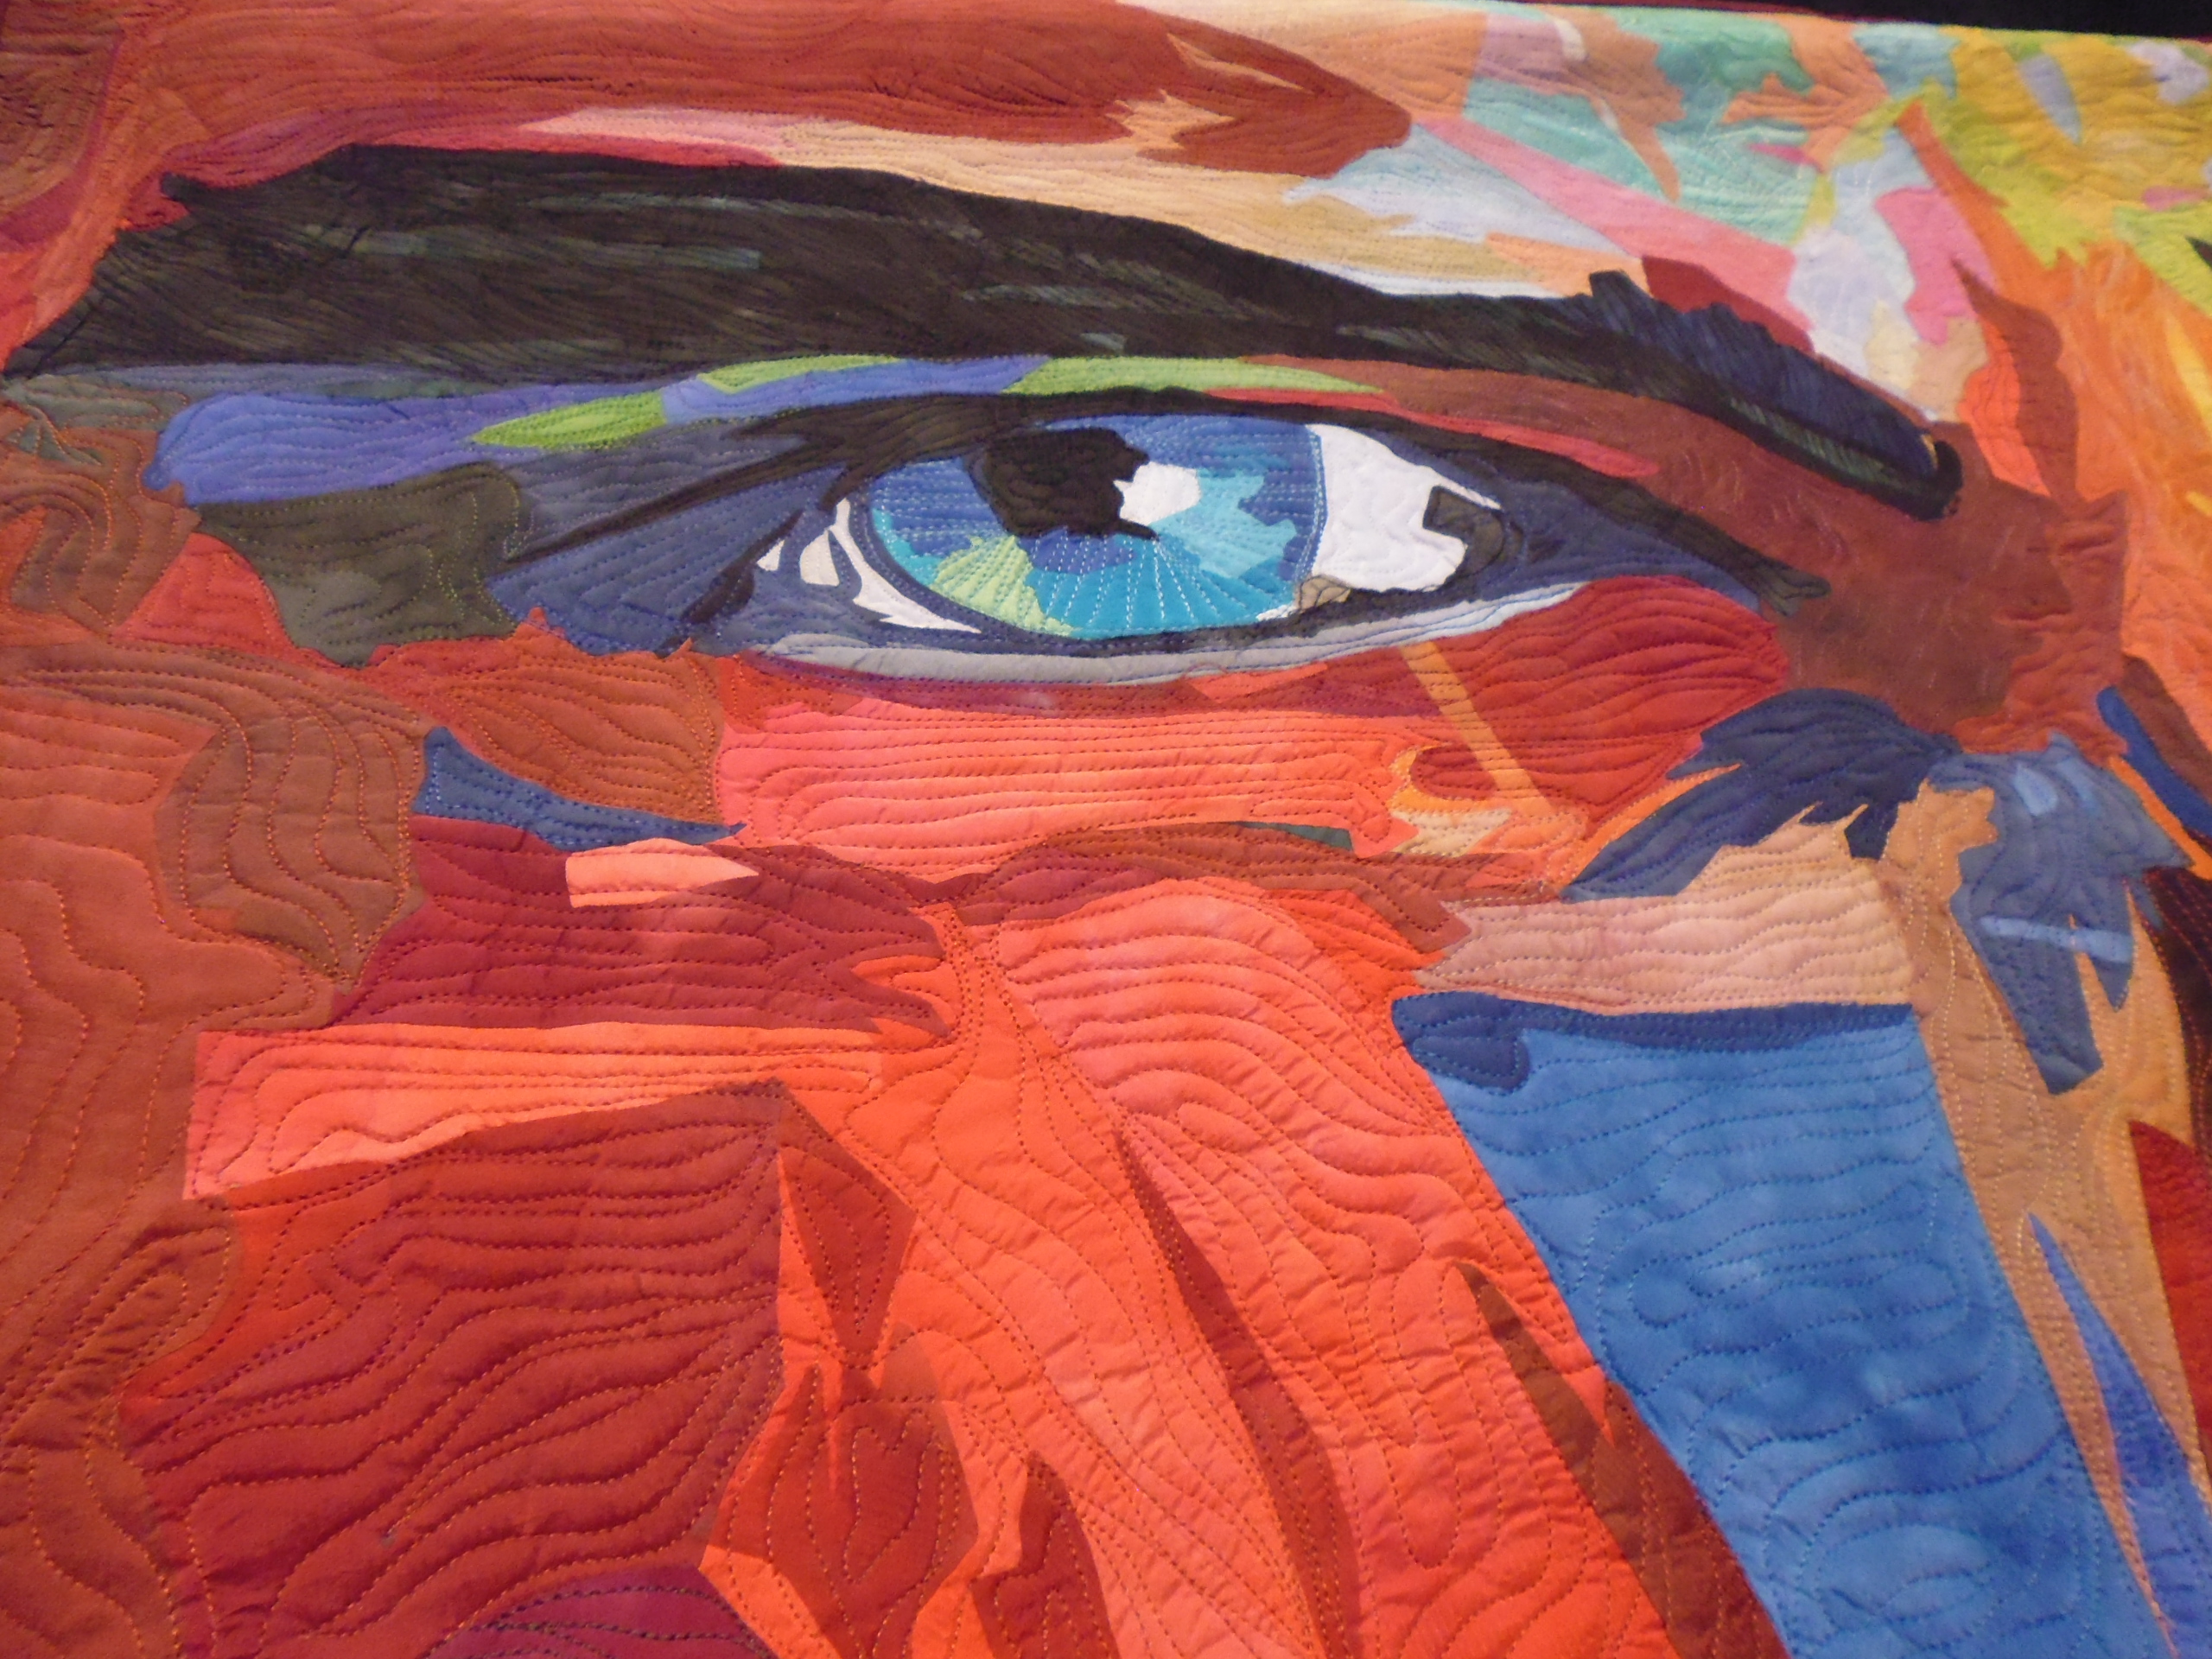
This quilt won the Gammill Master Award for Contemporary Artistry and $5000 cash at the Houston International Quilt Festival. Tell me this isn’t art! I absolutely love it. For those interested: It’s raw edge applique, machine stitched. And it’s BIG. ‘Unknown man’ by Marina Landi and Maria Lucia Azara (Brazil).

p1070373

p1070432

p1070434

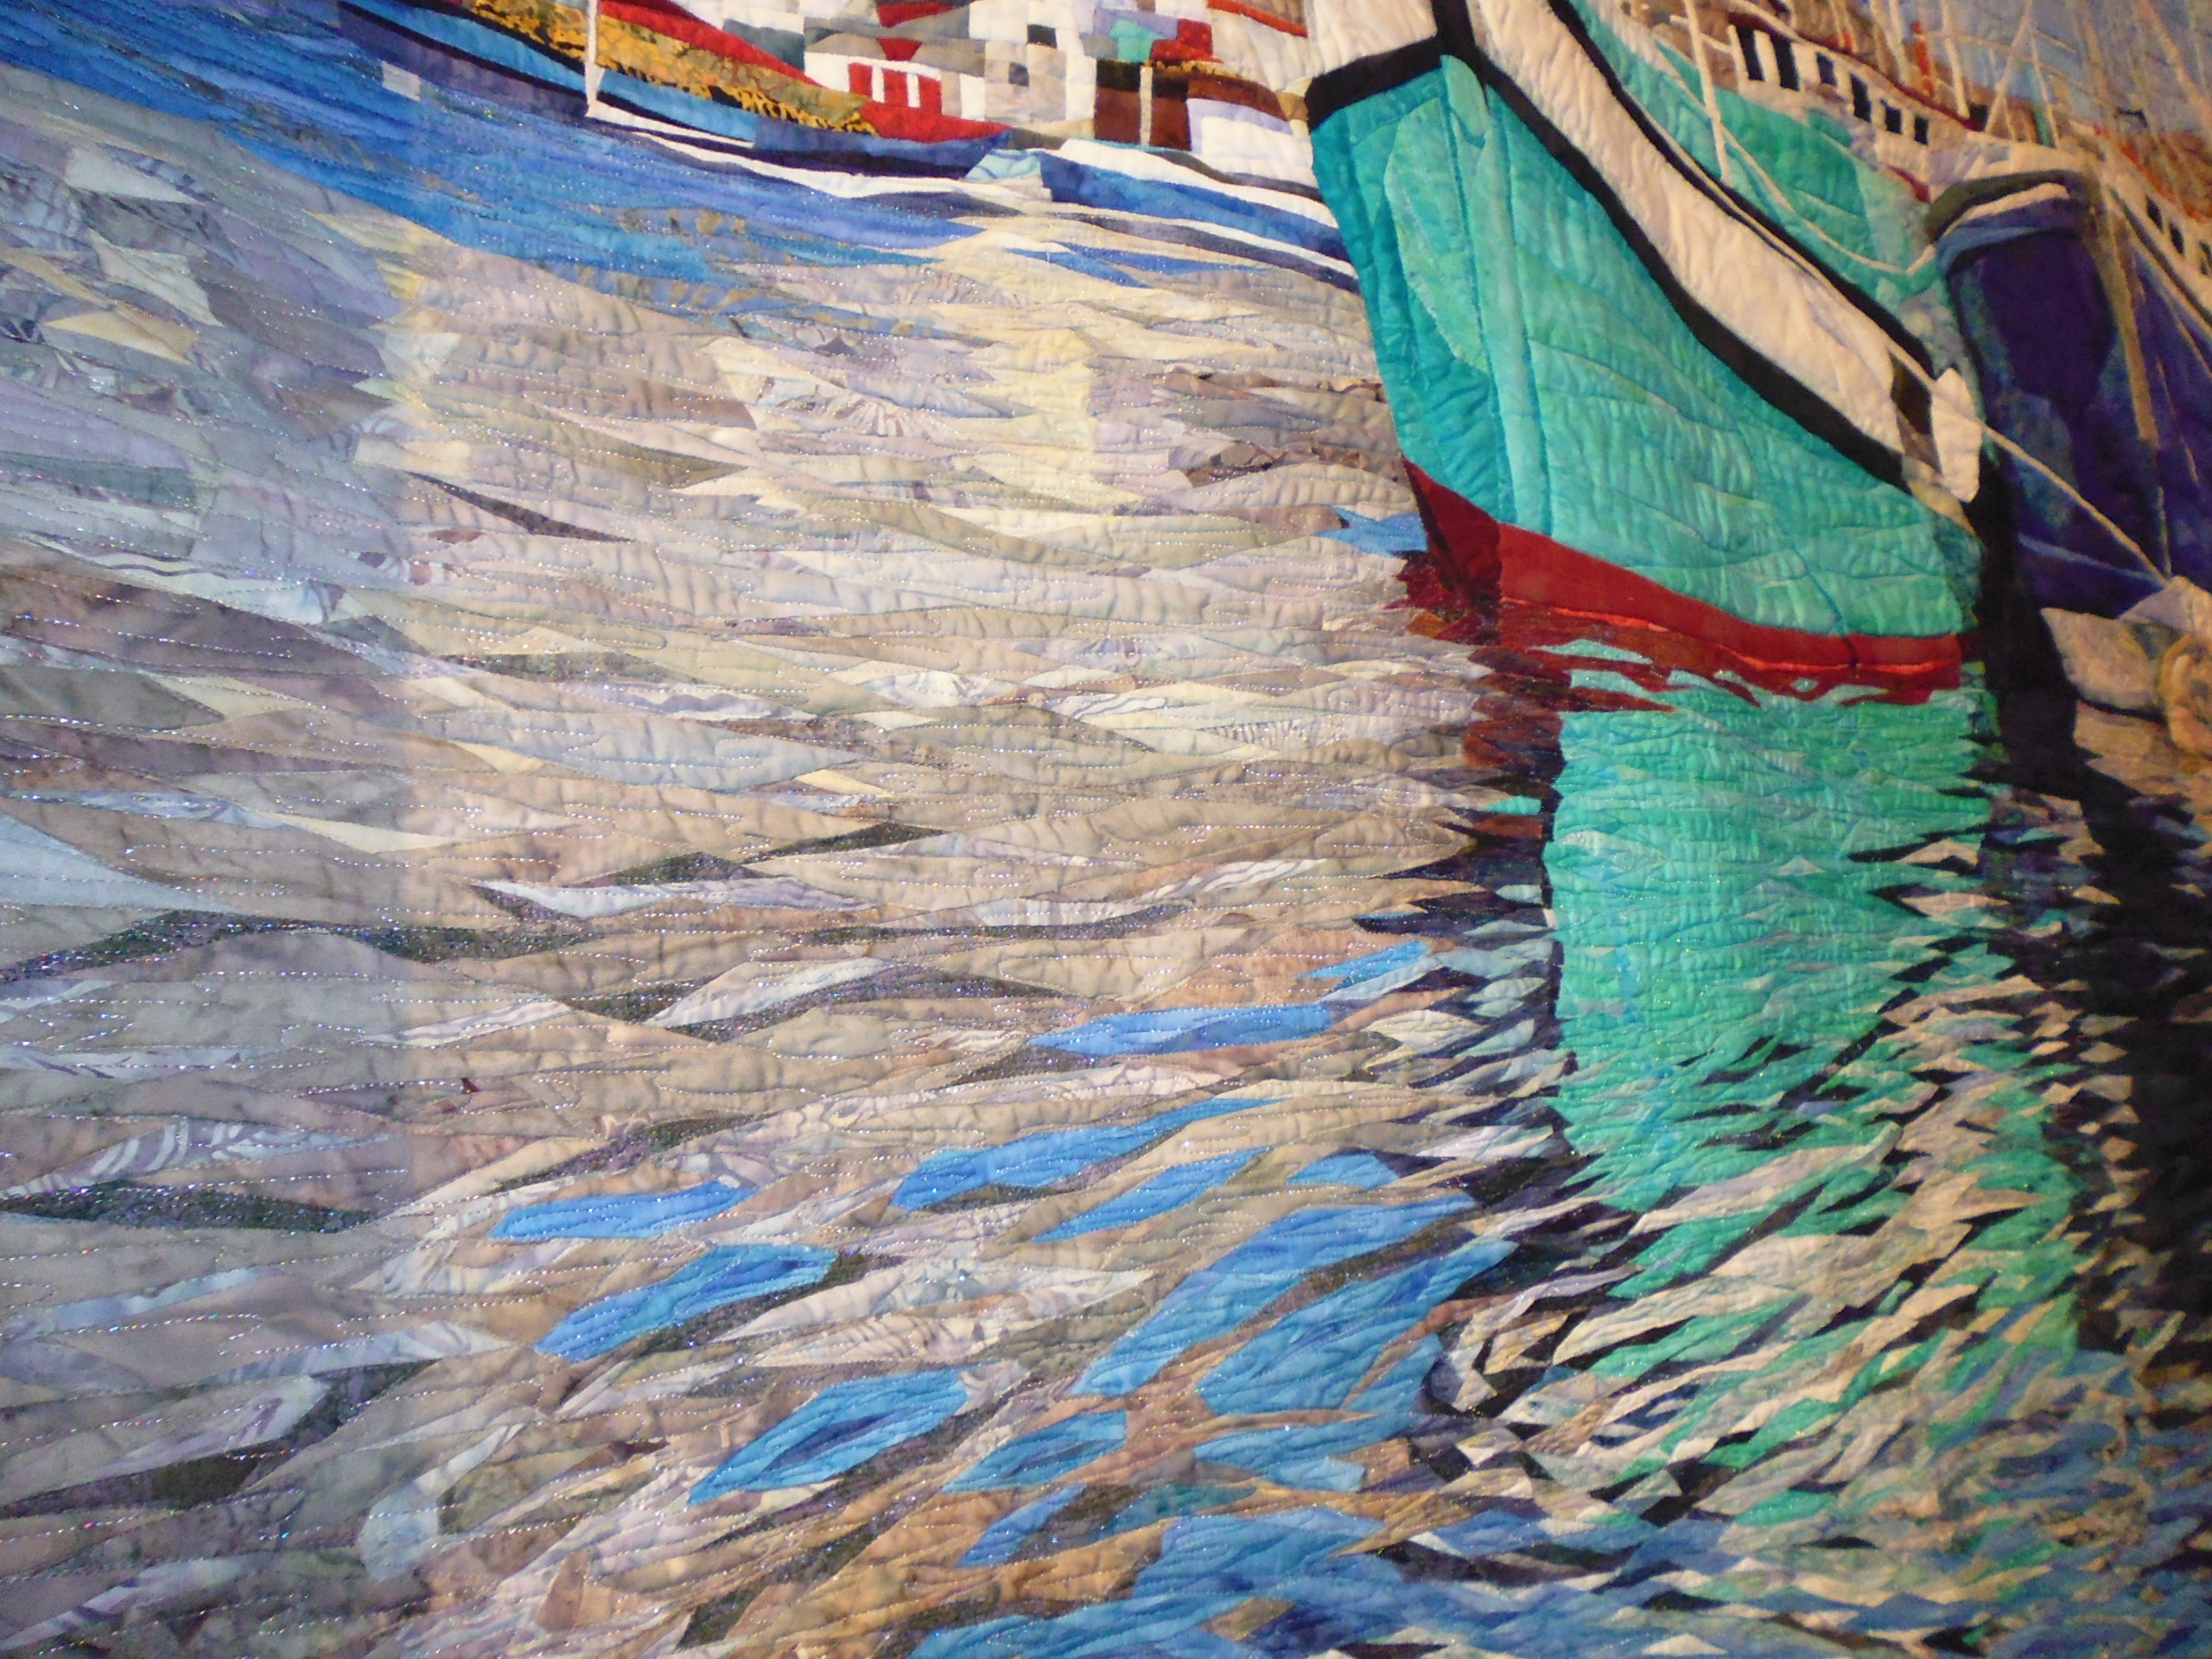
The quilt below won ‘Best of Show’ and a $12,500 cash prize. In her artist’s statement, she said it took her a year to make and she used some 8400 pieces of fabric. Look at how she’s captured the reflections in the water! Reflections of Cape Town, by Cynthia England (Texas).

p1070392

p1070393


QV2016: Day 10: Amish country — second day

29 10 2016

We had a ‘leisure’ day today, although almost everyone decided to join the group for a trip to Walmart and to an outlet mall (there’s nothing similar in Australia!). Many dollars were added to the local economy 😉 And many in the group acquired the super power of ‘extreme shopper’. Oh, I had another freshly made hot soft pretzel at Auntie Anne’s in the outlet mall — it was a jalapeno and cheese one and was SOOOO good.

Next stop was an out of the way place in New Holland, PA (Cedar Lane Dry Goods, 204 Orlan Rd) that seemed to mostly sell to the local Amish and Mennonite communities, based on the fabrics and clothing in their store. I could have bought a black cap worn by the females for $12.50, but didn’t. The big attraction for many in our group were the quilt tops made by local women — they all cost around $200 each for a queen bed size top, and were an absolute bargain at that price because I know how much fabric, time, effort, and work goes into making them. Many of the ladies will take them home and finish them off, adding the batting and backing, then quilting them, then adding binding. Some may just keep them as they are as an example of an authentic quilt from Lancaster County, PA. I didn’t buy one — I have enough quilts!

Our final stop of the day was a post office where some of the women sent home boxes of things they’ve purchased along the way. This wasn’t cheap. A single flat rate box with up to 20 lb of goods cost around $95 to send to Australia; some sent several. You could buy a suitcase at Walmart for about $30, then pay the excess baggage charge (say, another $30) and still be in front. However, you have to schlep that extra luggage, and for some that wasn’t an option.

I took very few photos today — the first two are of a car parked in the hotel car park, as viewed from the bus (Halloween is in a few days… at least, I hope that’s the reason he had the skeleton in there trying to get out!). The ‘doe in rut’ can was spotted in Walmart.

p1060991

p1060992

p1060994

p1060995


QV2016: Day 9: Amish country

28 10 2016

Today was spent in Lancaster County, PA. The group was divided in two, with Group A learning hand-quilting techniques from Lois, a Mennonite quilter at The Country Store in Intercourse, PA for the first half of the day, while Group B did an Amish farm and house tour. In the afternoon, we swapped activities.

I was in Group B. We started with a tour of a typical Amish house, learning about their history, some of their customs, their dress, their work practices, their dating practices, marriage and funeral practices, etc. It was really interesting. I think the most surprising thing I learned was that Amish women pin their clothes (e.g. aprons) together, and their prayer bonnets to their heads, with straight sewing pins!! Ouch!!! Buttons are considered ‘fancy’ for women, yet men’s trousers use buttons for the fly flap — that seemed a little inconsistent to me. Unmarried females wear white aprons, while married ones wear black; unmarried males are clean shaven, while married ones have beards, but never moustaches (something about the German soldiers from the 1600s who persecuted them for their religious beliefs having moustaches…). After seeing the house and hearing the history, we then travelled in a small bus around the countryside, viewing farms from a distance, and stopping in at a couple of places that sold things to the public — like quilts, and the OMG best-ever soft pretzel straight out of the oven I’ve ever eaten!!!!

After lunch, Group B met in The Country Store’s classroom, where Lois, a Mennonite, taught us hand-quilting techniques for several hours. What a lovely person she is! I always learn something from every class I do, even if the lesson is not to do that technique again, and so it was with hand quilting. Not my thing beforehand, and confirmed by actually doing it for a time. But I’m really glad I did it — first because we learned a bit more about Lois and the Mennonite beliefs, and because it was a good ‘bonding’ session with others in our group.

This evening we had dinner at a HUGE buffet restaurant (Bird in Hand, I think it was called) that was full of large groups, many of whom were much much older than those in our group, who, with only a couple of exceptions, are no spring chickens ourselves.

Some of my photos from today (it rained most of the day, so it wasn’t a good day for taking photos):

p1060981

p1060955

p1060959

p1060960

p1060966


QV2016: Day 5: Lowell, MA and Canterbury Shaker Village, NH

24 10 2016

We got on the road this morning, leaving behind the luxurious ‘The Langham’ in Boston, which had been our home for the previous four nights.

First stop was Lowell, MA, just up the road a bit from Boston. We were there for a special tour of the New England Quilt Museum by the curator. The special exhibition featured at the moment is a selection of red and green applique quilts from the 1840s to 1870s or thereabouts. These are held in a private collection of some 2000 quilts, and were amazing in their colours and their workmanship. Most, if not all of them, were hand quilted and likely stitched in poor light conditions (candle light). I’ve only shown a few here.

After some 90 minutes or so at the NEQM, we moved on to New Hampshire and the Canterbury Shaker Village. The weather was sunny, but the wind was bitingly cold. Perfect for taking photos, but not so good if you were out in it without adequate protection! The Shaker Village tour (75 mins) was really interesting. I knew a little about the Shakers, but learnt so much more (celibacy and the relinquishing of all personal property were their two big things). We visited the Meeting House, the Laundry, and the chapel in the main Dwelling House, and the lovely Kia told their stories and answered our questions. The Canterbury Shaker Village was handed over to a non-profit organisation back in the late 1960s as their population dwindled and died out (the last one in this village died in 1996 aged 93; today, only three Shakers survive). Interestingly, unlike the Amish and similar groups, the Shakers embraced technology that made their lives easier and invented many labour-saving devices. The Laundry was a great example of that.

Our final destination today was Meredith, NH, by the shores of Lake Winnipesaukee.

p1060519

p1060583

p1060591

p1060640

p1060641

p1060642

p1060686


MacGyvering a solution

3 10 2016

Handi Quilter have brought out an LED light strip for their machines. It plugs into a USB connection on your machine, or into a USB charger thingy at the wall. Unfortunately, I have an earlier Sweet 16 model so there’s no USB connection on my machine. And the LED strip has a SHORT cord to the USB end — way too short to reach to a power outlet near the floor (yeah, that was really bad design — for around $70, I expected a cord at least 1 m long, not one that’s only about 50 cm).

My first solution was to use a USB extension cable plus a USB charger thingy to plug into the wall. However, I have other things plugged into that same wall socket, so that was no good. The next solution (as suggested by my dealer) was a power board (aka power strip in other parts of the world) that takes a USB plug and then push it out of the way into the back of one of the side openings under the table.

Well, that sounded fine in theory, but in practice was actually quite difficult. Why? Because any power board is already quite thick and when you plug a power cord into it, the combined height is MUCH more than the height of the table opening! (yes, there’s a reason I know this….) Turning the board on its side didn’t work either. So I looked at the back of the board and saw there were some notches for hanging the board from nails. Perhaps I could screw some nails into the back of my table? But the power board I purchased was quite long and wouldn’t fit at the back of the machine. One reason the board is long is that it has an on/off switch (this is IMPORTANT because you don’t want to have to reach behind the machine to the wall outlet to turn it on and off! You can leave your machine plugged into an ‘always on’ wall outlet because you have a separate on/off switch on the machine, but not these USB LED strips — if the power board has no on/off switch, that means you can only turn the light strip off at the wall. Very inconvenient, and another design flaw, in my opinion — having a rocker switch near the end of the lights before it becomes the USB cable to turn them on/off would help.) Having a board with an on/off switch meant that I needed to position that switch within easy reach and not at the back of the machine where it would be hard to access. What to do????

I tried all sorts of configurations in practice and in my head, finally deciding that suspending the power board from the table legs would solve all the problems — I could turn it so that the on/off switch was near the front, and having is suspended meant that it wouldn’t get in the way, or collect as many dust bunnies! I initially tried suspending it with ribbon, but the ribbon wanted to slip and fall off the end of the board. So then I joined two cable ties together to make a larger cable tie and tied up each end of the power board, slipping the cable ties between the metal parts of the table legs to keep the board in place. If I need to fold up the table for transport, it’s easy enough to cut off a cable tie with scissors. NOTE: I still had to use a USB extension cable — there was no way I could get a power board close to the LED strip.

Here’s a photo of my solution (the other stuff you can see near the table legs is the hanging rack I use for my bungee cord system, and a rollaway set of drawers for rulers, notions, etc. — ignore those [and the dust bunnies!]):

usb_lights01

One other thing — if you purchase one of these strips, resist the temptation to position the strip in the centre join of the machine! Why? Because when you get your machine serviced, the technician opens it in half along that centre join. You can see from the photo below that I’ve placed my LED strip on one side of that centre join so it doesn’t have to be removed for servicing. I also kept the cable fairly tight as it goes around to the back of the machine to avoid it getting caught in a quilt AND used the sticky patches to adhere it to the base of the machine (that was a design aspect I thought was very useful).

usb_lights02


Update April 2019: My light strip started behaving badly. Every time the quilt touched it, it would go off (or on). I suspected a contact inside had been damaged. The position of the end of the light strip is such that any decent sized quilt WILL touch the cable where it joins with the strip. I sent the unit up to my dealer, and sure enough, the contact was damaged. They soldered it back, and taped up the connection between the cable and the strip so that it won’t do it again. No guarantees, though. So here’s hoping.


Community Quilt 292

3 09 2016

I’m not really a fan of these colours, but together I thought they worked really well. To keep with the simple shapes, I decided to quit vertically in the three strips on the sides, and horizontally for the three middle strips. Each line is about 1 inch apart. Yes, I used my Line Tamer ruler for this!

(Click on a photo to view it larger)

quilt292_01

quilt292_03

quilt292_02

Threads used:

  • Top: Fil-Tec Affinity ‘Carolina’ (40 wt, trilobal polyester, colour 60292)
  • Bottom: Fil-Tec Magna Glide Classic pre-wound bobbin (white)


Community Quilt 291

3 09 2016

To counterbalance the rectangular shapes in this quilt, I decided to quilt large circles with a smaller inner circle coming off at a tangent.

(Click on a photo to view it larger)

quilt291_01

quilt291_02


Threads used:

  • Top: Fil-Tec Affinity ‘Carolina’ (40 wt, trilobal polyester, colour 60292)
  • Bottom: Fil-Tec Magna Glide Classic pre-wound bobbin (white)


Community Quilt 290

3 09 2016

This was a BIG eye spy quilt for a kid, with each ‘jar’ containing some sort of bug or other animal (I had to photograph it on its side as it would’v e dragged on the ground otherwise). I decided to just do a simple large meandering stipple as there was so much ‘busy-ness’ in this quilt that anything else would’ve been overkill.

(Click on a photo to view it larger)

quilt290_01

quilt290_02

Threads used:

  • Top: Floriani (40 wt, rayon, colour PF546)
  • Bottom: Fil-Tec Magna Glide Classic pre-wound bobbin (light tan)


Community Quilt 289

3 09 2016

For this quilt, I just used a simple variation on the ‘open headband‘ motif, adding a slightly curved hook to the point of the inner arc.

(Click on a photo to view it larger)

quilt289_01

quilt289_02

Threads used:

  • Top: Fil-Tec Glide ‘Linen’ (40 wt, trilobal polyester, colour 10WG1)
  • Bottom: Fil-Tec Magna Glide Classic pre-wound bobbin (white)


Community Quilt 288

3 09 2016

I took my quilting inspiration from the curves in the border fabric, following those curves in that border, and then using a similar curve sort of on the diagonal in the main part of the quilt.

(Click on a photo to view it larger)

quilt288_01

quilt288_02

quilt288_03


Threads used:

  • Top: Fil-Tec Affinity ‘Carolina’ (40 wt, trilobal polyester, colour 60292)
  • Bottom: Fil-Tec Magna Glide Classic pre-wound bobbin (white)