Handi Quilter have brought out an LED light strip for their machines. It plugs into a USB connection on your machine, or into a USB charger thingy at the wall. Unfortunately, I have an earlier Sweet 16 model so there’s no USB connection on my machine. And the LED strip has a SHORT cord to the USB end — way too short to reach to a power outlet near the floor (yeah, that was really bad design — for around $70, I expected a cord at least 1 m long, not one that’s only about 50 cm).
My first solution was to use a USB extension cable plus a USB charger thingy to plug into the wall. However, I have other things plugged into that same wall socket, so that was no good. The next solution (as suggested by my dealer) was a power board (aka power strip in other parts of the world) that takes a USB plug and then push it out of the way into the back of one of the side openings under the table.
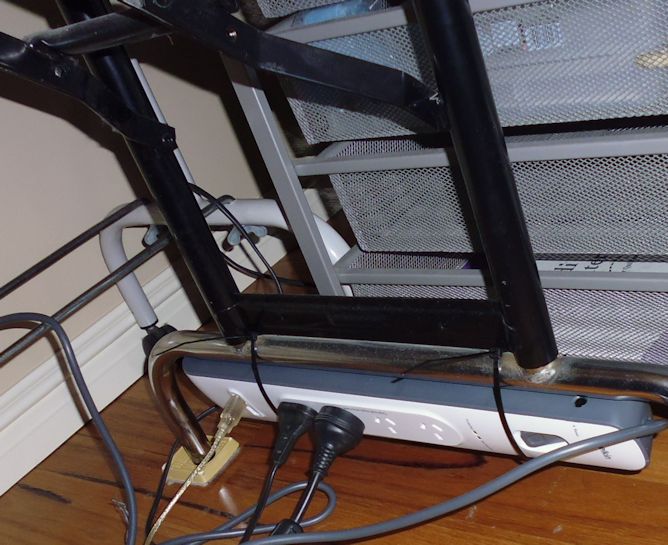
Well, that sounded fine in theory, but in practice was actually quite difficult. Why? Because any power board is already quite thick and when you plug a power cord into it, the combined height is MUCH more than the height of the table opening! (yes, there’s a reason I know this….) Turning the board on its side didn’t work either. So I looked at the back of the board and saw there were some notches for hanging the board from nails. Perhaps I could screw some nails into the back of my table? But the power board I purchased was quite long and wouldn’t fit at the back of the machine. One reason the board is long is that it has an on/off switch (this is IMPORTANT because you don’t want to have to reach behind the machine to the wall outlet to turn it on and off! You can leave your machine plugged into an ‘always on’ wall outlet because you have a separate on/off switch on the machine, but not these USB LED strips — if the power board has no on/off switch, that means you can only turn the light strip off at the wall. Very inconvenient, and another design flaw, in my opinion — having a rocker switch near the end of the lights before it becomes the USB cable to turn them on/off would help.) Having a board with an on/off switch meant that I needed to position that switch within easy reach and not at the back of the machine where it would be hard to access. What to do????
I tried all sorts of configurations in practice and in my head, finally deciding that suspending the power board from the table legs would solve all the problems — I could turn it so that the on/off switch was near the front, and having is suspended meant that it wouldn’t get in the way, or collect as many dust bunnies! I initially tried suspending it with ribbon, but the ribbon wanted to slip and fall off the end of the board. So then I joined two cable ties together to make a larger cable tie and tied up each end of the power board, slipping the cable ties between the metal parts of the table legs to keep the board in place. If I need to fold up the table for transport, it’s easy enough to cut off a cable tie with scissors. NOTE: I still had to use a USB extension cable — there was no way I could get a power board close to the LED strip.
Here’s a photo of my solution (the other stuff you can see near the table legs is the hanging rack I use for my bungee cord system, and a rollaway set of drawers for rulers, notions, etc. — ignore those [and the dust bunnies!]):
One other thing — if you purchase one of these strips, resist the temptation to position the strip in the centre join of the machine! Why? Because when you get your machine serviced, the technician opens it in half along that centre join. You can see from the photo below that I’ve placed my LED strip on one side of that centre join so it doesn’t have to be removed for servicing. I also kept the cable fairly tight as it goes around to the back of the machine to avoid it getting caught in a quilt AND used the sticky patches to adhere it to the base of the machine (that was a design aspect I thought was very useful).

Update April 2019: My light strip started behaving badly. Every time the quilt touched it, it would go off (or on). I suspected a contact inside had been damaged. The position of the end of the light strip is such that any decent sized quilt WILL touch the cable where it joins with the strip. I sent the unit up to my dealer, and sure enough, the contact was damaged. They soldered it back, and taped up the connection between the cable and the strip so that it won’t do it again. No guarantees, though. So here’s hoping.


Hmm wish I knew about the service issue before I stuck it in the middle!,,,
Easy mistake, Lesley! I put it in the centre, then realised almost immediately that the join was where the machine split in two for servicing (I’ve seen a machine open), so took it off before I pressed it to stick it down. I don’t know how permanent the adhesive is, so you MAY be able to pull it off and reposition it. No guarantees though.
The big question is – does it help for sewing? Is it much of an improvement? Or do those ones at the back shine in your eyes?
Another question that occurs to me is why the distributors don’t send info about products like this to all the customers on their books? All I ever get from them is info about classes I am not able to attend. I’d be much more interested in hearing about new products/accessories direct from them instead of finding out indirectly such as by reading your blog! Or do they have a mailing list like that that I have somehow missed?
Actually I don’t know if my machine has a USB port either – will have to go and have a look.
Distributors send the info to the dealers, who then pass it on to their customers. It’s likely the distributors do not have customer details. My dealer told all her customers in her regular newsletters, via her Facebook page, etc. And Handi Quilter promoted this a few months ago too, on their website/blog.
I really like this lighting system. Did you get it from the HQ dealer? I have the Tiara, essentially the same machine as yours, and I would like to get a light strip. Thanks for all of your helpful blogs.
I attached my lite strip exactly how you did it.