I wrote these instructions for me, in case I ever have to do this again.
DISCLAIMER and NOTES:
- I’m not a HQ dealer or service person — just a user of their Sweet Sixteen quilting machine. So while these instructions suit ME and MY machine, if you follow them on your own machine, you do so AT YOUR OWN RISK.
- Only do this if you have explicit permission to do so from your dealer and/or Handi Quilter, as you may void your warranty.
- This is a FIDDLY procedure, so if you live reasonably close to your dealer, get your dealer to do this for you as they have all the specialist tools for the job, and will have experience in doing it. The only reason I did it myself was that it’s a 3+ hour round trip to my dealer.
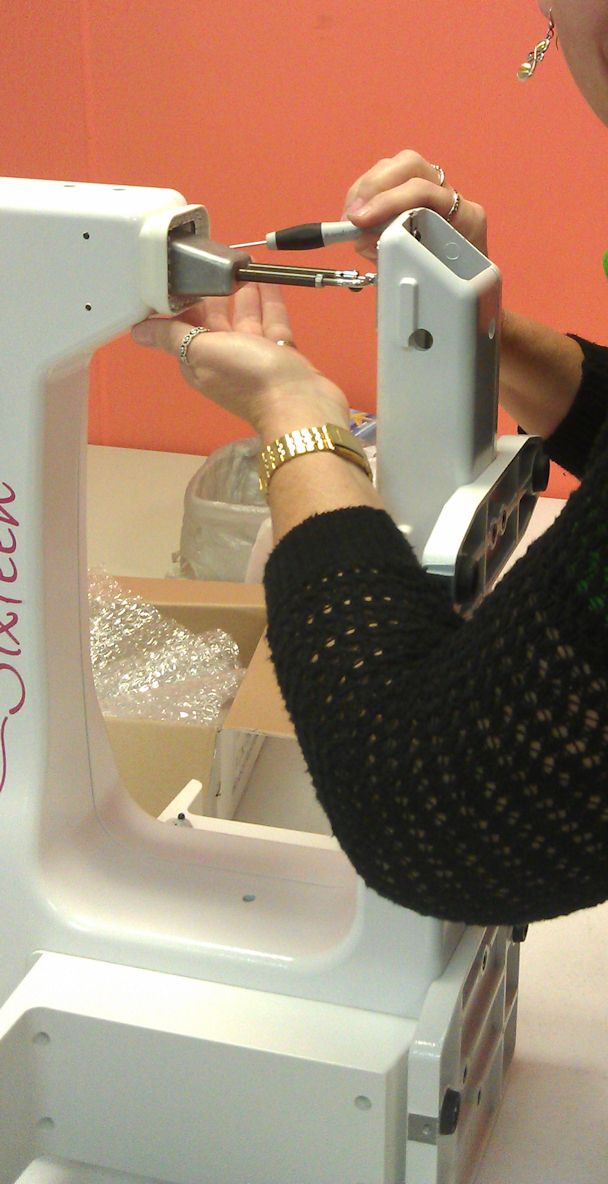
- If you do it yourself, you may find it easier to access the relevant parts of the machine if you take it out of the table and CAREFULLY lay it down on its side or its back end. I did it with the machine in situ — i.e. in the table — and found it very awkward to get to all the places. Update: Another light ring went… This time I replaced it by lying the machine on its side with the left side uppermost. It was much easier to change out the light ring than doing it in situ. Further update: Here’s a photo of how my dealer does it — she lays the machine on its back:

- If your machine is still in its warranty period, you may find that the replacement light ring is at no cost. However, you may incur labour charges, depending on where you live.
You will need:
- a replacement Handi Quilter Sweet Sixteen light ring (not available commercially, as far as I know — only available from your dealer or perhaps direct from HQ)
- one small Philips head screwdriver, preferably with a magnetised head (the screwdrivers that come in a small pack for computers/electronics are ideal)
- several types of tweezers; needle-nose tweezers (like surgical tweezers) are ideal
- about 15 to 30 minutes of spare time
- lots of patience and the ability to sit/squat on the floor for several minutes at a time and do things by touch (if you don’t take the machine out of the table)
First things first — this is what the original light ring looks like (front and back views); the red arrows indicate the screw holes and the green arrow shows the connector. (NOTE: As at May 2013, Handi Quilter source their light rings from a different manufacturer. These newer light rings look slightly different to the pictures below, but the screw holes, connector pieces, and these instructions remain the same.)

Front view of light ring

Back view of light ring
To swap out a faulty light ring with a new one (these instructions assume you’re changing the light ring with the machine in the table):
- TURN OFF YOUR MACHINE and move your chair out of the way.
- Remove the needle.
- Sit on the floor where your chair normally goes. (If you’re lying the machine on its side or back, you don’t have to do this, obviously.)
- Using the small Philips head screwdriver, unscrew the two small screws on each side of the light ring.

Side screws (left and right arrows) and front and back screws
- Now unscrew the two small screws at the front and back of the light ring. These are longer screws and hold the plastic cover in place. The back one is particularly awkward to get to if the machine is in the table — you’ll have to find it and unscrew it by feel alone as you can’t see it.
- When you unscrew the last screw, the plastic housing over the light ring and the light ring will drop a little as there’s almost nothing to hold it up. However, it’s still connected to the machine, so DO NOT try to pull it down.

The loosened light ring and plastic housing
- Next, disconnect the connector at the back left of the light ring. Again, this is very fiddly as the connector is very small and the wires that connect to it are VERY short. Use tweezers to grab the top part of the connector and ‘unclick’ it from the housing in the light ring. Be careful that you don’t put any downward pressure on the connector wires/piece as you don’t want to damage these wires.

Green arrow points to the connector wires
- Once the connector has been disconnected, gently lower the plastic housing and light ring to the table. You can see how short those wires are and how small the connector piece is!

Connector at rear of foot/needle housing
- Please check that the faulty light ring’s plastic connector housing is still attached to the light ring. When I did my second change out, the connector piece on the light ring remained attached to the connector on the machine and so I couldn’t reinsert it into the new light ring with that piece still attached. So, look at the light ring that you’ve taken off and make sure that the little plastic connector housing is still attached to it (see the picture of the back view of the light ring before the start of these steps–the plastic connector housing is arrowed in green). If it isn’t attached to the light ring, use tweezers to pull it off the connector on the machine and put it back on the faulty light ring, making sure the pins go in the same direction as those on the new light ring.
- You probably can’t get the faulty light ring out from under the foot, so you get your fingers underneath the foot and lift it a tad. Once lifted, slide the faulty light ring out and slide the new one in, leaving the plastic housing where it is. Make sure you put in the new one, not the old one!
- Make sure the replacement light ring is facing the correct way — lights facing down and the connector at the back left when looking at the machine from the front. Slot the light ring into the plastic housing and screw in the two side screws (these are the short ones) to connect it to the housing.

Screw the side screws into the light ring to secure it to the plastic housing
- Now here comes the REALLY tricky/fiddly/awkward bit. Lift the plastic housing up almost to where it normally goes. Using tweezers, grab the loose connector piece and slot it into the connector on the light ring (you may have to reach from the right behind the foot/needle housing and go around the back to grab the loose connector piece). Use the tweezers to push it in. Did I say this was fiddly? If you have someone else to hold the plastic housing you may find it easier to connect the light ring to the machine. But there’s no getting away from this step being the most difficult and awkward.
- Once the connector is connected, test it before putting the remaining screws back in. Turn on your machine and see if the light comes on as it should. If it does, congratulations — you got the connector properly connected! (NOTE: If the light doesn’t come on, first check that it’s turned on in the control panel — you may well have turned it off when the lights were flickering. Touch More then Options and then the icon for the lit light bulb.) If it still doesn’t come on, the connector hasn’t connected properly so repeat the previous step.
- Turn the machine off again and screw in the remaining screws (front and back). Screw in the front one first. The back one is the hardest to screw in as you can’t see what you’re doing and will have to go by touch alone.
- And you’re done! Put your needle back in, turn on your machine, and off you go.


