Evolution of a quilt: 5

30 12 2007

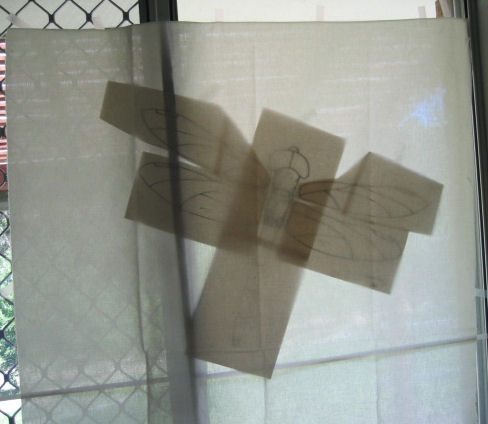
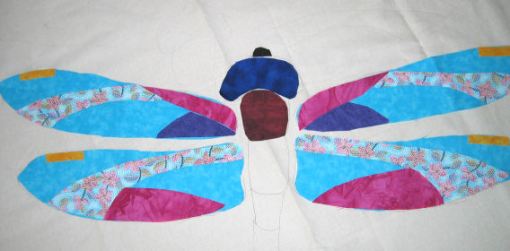
The last step before I finished yesterday evening was to use the remaining fusible web to create the dragonfly body and wing parts. I didn’t have enough fusible (back to the fabric shop tomorrow!) so was only able to get the wings completed, and a couple of small body parts. In the picture below, I’ve laid them out on top of the muslin which I won’t use now, but you can get a sense of how the dragonfly is coming together.

Fused wings

Still to do, but not in order…:

  • Finish applying fusible web to the remaining dragonfly parts
  • Position the dragonfly parts on to the background
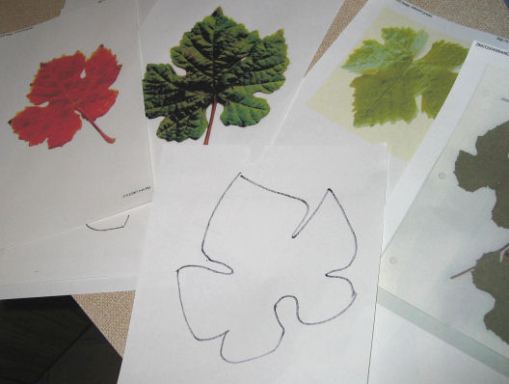
  • Add some grape leaves (as required)
  • Possibly add some bunches of grapes,
  • Fuse applique all parts
  • Stitch the appliqued pieces down with monofilament thread so they don’t go anywhere!
  • Free motion embroider veins in the leaves and lace effect on the wings; if add grapes, free motion embroider light highlights (gold, silver metallic thread?)
  • Get some thin bias tape (gold, silver and black) and outline the dragonfly and other relevant bits with it
  • Add a border
  • Add batting and backing, and a hanging sleeve
  • Quilt the quilt
  • Add binding
  • Continue documenting the process!

Links to all posts about this quilt


Evolution of a quilt: 4

30 12 2007

Major setback: When I scattered the leaves over the muslin, there was a LOT of white poking through. Without creating hundreds more leaves, this wasn’t going to work. And even if I did create hundreds more leaves, I think the background would’ve been TOO busy and swamp the dragonfly (‘scuse the pun!).

So back to the drawing board… More thoughts, ideas, and possibilities later (and some more hours…) and I decided to use the remaining green fabrics and create a green gradient background for the dragonfly.

Some of the green fabrics laid out in a possible order:

Green fabrics for the background

The next step was deciding what to do with these fabrics. I thought of putting large patches of green over the muslin, then laying some leaves on it, but that looked weird. Next thought was to look at how I could cut the green fabrics in wavy lines so that I could get the effect of undulation (a la Ricky Tims). But I couldn’t figure out how to do that successfully! (Fortunately, I tested on small fabric scraps before cutting ANY of the green fabric!)

I then thought I could make uneven lines in the greens getting a geometric effect with long thin triangular shapes, but I tried that on four strips and it just didn’t look right, so I unpicked all those stitches and decided to go for very boring strip piecing of these 5 and 6″ strips…

Strip pieced background

Next: Create the dragonfly body and wing parts

Links to all posts about this quilt


Evolution of a quilt: 3

30 12 2007

In the previous two steps, I’ve got my inspiration and created the grape leaves for the background. Now to create the dragonfly…

I found some pictures, traced the essential outlines so that you could tell it’s a dragonfly not a butterfly, assembled the pieces of paper, taped them to the window, overlaid them with quilter’s muslin, traced the design on to the muslin in pencil, rearranged everything and retraced the design on to the muslin in permanent marker.

Dragonfly drawing

Muslin overlaying the drawing

The reason I traced the lines in permanent fabric marker was so I could position the leaves on the muslin and applique them on without going too far into the area where the dragonfly would overlay the leaves—I needed to see where the dragonfly was going to go.

Next: The background dilemma

Links to all posts about this quilt


Evolution of a quilt: 2

30 12 2007

Grape leaves as a background! I like the idea… So off to the internet again to get some simple images of grape leaves that I can trace to get my outline. Not just one grape leaf either—I have to have a few variations of shape and size.

Grape leaves - inspiration

The first stage is finding suitable images (do you know how many pictures of dolmades there are???). Next, printing them off. Then I used the window as a light box and traced the outline of the photos on a sheet of paper with a black marker. Next, I photocopied these outline sheets at various increased and reduced sizes.

Then it was off to the fabric store (bliss!) to find suitable fabrics for vine leaves, and dragonfly wings, and to get some fusible web to trace the leaves on to in preparation for appliquing them on to the background. That all sounds so quick and easy, but believe me it wasn’t!

Here’s the fabric I chose sitting on top of the fusible web showing the outlines of some 70+ grape leaves that I’d traced, hoping that I’d have enough:

Fabrics

And here are some of the traced outlines making the best use of the available space:

Outlines of grape leaves

So now I have the fabric and the outlines traced on to fusible web. The next step is to cut out the tracings into individual leaves, then hot iron the fusible on to the backs of the various fabrics, then cut out each individual fabric leaf. Again, this took some hours…

Fusible web on backs of leaf fabrics

At the end, I had some 70+ leaves, about a third of which I had cut in half and joined together to get colour variation.

Grape leaves ready for fused applique

Next step: Create the dragonfly.

Links to all posts about this quilt


Evolution of a quilt: 1

30 12 2007

Since moving down south, we’ve discovered the delightful Scotts Brook wines, and I’ve been quite taken by the dragonfly logo. An idea for a quilt/wall hanging using the dragonfly has been brewing in my head for a few weeks now. With some time off over the Christmas break and with only a few social activities to attend, that idea has now started to come to fruition.

But I’m finding that without a pattern or instructions, the original idea has changed a lot since inception. That’s what this series of posts is about—how I’m going from an original idea to a finished product. It’s not finished yet, and may not be for quite a while, but I wanted to document the process, as even at this early stage, it’s changed a lot.

My original thought was to make a wall hanging using the dragonfly logo on the Scotts Brook wines, and sticking pretty much to that design. However, my husband—who’s much more artistic than me—suggested that making something that was almost all white wouldn’t be a good idea as it would look very bland. Between us we searched the internet for dragonfly quilts made in a stained glass style, and expanded the search to stained glass patterns, and images of dragonflies in all their forms.

After looking at all sorts of variations, we agreed that the dragonfly should be colourful and on an angle, and that some leaves should be in the background. However, we didn’t want the strappy leaves we saw in some designs we found as they aren’t in keeping with the local area. So I had a brainwave of creating a background of grape leaves! More in the next episode…

Original inspiration:

Scotts brook wine label

Some of the other inspirations:

Stained glass dragonfly Dragonfly with strappy leaf background

Links to all posts about this quilt


So darned secure…

30 12 2007

… you just can’t open it!

Why did a miniscule proportion of world’s population do such stupid acts as tamper with products that they’ve made it difficult for the rest of us? And why are companies so fearful of tampering and law suits that they make products that are almost impossible to open—by anyone?

I’m not arthritic and I can use my hands as well as I could when I was in my 20s, but in the past few days I’ve had two instances where getting a top off a product was more than difficult. It was frustrating, annoying, and in one case put my teeth at risk!

One instance was one of those ‘push down and turn to open’ lids that’s meant to keep children from consuming the contents. Well, I pushed down and turned about six times before I got the darned thing to open. And I swore a bit too.

The other was a plastic jar of what used to be called stewed fruit. It seems the two main producers of these ‘jars’ are using a seal that can only be opened by brute force. Here’s a picture of this ‘seal from hell’:

The safety seal from hell

So, what makes it nasty? See those two little bits that stick out? Well, there’s four of them, evenly placed around the seal.  But they are almost impossible to lift using my adult fingers, small though they are. Fingernails get broken in the process, and once I resorted to using a kitchen knife (NOT a sharp one), but that only put my eyes, face, arms, and hands under serious threat of mutilation. Only once have I been able to lift these tabs enough to pull them back to break the incredibly strong seal. And then the seal itself is a sod of a thing to remove without spilling the contents.

The only thing that works for me on this seal is my bottom front teeth! Yes, teeth. I’d like to see the manufacturers’ reactions if I sent them a bill for missing or broken teeth as a result of trying to consume their product!

I wonder how those with even slightly limited motor impairment get on. The elderly spring to mind, anyone with arthritis or lessened strength in their arms and hands, multiple sclerosis sufferers, and the like.

Design for usability and accessibility is not just for software—it’s for every product we use. This seal meets neither requirement—it’s not usable, and it definitely prevents the product from being accessible!

Just a little rant to finish off the year…