Handi Quilter Sweet Sixteen: Using bobbin thread as the top thread

29 04 2013

I had a devil of a time with a small spool of 100 wt Wonderfil Invisifil thread — it kept getting caught in the slot on the spool that secures the thread, or wrapping itself around the vertical or horizontal thread spool holder. It was the only spool of that colour that I had and it was perfect for the top stitching I wanted to do. But how to get it off the horrible spool and put it onto something that wouldn’t catch?

I had a lightbulb moment — I’d use the bobbin winder and wind the thread onto a bobbin then put the bobbin on the spool holder and I could use the thread without it catching every few seconds. Easy peasy. But not so fast, Batman…

Once I’d wound the thread off the spool and onto the bobbin, I was reminded that the Handi Quilter Sweet Sixteen has a thicker rod for spools than it does for bobbins! (that’s a silly design flaw, in my opinion — if the spool rods were a tad narrower they could take both spools and bobbins, not just spools). That meant that I couldn’t put the full bobbin onto either the vertical or horizontal spool holder. And I couldn’t wind the thread back off the bobbin and onto a different sort of spool as the bobbin winder can’t do that. Thwarted…

Except the previous day I’d rigged up a temporary lighting system for my Sweet Sixteen 😉 Surely I could do the same for the bobbin so I could use it as the top thread? Off to the sewing room, the kitchen and the shed to see what would work. I came back with an artist’s paintbrush, a roll of painters tape, and a satay stick. Well, the satay stick wasn’t going to work as it was way too thin. But the paintbrush was an option — the bobbin spun nicely on it, until I set it up, when I found that the 100 wt thread just wanted to spool off the bobbin and get wrapped around the paintbrush. So that was no solution.

bobbin_as_top01

This solution didn’t work as the thread kept coming off the bobbin and winding around the paintbrush

The problem was that there was nothing to prevent the thread from coming loose from the bobbin and winding itself around whatever makeshift spool holder I had. I needed a cap of some sort… Just like on my domestic machine. My husband brought out a screwdriver that was the perfect diameter — my domestic sewing machine caps and felt pads fitted perfectly. It was then a matter of attaching the screwdriver to the machine with painters’ tape and off I went!

bobbin_as_top02

This solution was perfect — the felt pads and the caps from my domestic sewing machine kept the bobbin thread where it belonged, and the diameter of the screwdriver was such that the bobbin spun smoothly.

So now my Sweet Sixteen looks like some sort of makeshift Heath Robinson invention! I have an OTT Task Lamp tied to the left side with twist ties, a floor lamp on the right, and now this screwdriver spool holder for my bobbin full of the thread I wanted to use 😉

This option would not have been necessary if Handi Quilter had built these machines with slightly narrower diameter spool holders that would comfortably take thread spools and cones, AND M bobbins. Such a small design change would offer more thread delivery options to users.


Using the Handi Quilter Sweet 16 cuTex Bobbin Winder

13 01 2013

I bought my Handi Quilter Sweet Sixteen just under two years ago. With it came a bobbin winder, which my dealer showed me how to use. The instructions that came with the machine were next to useless…

So here are some instructions for THIS bobbin winder (see picture below). I believe Handi Quilter now supplies a different style bobbin winder with the Sweet Sixteen, so only use these instructions if your bobbin winder is made by cuTex and looks like this:

bobbin_winder01

bobbin_winder02

How to thread the cuTex bobbin winder

See the diagram below for the thread path; you can thread either side of the bobbin winder, just don’t cross thread over from one side to the other.

bobbin_winder03

  1. Pull the thread off the spool and up and through the thread mast.
  2. Poke the end of the thread into the little hole above the tension knob (circled in yellow in the photo above).
  3. Pull the thread you’ve just poked through the hole back towards the spool and ‘floss’ it between the tension disks (the silver part of the tension knob area)
  4. Pull the thread towards the silver spindle (far left in photo above — NOTE: there is no bobbin on this spindle). If you have a bobbin with a slot, poke the thread through the slot, then push the bobbin onto the spindle. If you don’t have a slot on the bobbin, wind the thread around the bobbin several times before pushing it on the spindle – it needs to have a decent grip so the rest of the thread can ‘catch’ on it when you switch the bobbin winder on.
  5. Press the On switch.
  6. Adjust the timer (how much time will depend on how thick the thread is – I tend to have mine set between 9 and 15, but thicker threads will require less as they fill up quicker). You can always restart if the timer stops before the bobbin is full.
  7. Press the Start button and make sure the thread ‘catches’ on the bobbin and starts to fill.
  8. Use your fingers or the back of your hand to feel the tension of the thread coming from the tension disk to the bobbin – it shouldn’t be too tight, but equally it shouldn’t be totally slack either. There should be some ‘bounce’ in the thread tension. If the tension is too tight or loose, turn the tension knob – retest the ‘bounce’ and adjust the tension as required.
  9. Do NOT overfill the bobbin – only fill it to about 80% full, not all the way. If you overfill the bobbin, it will not work correctly in your machine.
  10. Turn the bobbin winder off when you’ve finished, cut the thread near the full bobbin, and remove the bobbin — sometimes the bobbin will be quite tight, so you may need to use a bit of brute force to get it off!

As I tend to use similar weight threads for my bobbins, I only need to tweak the tension a little every so often; otherwise, it’s set and forget.

Other hints:

  • I use the back metal holder on the bobbin winder for some of my spare bobbins — it holds about six (see the top photo).
  •  To stop thread from spooling off the bobbin once it’s wound, I wrap it was a child’s ponytail elastic (see picture below) — I can get a pack of 20 or so from the supermarket for just a few dollars.
  • I keep my already-wound bobbins in a zip-lock bag suspended by a ribbon from the unused thread mast on my Sweet Sixteen — I find it’s easier to keep them there as they are only an arm’s length away (see picture below). Unfortunately, the metal spool holders on the Sweet Sixteen are just a tad too thick for the bobbins — I wonder if they’ll change that in a future design? So many thread spools have different thicknesses in their central cores, I’m surprised HQ didn’t just go for a versatile spool holder thickness that would suit thread spools AND M-size bobbins.
bobbin_winder04

And yes, my Bling Bear (a present from my friend Glenys) watches over me while I quilt 😉


Static!

7 06 2014

For Community Quilt #148, I decided to use white Magna Glide pre-wound bobbin thread for the top AND the bottom thread. Why? because the colour match was perfect. So I slipped the bobbin onto a hacked thread holder and started.

What I didn’t realise was how much static there was on the machine, which picked up the tiniest bits of polyester ‘lint’ from this thread and deposited it on the metal bits of my Handi Quilter Sweet Sixteen! I’ve never noticed any issue with this sort of static buildup in the bobbin housing, but it was very prevalent in the top thread path.

I wonder if it’s due to the continual up and down motion of the thread before it finally gets to the eye of the needle and into the quilt? The bobbin thread, on the other hand, just loops off the bobbin in one continuous motion, as far as I’m aware.

Whatever the reason, I had to clean the tension disks and other parts of the upper thread path several times while quilting this quilt.

Here are some pictures to show that static build up at the tension disk area and near the needle.

static02

static01


Handi Quilter Sweet Sixteen: Working with metallic threads

29 04 2014

sewers_aid_metallic

I don’t have a good history with metallic threads. They are oh so pretty, but many’s the time I’ve wanted to throw the thread in the trash as it just won’t work for me in either my domestic sewing machine or my Sweet Sixteen. I follow all the rules and guidelines, and occasionally… just occasionally, it will work. And then there will be several months before I’m willing to try it again, knowing that there will be frustration and that angry words will be spoken 😉 I’ve watched Helen Godden demo HQ machines at quilt fairs and she often uses metallic thread and she seems to have no issues with it so I figure it has to be tamed somehow.

My latest foray into metallics was using a Fil-tec ‘Glisten’ metallic thread in gold. It was such a pretty thread and the quilt top begged to be stitched in gold… I had Fil-Tec Magna Glide in the bobbin.

But I went crazy trying to get this metallic thread to work without snapping every inch or so or stitching.

Here’s my litany of frustrations and what I tried, as I emailed to my dealer:

Top thread settings and things I tried:

  • one hole only in the 3-hole thingy
  • loosening top tension to the point that I had to unpick as I had scrunchies on the back
  • horizontal spool holder and upright (it’s a cross-wound spool), with and without a thread net.
  • slowing down from 50% to 25%
  • Size 18 Groz-Beckert needle set at 5:30 and then 6:30 position (I have very little success with ANY threads at 6:00 position). HQ’s website says the size 18 needles ‘work well with metallic thread’.

I’m trying to use it with a ruler but it keeps snapping. If I’m lucky I get to stitch about 2 inches, then SNAP. Changing from 5:30 to 6:30 helped a bit, but not for long.

My test piece worked fine – no ruler for that though, and it was only to check tension. However, I need to use the ruler as I need to get straight lines around 18 blocks. I haven’t even finished ONE block after nearly an hour….

I don’t have much luck with monofilament either, but that’s not today’s issue.

While I was waiting for her reply, I checked the archives of the forum I’m on and found that some people had luck with putting a few drops of Sewer’s Aid onto the spool of thread. I had some of that, so I tried it and it worked SO much better. Not perfect, but a LOT better, though not enough for me to continue with the metallic thread after I’d finished the outside stitching around each block. By dribbling three drops of Sewer’s Aid onto the spool, I was able to complete the ruler lines around a block without a single break – it took 2 minutes instead of the hour of frustration for the first block! I put another two sets of three drops in total for the rest of the blocks, so this isn’t a one-off fix — you do have to reapply it. But it worked so much better than doing nothing.

My dealer also got back to me with these suggestions:

I quilt all the time with metallic both FMQ and with rulers.  I don’t have any troubles.  Here is what I do:

  • Use a thread net.
  • Reduce the tension in my bobbin slightly so that I can back off the tension on the top
  • I usually quilt at around 35-45% depending on what I am doing.
  • I will use either size 16 or 18 needle (whatever is in usually suits)
  • Mainly I use 2 holes (but have gone to 1 if thread performance is questionable)
  • I don’t look at my needle position – whatever position it is in is fine.

Recently at Helen’s workshop she demonstrated in metallic.  Of course everyone wanted to sew with that.  Most people had trouble.  But honestly the thing that will tame metallic thread is a thread net!!  It is an essential when using metallic in my book (cannot be used on horizontal spool holder though).

The thread net will add tension however, so you will have to compensate with the tension and reduce it a little.  If you are getting looping underneath, then back the tension off on the bobbin case.  You can tweak this a fair bit.  Each wrap in the 3-hole guide will also add tension, so you might find that with all of the above you still have to drop back to threading through one hole.

Also, you must consider wadding types.  Thread performance is also affected by different types of wadding.  Was your sample piece the same as your quilt you were working on?

After all that.. I am out of ideas.  I would have to sit and work with the thread myself to get it going… Sometimes – the thread just has to be filed.. in File 13 (trash!)

I have no trouble with monofilament either – but see if the abovementioned helps you to use mono as well.  All the same principles apply.


Thread tension on the Handi Quilter Sweet Sixteen

5 09 2013

On the Yahoo! Group for the HQ Sweet 16 (and now Babylock Tiara), Mary asked about tension and threads.

Here’s my response:

Threads are unlikely to be your problem (except at the very thick and thin ends of the thread spectrum). The main problem with tension is getting to know your machine. For the first few weeks, I got very frustrated with incorrect tension, and then it seemed to click.

threads

Many factors affect thread tension:

  • thread path to the needle – I use 1, 2, or 3 of the little holes after the thread mast or horizontal spool, depending on the thread
  • incorrect needle size – thick thread = larger needle; thin thread = smaller needle
  • tension knob – don’t be afraid to turn that baby several times when testing tension. The better the result, the smaller turns you need to make to get it perfect
  • possible lint/fluff caught in the top tension disks
  • incorrect thread path – did you ‘floss’ between the top tension disks or did you miss them and the thread is in the spring? Have you put the thread through ALL parts of the thread path?
  • thread caught on thread path – thread on the horizontal spool can come off and get caught on the spindle and wrap around it, causing tension to go wacky. I’ve now put one of those felt pads from my domestic sewing machine between the spindle and the spool to help prevent this
  • thread getting twisted — the three holes at the top are meant to prevent this, but some threads don’t go through all three holes, or just don’t behave. I use a thread net for those
  • not getting the bobbin tension right – Jamie Wallen’s excellent video on bobbin tension: http://www.youtube.com/watch?v=Q1mRhcquZTM You should not have your bobbin tension too tight

Keep a practice sandwich next to the machine to test the tension every time you change threads or bobbins – even if the bobbin was wound at the same time with the same thread and settings as the previous bobbin.

The only threads I’ve haven’t been able to use successfully (yet!) are 12 wt Egyptian cotton threads (my needle sizes only go up to 18, so I need to buy a bigger needle size for that thread) and 100 wt threads (my size 14 needle is probably too big for that and so I may need to buy smaller needles for that thread weight). I’ve used two 40 wt rayon threads going through the needle at the same time, and I believe you can use three threads (using the horizontal spool holder too) if your needle size is big enough.

Tension is a matter of time and patience. Threads are only one part of the story.

See also:


Score!

16 04 2013

I had to have my car serviced last Friday. I’d requested a loan car as I needed to go shopping in town and here’s what I got for the day — a brand new (only a few thousand km on the odometer) Mercedes A-Class in bright flaming red!

loan_car

Cool car! Loved the reversing camera, the simplicity of the gear changes, and the simplicity of the parking brake mechanism. After having used them for a few hours, you wonder why no-one has simplified these things before!

score_threads

Another big score of the day was these threads. I went into Spotlight to get something (I can’t even remember what, now), and spotted a bin of ’embroidery’ threads going out for $3 each. Normally I wouldn’t even look at the threads Spotlight has on sale as they are usually cheapies, not name-brand good threads that I use. But this time the bin was full of all Wonderfil threads! I bought every Mirage (30 wt), Inivisifil (100 wt), Silco, and Fruiti (Egyptian cotton) thread in the bin. I left the Razzle and 12 wt threads as I do very little bobbin work. Each spool of thread was $7 or more retail, reduced to $3. Total number of thread spools purchased: 55. At $3 a spool, that haul cost me $165. Had I bought them all at full price, they would have cost $385. And yes, they all fitted on my spool holder and in one of my spool trays.

The final score of the day actually occurred the afternoon before. The last block of land we owned in Bridgetown Gardens was finally settled (after the contracts were signed in mid-January and after settlement was meant to occur in mid-March). I immediately paid down some debt, and left enough for any capital gains tax we may incur, and left a tad over for play money 😉


Community Quilt 57

26 01 2013

This was a BIG quilt, with heaps of lovely autumnal fabrics. In the photo below, there’s about a 12″ fold at the top to stop it dragging on the path.

(Click on a photo to view it larger.)

quilt57_01

How to quilt it? I decided to start with the light areas of the snowball blocks (I think they are snowball blocks…). I picked out a lovely variegated thread in tans and golds and stitched a small centre circle around the joins in the fabric, then radiated out with nice big bulbous feathers (with echoes), thus creating big flowers. I decided not to do these flowers for ALL the light coloured blocks — there were a LOT of them, so I only did flowers every second row.

quilt57_04

What to do with the other light coloured centres? Ah! My favourite — bird feathers! I knew I’d have to curl them around so stitched the spine of each one first in a big ‘J’ shape, then came out to the edges of the space with the ‘S’ curves needed for each feather.

quilt57_03

Again, I used the variegated Sulky thread, but I had to change to a different thread after doing about five of these blocks with that thread. It played up something awful — shredded, snapped, bunched up in a mass on top and below the quilt. It had been mostly OK when I stitched the flowers.

I tried all the tricks I knew — I changed the needle to a brand new one in a larger size; I oriented the needle at the 5:30, 6:00, and 6:30 positions; I rethreaded the thread from different spool holders and through various tension holes; I adjusted the top and bobbin tension; I slowed down the speed dramatically… NOTHING would make that thread behave. It would stitch for a minute or so and then something would go wrong and I’d have to stop and fix it and unpick etc. This was becoming very tedious… So I eventually bit the bullet and swapped to a soft gold thread in a single colour and from a different manufacturer. This thread behaved perfectly. I wasn’t going to unpick all those other feathers I’d already done and redo them, so someone with a keen eye will see that they are slightly different, but for most people, they probably wouldn’t notice.

quilt57_05

Next, how to quilt the half blocks on the edges of the quilt… I kept with the bird feather motif as these would have been bird feather blocks had they been full size. But instead of trying to do half a feather, I just did a double stitched arc for a ‘spine’ and radiated out on only one side with the ‘S’ curves. It looks a bit like a rising sun.

quilt57_02

Finally, I did a large meandering stipple in all the dark areas, in a tan coloured thread. I figured it didn’t need any more close quilting 😉

I like how the quilt sort of ended up looking a bit Japanese with the big flowers and the bird feathers.

Threads used:

  • Top: Robison-Anton ‘Penny’ for many of the bird feathers in main quilt top (rayon, 40 wt, colour #2332); Robison-Anton ‘Date’ for the stippling in the dark areas(rayon, 40 wt, colour #2290); Gutermann Sulky variegated thread in tan and gold tones (rayon, 40 wt, colour #2120)
  • Bobbin: Wonderfil Deco-Bob (80 wt, colour DB 115)


Domestic sewing machine needles vs industrial sewing machine needles

6 01 2013

Update June 2019: This Handi Quilter Blog article clearly explains the type of needles you need to buy for your longarm or Sweet Sixteen machine: https://handiquilter.com/all-about-needles/

On the Handi Quilter sit-down model Yahoo! group someone asked about whether they could use their domestic sewing machine needles in their HQ Sweet Sixteen (or Babylock Tiara) machine.

In a word, NO!

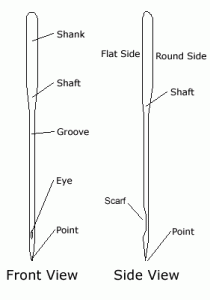
The needles are made differently, with the prime difference being the shape of the shank. On a domestic sewing machine needle, the shank is flat at the back. On an industrial machine needle, the shank is fully rounded.

sewing-machine-needle-parts

Image of a domestic sewing machine needles’ parts. Industrial machine needles have the same parts except for the shape of the shank. (From http://www.sewingmantra.com/index.php/needles/parts-of-sewing-needles/)

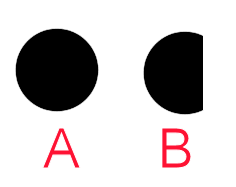
The needles used in the Sweet Sixteen are industrial needles and do not have this flat piece on the shank. In the diagram below, A represents an industrial sewing machine needle looking down from the top, whereas B is a domestic sewing machine needle from the same angle — note the flat part on the shank.

needles_tops

needles_front

The fronts of industrial (A) and domestic (B) sewing machine needles look just the same.

needles_back

However, the backs are different. The industrial machine’s needle (A) is fully rounded at the back; whereas the domestic sewing machine’s needle (B) has a flat back on the shank.

Domestic sewing machine needles have the flat side on the shank to make it easy for you to insert the needle correctly into the needle holder on the machine. However, with the industrial needles, you have no guide as to where to place the needle. Thus you need to be careful when inserting the needle in your Sweet Sixteen to make sure the long groove is facing you, and the scarf (the notch on the back) is away from you.

One way to do this successfully is to take the old needle and place its point into the eye of the new needle (with the long groove facing towards you), then insert the needle so that the old needle is at the 6 o’clock position, perpendicular to the new needle. Some people position the needle just off centre, at the 5:30 position (this is what I do) and that’s fine. But don’t position it too far away from the 6 o’clock position otherwise the bobbin thread won’t be picked up correctly and you will not be able to form a stitch correctly.

needles_position

For more information about sewing machine needles and how they work, check out the excellent videos on needles (videos 16 and 17) from Superior Threads: https://www.superiorthreads.com/videos/thread-therapy-with-dr-bob-educational-videos/. Note: These videos focus on domestic machine needles (particularly topstitch needles), but much also applies to industrial machine needles, especially the information on needle sizes. As an aside, I mostly use 40 wt threads for my quilting and a size 100/16 134 R Groz-Beckert needle in my Sweet Sixteen (the 134 is important).

For more information on needles suitable for Handi Quilter machines, see this free video: http://www.qnntv.com/videos/tnt-threads-needles-tension-with-handi-quilter/ or http://www.youtube.com/watch?v=dZBNUKsCyxg (needles and their relationship to thread is discussed in the first 10 minutes).

Update: R versus MR needles: A further question from the group was about whether we can use MR needles instead of R needles in the Sweet Sixteen. Handi Quilter is quite clear on that — NO! See https://www.handiquilter.com/forums/discussion/1375/needle-confusion (To quote from that 2015 forum post response by the Handi Quilter Educator: “Handi Quilter recommends the R needles for the Sweet Sixteen, the Avante and Fusion machines and the MR needles for the Infinity machine.”)

There’s a picture of an MR needle here: http://www.schmetzneedles.com/category/Long-Arm-Needles-27 — you can see the difference in the shape of the needle, so I can see why HQ says NOT to use them in the S16.

Groz-Beckert describes the tips of the needles (which give the letter designation such as ‘R’) in the ‘Cloth points’ article here: https://dev.groz-beckert.com/mm/media/en/web/pdf/Cloth_points_from_Groz-Beckert.pdf . And Superior Threads has more information on the codes on Groz-Beckert needles here: https://www.superiorthreads.com/education/groz-beckert-needle-package-numbers.

These are the main needles I buy (in sizes 12 to 20, though mostly 14 and 16):

Two final hints:

  • Hint 1: Use the groove on the front of the needle to help thread your needle easily every time. Instead of trying to get the end of the thread into the eye of the needle, run it down the groove and it will pop into the eye without a problem almost every time (assuming the end of the thread is snipped, of course, and not frayed).
  • Hint 2: Discard your old sewing machine needles, pins etc. into a safe, sealed container. I use an old glass spice jar as I couldn’t justify the expense of an official ‘sharps’ container from the drugstore. It will take a long time to fill this jar, and once full, I’ll throw out the sealed jar take this jar to my local pharmacy for correct disposal and grab another one for my dead needles.

needles_dead