Citrus hexagon quilt

5 04 2017

This was a quilt I quilted for a friend. It is a gift for someone, so even though I quilted it in December 2016, it’s not being given to the recipient until March 2017. Hopefully, the handover has been done now (I’m writing this in December for publication in early April).

I loved this quilt — I loved the colours, the white space, and the fabrics used. It really ‘spoke’ to me. As soon as I unfolded it, I saw citrus elements in it — oranges, lemons, limes — represented by the hexagons.

My brief was to quilt it ‘modern’ style and to emphasis the white space. I hope I did it justice.

How I quilted it:

  • stitched in the ditch around all the coloured hexagons using a yellow thread
  • free motion quilted pseudo citrus segments in the white hexagonal spaces, using bright citrus, fluoro/neon colours
  • continued the coloured segments in a few of the edge hexagons, and in the half-white hexagons too
  • for the remaining white hexagon spaces, I used white thread to stitch citrus segments
  • for the border, I stitched a straight line about half an inch from the seam, then another about 2 inches away then free motioned citrus segment-style triangular shapes in the white space, all with white thread

All up, it took me 5 hours to quilt this quilt — 2 hours just for the stitch in the ditch step. I only used rulers for the stitch in the ditch process and for the straight lines in the border — everything else was free motion.

The photos vary based on how the light was catching the quilt. Click on a photo to view it larger.

gwen_citrus_06

gwen_citrus_05

gwen_citrus_01

gwen_citrus_03

gwen_citrus_02

Back:

gwen_citrus_04

gwen_citrus_07

Threads used:

  • Top: Fil-Tec Glide ‘Neon Green’ (40 wt, trilobal polyester, colour 90360); Fil-Tec Glide ‘Neon Orange’ (40 wt, trilobal polyester, colour 90811);  Fil-Tec Glide ‘Mango’ (40 wt, trilobal polyester, colour 80116);  Fil-Tec Glide ‘White’ (40 wt, trilobal polyester, colour 10000); Isacord (40 wt, trilobal polyester, colour FB6010); Isacord (40 wt, trilobal polyester, colour 0600); Mettler Poly Sheen (40 wt, polyester, colour 1306)
  • Bottom: Fil-Tec Magna Glide Classic pre-wound bobbin (white)


Quilting Adventures 2017: Ann Shaw’s class

1 04 2017

It’s with some sadness that I write this blog post — this was the last-ever Quilting Adventures to be held at T Bar M near New Braunfels in Hill Country, Texas, and one of the last workshops they’ll ever hold. Kim and Debby are closing their Quilting Adventures business later in 2017. I’ve been coming here since 2012, and have attended four Spring Seminars.

This one was great! We had the lovely Ann Shaw as our tutor, and as there were only 5 in the class, we got heaps of attention and help from her throughout the week. The workshop was ‘Designing from nature’, and as a group, we did some amazingly creative work.

My piece was a blue and yellow macaw; the photo was taken by Wade Courtney, a friend of mine from California.

**********

The notes below are to remind me what we did so that I have a reference point when I use this technique again. They are NOT a substitute for doing Ann’s class, and it’s very possible I’ve missed some steps. Do not follow these instructions without first having done one of Ann’s classes, otherwise you’ll likely get confused!

Click a photo to view it larger.

Step 1 – Create the master drawing and sewing order

  1. Tape your photo to the table, and tape tracing paper over it. Study your photo for the ‘gesture’ lines.
  2. Use a straight ruler to trace the ‘gesture’ lines of your own photo — these are straight lines.
  3. Make sure there are several full-width lines to create sections, then rule straight lines between those lines, as necessary and following the colours, to create sewing lines for the piecing.
  4. Check that ALL lines go somewhere and that there are NO pieces that will have to be inset when sewing.
  5. Label each section with a unique letter and a set of numbers for each piece in that section, following the logical sewing order (e.g. A1, A2, A3, etc.).
  6. Write down the sewing order, using a notation to represent what piece gets sewn to another, which pieces have to be sewn before others can be done, and how all get sewn together to create the section. For example, A1 A2 means sew A1 to A2, and then sew A3 to either A2 or the entire piece made from A1 and A2.
  7. Make a photocopy of the traced design and use coloured pencils to colour in the pieces (not the background or borders). You’ll use this when sewing to make sure you sew the right fabrics (colours and labels) together.

Rule straight lines around the elements of the photo

Ruled lines – not yet labelled

Labelled sections, with photocopies coloured in to show main colours

Sewing guide

Step 2 – Use the full-size copy of the drawing to create the freezer paper copy

  1. Resize the tracing paper copy at a large-print copy store. I had mine resized to 250% and 260%, creating a final size of around 31 x 33 inches. Write the sizes on the printouts! My 250% image was the final size and the one I used to create the freezer paper templates; the 260% image was the one I used to pin the cut fabrics on to (the reason for increasing by 10% is to allow for the seam allowance for each piece when it’s pinned so it still matches the pattern reasonably closely).
  2. Tape the full-size copy (mine was the 250% one) to a large window, which will act as a light box. Make sure the labels are facing you.
  3. Tape pieces of freezer paper (dull side up) together with first-aid cloth tape (cloth tape doesn’t melt when ironed!) so that you have a single sheet of freezer paper big enough to cover the final size image.
  4. Tape the freezer paper to the window over the full-size copy with the shiny side facing you (dull side against the copy).
  5. Using a ruler and a permanent ultrafine Sharpie, transfer ALL lines from the copy onto the shiny side of the freezer paper. Add lines for the edge of the design. DO NOT label this shiny side. Put the Sharpie away — do not be tempted to use it for anything else!
  6. Remove the freezer paper and the copy from the window.
  7. Turn the copy over and re-tape to the window, this time with the labels facing out (i.e. away from you).
  8. Turn the freezer paper over and re-tape to the window matching the lines in the copy — the shiny side should face away from you and correspond to the lines in the copy. The dull side should now be facing you.
  9. Using a lead/graphite pencil only, label each section on the dull side of the freezer paper. Make sure you don’t miss any sections.
  10. Use various coloured pencils to make tick marks on each edge of EACH piece. Use different colours for each edge and make sure the tick marks extend across the Sharpie lines you can see through the freezer paper. These tick marks are hugely important when you come to line up your fabric pieces for stitching.
  11. Mark the full-width section lines with a single colour highlighter. Mark any large subsections crossing a major section with a different colour highlighter. Mark about a half inch inside the outside edge of the design with another highlighter colour.

Enlarged photocopy of lined and labelled pieces

Dull side of freezer paper showing major sections (pink highlighter), subsections (green highlighter), labelled pieces, and coloured pencil tick marks for each edge of each piece

As above, but more detailed view

Step 3 – Create freezer paper templates of each piece and iron on to the fabric

  1. Pin the larger-size copy to the design wall, and pin the freezer paper copy over the top. Pin a ziplock bag close to the design to hold any small pieces.
  2. Cut out the major sections from the freezer paper and pin in place back over the paper copy (approximately is fine). DO NOT cut apart all sections or pieces at once — you’ll lose them and get very confused.
  3. Pick a piece inside a section and cut it from the freezer paper — make sure you cut accurately on the Sharpie lines.
  4. Audition fabric for this piece.
  5. Once you’ve selected the fabric, iron the SHINY side of the freezer paper to the WRONG side of the fabric, using a hot iron and pressing for several seconds to adhere the freezer paper to the fabric.
  6. Cut out the fabric around the freezer paper, adding at a quarter-inch seam allowance all the way around the freezer paper template for the seam. Use a rotary cutter for a clean cut, where possible.
  7. Pin the fabric (with the freezer paper on the back of it) onto the larger size copy in the position that matches its label.
  8. Repeat steps 3 to 7 for ALL freezer paper template pieces. This may take a day or so, so be patient, be careful, and be methodical. Swap out fabrics as necessary – the freezer paper can be lifted and repositioned and ironed onto other fabric several times.

This was not from my piece, but it shows the freezer paper template ironed to the wrong side of the fabric, ready for cutting out the piece.

Placing the fabric pieces one at a time — note that very few parts of the freezer paper template have been cut yet

Step 4 – Sew the pieces together

  1. Put your sewing guide and the photocopy you coloured in Step 1 near your sewing machine — you will refer to both when sewing.
  2. Follow the sewing guide and place two pieces right sides together. Match the coloured pencil tick marks on the freezer paper to make sure you have matched them exactly. Use fine pins to hold the pieces in place.
  3. Stitch from one end of the freezer paper template to the other, using the edge of the template as your stitching line. Backtack at each end. Do not stitch into the seams. Try  not to stitch into the freezer paper.
  4. Press the sewn seam to one side.
  5. Repeat steps 2 to 4 for ALL other pieces. Again, this could take a day or more so be careful and methodical.
  6. Eventually you will have each subsection and section stitched and can then stitch the major sections together to complete your quilt top.
  7. Remove the freezer paper and discard.

Top section all sewn together

All sections sewn together

Ready to remove freezer paper

Step 5 – Finish your piece

Once you’ve completed stitching the quilt top together, use whatever methods suit you to sandwich the quilt, quilt it, thread paint it, bind it etc. I’ll do this once I get home — one of the first things I do will be to get the black lines done around its face.

So far, I’ve spent about 30 hours to get to this stage. I expect the last stages to take around 10 hours. This is why hand-crafted art costs so much!!

Left to right: Ann Shaw, Judy (Alaska; flower), Rhonda (Australia; macaw), Alice (Texas; cockatiel), Gayle (Texas; bison calf), and Beth (Texas; scrub jay)


Sophie Standing workshop

11 03 2017

Last weekend I had the privilege of attending the first-ever workshop held by textile artist Sophie Standing. And what a workshop it was! Sophie (originally from the UK, then ten years in Kenya, and now living in the Seychelles) was an absolute delight, so helpful, and just an all-round lovely person. And her art is AMAZING! The four days just flew by, ably helped by the hospitality of Michelle and her team at Handcrafters House in Midland, Western Australia. Thanks must go to Michelle for working for more than two years to convince Sophie she needed to share her skills with the quilting world. I’m sure a new world has now opened up to Sophie, and I expect to see her moving from strength to strength as her work and techniques become more widely known.

Now, to the workshop…

We all worked from the same photo (provided by Sophie) of a shell on a beach, but the variety of work produced by the 20 ladies in the workshop was as different as they were.

Sophie started by talking about some of her pieces and the techniques she used for choosing fabrics, thread, and stitches. Then we were off on our own, choosing our fabrics and getting started on cutting out, pinning, and stitching. I think we all needed a little help from Sophie with our fabric choices — I know I did, and I was really pleased with the fabrics she helped me choose. I didn’t use some, added others (the lizards on the body of the shell, for example — I figured if Sophie can put flowers on a gorilla, I can put lizards on a shell!), but basically used the palette she helped me with.

The photos below show the original shell, some of my work in progress, followed by a section of Sophie’s work, and then some photos of some of the other work done in class.

My interpretation – in progress

(click on a photo to view it larger)

Others’ work

Sophie and her work


Huey, Dewey, and Louie

11 03 2017

A couple of months ago, I made some baby quilts for a relative. I purchased a duck applique pattern when I was at the New England Quilt Museum’s shop (Lowell, MA) last October. The pattern was for 9 different ducks on the quilt, but after cutting out the pieces for three ducks and knowing I was making three quilts, I figured cutting out nine ducks in total was enough, not 27!

I always make gender-neutral baby quilts, even if the recipient knows the gender of the child (she doesn’t) — I just have a thing about the stereotypical pink for girls and blue for boys, and so I make baby quilts in yellows, greens, oranges, and purples instead. For my niece’s quilts, I chose various shades of purple and of course the yellows and oranges in the ducks.

I started by cutting out a wide strip for the ducks, then fusing them in positions where they looked inwards to the centre of the quilt, with the middle duck looking straight out (I call them Huey, Dewey, and Louie). After fusing them in place, I satin stitched around them in matching colours. For the top section of each quilt, I did some improvisational piecing with strips of purple fabric, interspersed with flashes of yellow and orange. I then separated the top section from the duck base with a strip of yellow or purple fabric (the ducks on the darker background were separated by the yellow strip). The backing is some purple sheeting I had.

I quilted the top section of each quilt differently — for one I did a large meandering stipple, for another an open headband motif, and for the last one, a spiral motif. For each I used a variegated purple cotton thread. Each of the bottom sections has wobbly vertical lines, emulating rain. (On one, I’d done a heap of tight McTavishing in the bottom section, then because the tension wasn’t right, I decided to unpick it and do the vertical lines instead. Fortunately, I was on a retreat at the time and one of the other ladies helped me out — between us, it took a total of 10 person hours to remove that stitching!!!! Thanks again, Carol!)

I bound each quilt with the dark pink/purple fabric, stitching the binding to the wrong side of the quilt, then pulling it over to the right side and machine stitching it down — I liked the effect as the stitching line is straight on the front and doesn’t need to catch the back as it’s already stitched down.

(Click on an image to view it larger)

p1080071

p1080072

p1080073

p1080074

p1080075

p1080076

p1080077

p1080078 p1080079

And in situ:

triplets.jpg


Community Quilt 312

27 02 2017

Another scrappy quilt. The ‘busy-ness’ of the fabrics meant a simple stitching motif, so I chose ‘open headbands‘, which is a muscle-memory motif for me — I think I could do it in my sleep!

(Click on a photo to view it larger)

quilt312_01

quilt312_02

Threads used:

  • Top: Fil-Tec Glide ‘Navy’ (40 wt, trilobal polyester, colour 32965)
  • Bottom: Fil-Tec Magna Glide Classic pre-wound bobbin (lead gray)


Community Quilt 311

27 02 2017

Another predominantly blue scrappy quilt. I stitched ‘piano keys’ in the ‘Chinese coin’ strips, a medium stipple in the backgrounds for the flowers, and a large meandering stipple in the border.

(Click on a photo to view it larger)

quilt311_01 quilt311_02

Threads used:

  • Top: Fil-Tec Glide ‘Navy’ (40 wt, trilobal polyester, colour 32965)
  • Bottom: Fil-Tec Magna Glide Classic pre-wound bobbin (lead gray)


Community Quilt 310

27 02 2017

How to quilt this blue scrappy quilt? The squares were easy — a cathedral window motif, which I echoed in the light blue border too. For the large setting triangles (in navy), I free-motion stitched a large feather motif.

(Click on a photo to view it larger)

quilt310_01


quilt310_03

quilt310_02

quilt310_04

Threads used:

  • Top: Fil-Tec Glide ‘Navy’ (40 wt, trilobal polyester, colour 32965); Mettler Metrosene Plus (40wt, polyester, colour 672)
  • Bottom: Fil-Tec Magna Glide Classic pre-wound bobbin (lead gray)


Six new quilt tops

22 02 2017

On my recent quilt retreat with friends, I knocked out six new quilt tops. Most were made with batik fabric jelly rolls I bought in Bali a couple of years ago, and I made the others using fabrics from my scrap stash and the excess jelly roll fabric. No patterns, just from my head or from a picture I saw. Update: I’ve now finished all these quilts and added them to my Etsy store (except the pink one — that’s been donated to the McGrath Foundation). The photos below are of each unfinished top, followed by photos of the finished quilt.

p1080219

Available on Etsy: https://www.etsy.com/au/listing/583085869/green-and-black-crib-or-lap-quilt?ref=shop_home_active_4


p1080209


Available on Etsy: https://www.etsy.com/au/listing/569285250/pink-and-yellow-crib-or-lap-quilt-modern?ref=shop_home_active_7

p1080211

Available on Etsy: https://www.etsy.com/au/listing/569286400/green-and-white-crib-or-lap-quilt?ref=shop_home_active_3

Licorice Allsorts!

Licorice Allsorts!

Available on Etsy: https://www.etsy.com/au/listing/569286664/licorice-allsorts-lap-quilt?ref=shop_home_active_2

p1080214

Available on Etsy: https://www.etsy.com/au/listing/583085291/pink-yellow-and-white-crib-or-lap-quilt?ref=shop_home_active_6

p1080213


Doing myself an injury

22 02 2017

Quilting is a dangerous hobby! The only time I’ve ever been to an ER was because I spiked myself in/near the femoral artery while quilting. Until Monday.

I had a wonderful 4-day quilting weekend away with some very special gals, and was on my final three strip cuts to finish my 6th quilt top for the weekend when the rotary cutter jumped the edge of the ruler and took out part of my thumb (end of the nail and several layers of skin) and a big slice out of my index finger (I think it would’ve been much worse had my thumb not partly stopped it on its journey). I’d made several scrap quilts on the weekend so had used the rotary cutter hundreds of times. But that didn’t make any difference.

My friend Bobbie (an ex-nurse) was able to strap the main injury to my index finger tightly and take me to hospital where we spent three hours in the ER (at least two of which was waiting, me with my hand raised). Once I was in, the medical staff checked it out, put on some stuff to stem the blood, put some ‘glue’ stitches (no anaesthetic required) in my index finger (nothing could be done for the thumb except dress it; it was mostly a cosmetic injury anyway), gave me a couple of painkillers, and instructions not to remove dressings for a week, and I was on my way.

rotary-cutter

I’m fine. No pain at all, surprisingly, though it hurt like crazy (plus throbbing) after I did it and while I was waiting to be seen. I’m now looking online for a rotary cutter ruler guard or protective gloves (the Klutz gloves from Fons and Porter look like a good option).

Update 24+ hours later: Still no pain unless I inadvertently knock the end of my left index finger or the thumb (idiot!). No painkillers required. Slept well last night, except for being woken by a storm coming through. Feel absolutely fine, and except for some awkward movements (typing is interesting, as are other daily activities like showering and washing my hair) everything’s good. While a disposable kitchen/food prep glove works well for showering, it’s too hot for sleeping, so I MacGyvered a solution using a mini packing cube to protect my dressings while sleeping 😉

p1080216

The lack of pain is the most surprising — I sliced into a fair chunk of skin, though not to the bone as I’ve heard others do (shudder).

Update one week later

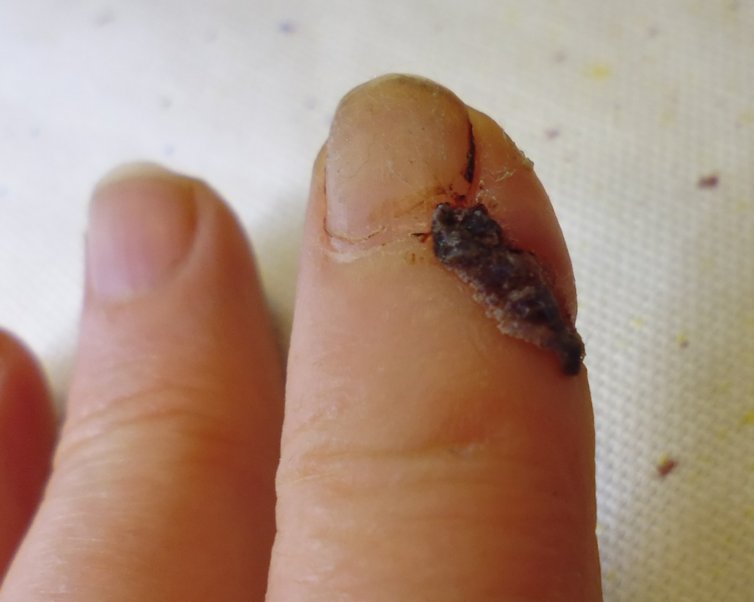
The thumb was a light injury in comparison to the index finger. Mostly, part of the nail was sliced off and several layers of skin behind that part of the nail. I think that hitting the thumb first caused the rotary cutter to slow down a tad and perhaps deviate a little, thus resulting in a less serious injury to my index finger.

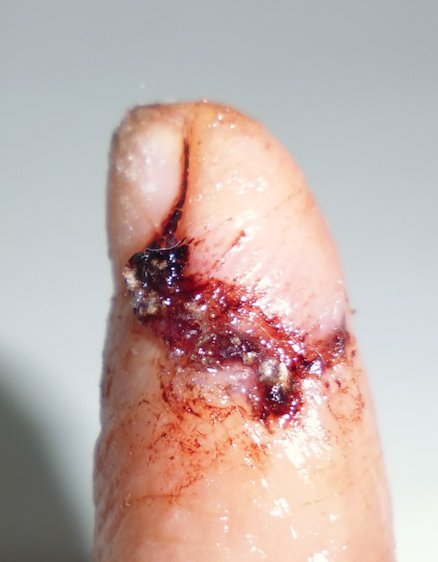
Here’s my thumb immediately after I removed the dressings; there’s still some caked-on blood from a week ago, and some fluff from the dressings:

p1080221 p1080220

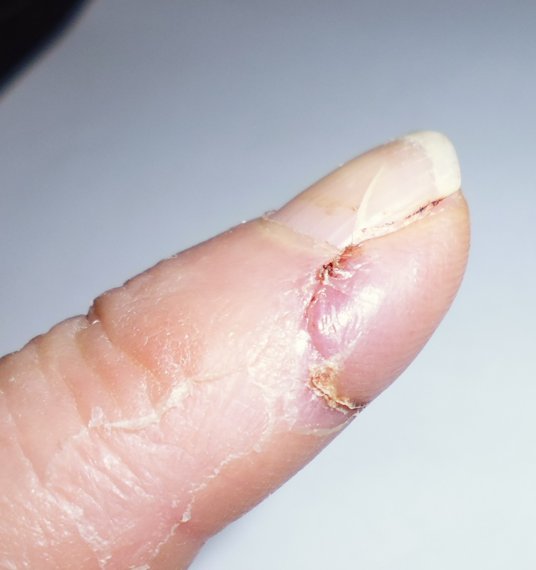
And my index finger, looking pretty ugly on removal of the initial dressings. I’ve since dressed it again, but obeyed the ER doctor’s instructions not to remove their initial dressings for a week. The very dark lumpy bits are a combination of dried blood and the glue used to hold the skin together, in lieu of stitches. It looks far worse than it feels!

p1080223

p1080222

p1080224

Although the site of the cut is tender to touch, I’ve had no pain since the first few hours after doing it. I’m keeping everything dry by wearing a disposable kitchen/food handling glove in the shower and when I prep food. And will keep changing the dressing on the wound every couple of days now until it’s completely healed.

Update two weeks later

Two weeks’ on and I’d taken to exposing it to the air. I was still showering with a glove, but the dressing — if worn — was minimal and just to stop me from ripping the wound. The wound looks far worse than it it — it’s just dried blood and glue. Still a bit tender near the wound site and some lack of feeling in the side of the finger pad, which I believe will come back over time.

Update nearly three weeks later

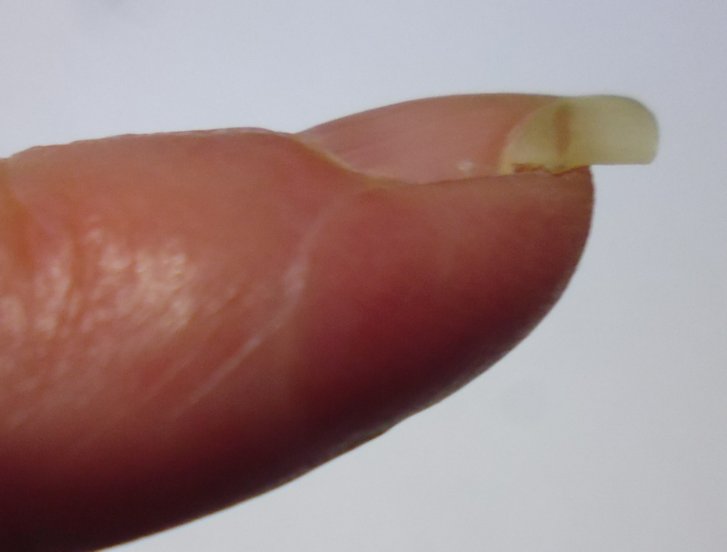
I’d been exposing the wound to the air, water, etc. and finally the last of the glue fell off some 19 days after cutting myself — now I can see the (superficial) mark in the fingernail where the rotary cutter went! The wound site is still a little tender, and I have small areas on the side of the finger pad where I can’t feel anything, but the colour is good so it’s just a bit of nerve damage, which I believe will eventually heal and regenerate.


Update four weeks on

Still slightly tender but it’s coming along well!


Update 22 April 2017

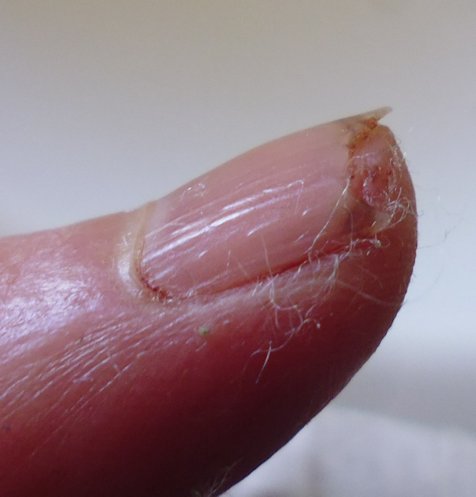
I’ve now purchased a Klutz glove and am using it religiously! And my finger has completely healed – you can hardly see the scar. I still have a little tenderness and lack of feeling along the side near the nail, but the area is gradually getting smaller. And since I took these photos, I’ve put Super Glue on the cut part of the nail to prevent it tearing too soon.

Update late August 2021

It’s been a while since I revisited this post. I have a tiny scar on my left index finger—you wouldn’t know it was there unless you were told it was and went looking for it. But I still have some residual numbness. Not full numbness, but a different sensation in the side of that fingertip, a sort of ‘not quite all there’ feeling. It’s nothing that stops me from using the finger, but I’m aware of it every time I touch it. It’s possible that I may have permanently damaged a nerve or two and may have this feeling for the rest of my life.


Australian distributor for Fil-Tec threads

21 02 2017

Fil-Tec threads (such as Glide and the pre-wound bobbins — some of my favourites) aren’t easy to find in Australia.

If you’re in Australia, try http://bluerosequilting.com.au/. The owner of the website is a quilter in Bridgetown, Western Australia, and will mail anywhere in Australia only.

Update Sept 2020: In Perth, try https://www.fromthefirststitchtothelast.com.au/ (online or shop in Wangara)