In this case, the title of this post reflects a tiny pinprick hole in a water pipe that resulted in a LOT of water damage in just a few hours. Who would’ve thought that such small thing would lead to repairs and remediation that took seven weeks to complete? Much of that time was drying time, but there was still a lot of work to do to get it back to normal. All this happened last October, but I haven’t written it up until now. Much of this is a record for me as to what happened and how long it took. NOTE: We work from home, so the leak would’ve only been going for a few hours before being noticed. Had we worked away from home, or been on holiday, this could have been MUCH worse.
So, what happened?
Wed 16 Oct 2019
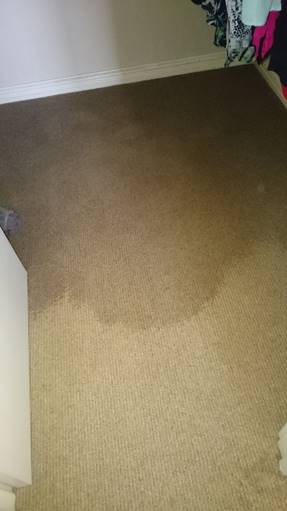
- Approx 3:30pm: Discovered a large patch of wet carpet in the bedroom at the entrance to the en suite bathroom and on the other side of the wall from the walk-in-robe (WIR). Identified that the water had seeped through the wall from the WIR. The WIR ceiling had water coming down from it, via the cornices and wall, and the alarm system box above the top shelf of the WIR. The water was pooling on the top shelf of the WIR, then running down the wall that adjoins the en suite shower. The carpet in the WIR was soaked, the back wall of the WIR was soaked as were the skirting boards, and water was still running down. The carpet on the other side of the WIR was soaked, as were its skirting boards—there’s possibly damp in that wall too.


- Raced outside to turn off the water main as we suspected a pipe had burst in the roof space. Called the plumber to attend ASAP.
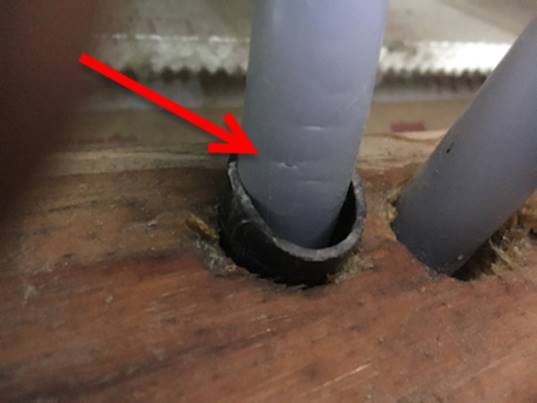
- Approx 4:30pm the plumber attended. He went into the roof space, and located the source of the leak, which was still running, though not as much. It was the hot water pipe from the hot water system (HWS) to the en suite shower. He got us to turn on the hot water tap in the shower to drain the rest of the water out. The cause of the leak was a very small hole/tear in the pipe. The plumber took photos, then cut the pipe and capped it as a temporary solution. The plumber identified only one insulation batt that was quite wet and removed it from the roof space; he put it in a large garbage bag and we put it in the bin.

This pipe is only about 12 mm (half an inch) in diameter
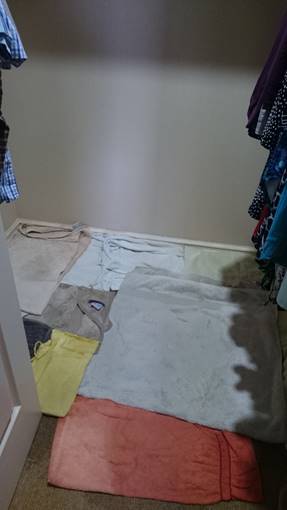
- Meantime, we were running around madly trying to mop up the water from the carpet in the WIR and outside it, and remove clothes and shoes that had been wet by the leak, as well as storage boxes on the top shelf of the WIR.
- I emailed my handyman (away on holidays) to let him know that we would need him very soon. He gave me the contact details of a handyman friend of his (Eric).
- I emailed my insurance broker to let him know and ask what to do next. He told me that no insurance policy will pay for the plumbing repair, just for finding it and the damage caused by it. Go figure!
- I called the alarm system people to see if someone could come out to check that the alarm box and its contents had not sustained any damage.
- During the night, we continued to mop up water using old towels, using the washing machine to spin out the water every so often, then laying them down again to soak up more water. We also ran a pedestal fan in the WIR to try to evaporate some of the moisture (not very successful).


Thu 17 Oct 2019
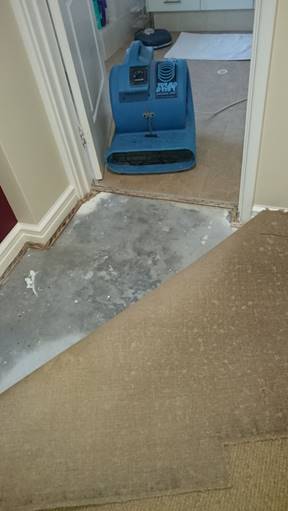
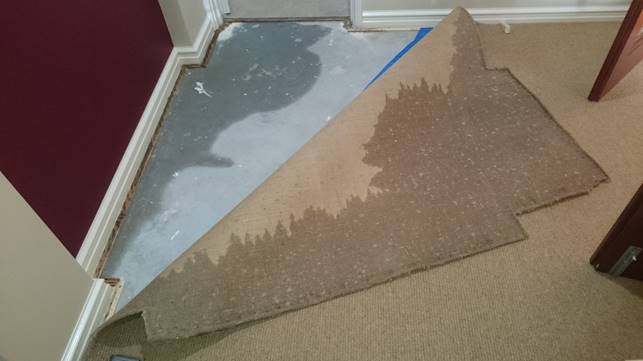
- I called three different carpet cleaners before I found one (Village Carpet Care, Bunbury, Western Australia) that had the equipment and knowledge to extract water from carpet in the hope of rescuing the carpet from potential mould and avoiding replacement. They came late in the afternoon. The carpet guy pulled back the carpet, cut out the wet underlay, extracted as much water as he could and left us with two floor-level fans (not heated—heated fans promote mould!) to help dry out the carpet and concrete slab. He will come back next week after everything is dry to re-lay the underlay and carpet and treat and steam clean the carpet. After the underlay was removed and the carpet peeled back, the extent of the water damage—both inside the WIR and outside it—was revealed. In addition to the carpet, the concrete slab in the WIR and outside it was wet, as was the wood holding the carpet in place, and very likely the skirting boards and wall between the WIR and the entrance to the en suite (still to see evidence of moisture—the handyman and the carpet cleaner both said it could takes weeks or even months to know the full extent of that damage). After extracting the water, peeling back the carpet, and cutting out the affected parts of the underlay, the carpet guy placed two powerful floor fans—one in the WIR (under the lifted carpet) and one at the entrance to the en suite—to dry out the carpets. We had these fans on constantly from 8am to 11pm for the next few days, and kept the windows in the bedroom and bathroom open for cross-ventilation, as well as running the exhaust fan in the WIR for those hours, and the air-conditioning. The aim was to extract as much moisture as possible from the carpets and save them from being replaced, if possible.


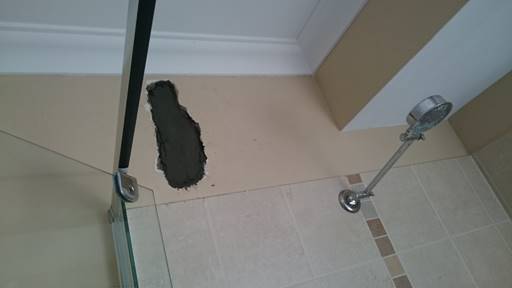
- The plumber arrived to repair the pipe. He had to gouge out and ‘chase’ the hot water pipe in the area above the shower, replace the pipe and reconnect it to the HWS piping in the roof. When finished, he cemented in the hole he’d made, leaving enough room for the handyman to patch the hole at a later date.

- The alarm guy came in the afternoon and checked alarm control box at top of WIR—bone dry, so no water ingress..
- I received an insurance claim form from the insurance broker.
- Meantime, we identified all clothing that had got wet and needed to be washed (including many towels) and started doing laundry to prevent the clothes from going musty/mouldy.
- I called Eric (the handyman) to get him to check the damage and see what needed to be done, in preparation for a quote. He found no evidence of any bubbling or bulging in skirting boards or behind paint, but he said that wasn’t uncommon at this stage and could take weeks/months to become evident. He left us an industrial floor fan (not heated) to help circulate air to remove moisture. He’ll quote me on the work needing to be done, based on this initial inspection.
- Approx. 24 hours after discovering the leak and after mopping up as much moisture as we could from the carpet and having the pedestal fan blowing over it for at least 18 hours, it was still quite wet both inside the WIR and on the other side of the wall near the en suite.


Sun 20 Oct 2019
Eric (handyman) came to collect his blower fan and to discuss the next steps. He will likely return the week starting 28 Oct to:
- replace the insulation batt(s) in the roof space
- while in the roof space, check the attachment of the WIR ceiling/cornice to see if it has been damaged and will need replacing
- patch, paint etc. the partially repaired hole in the wall above the shower where the plumber had to replace the pipe
- replace some or all of the top shelf in the wardrobe.
After a few weeks/months, he will come back to fix any issues with bubbling paint, water damage to cornices/walls etc. that reveal themselves over time.
Mon 21 Oct 2019
The carpet guy returned and spent several hours reinstalling the underlay and the lifted carpet, treating the carpet, then steam cleaning the carpet.
Sat 26 Oct 2019
Received partial payment of insurance claim to cover things like the carpet remediation, alarm box check, plumber exploratory work (though NOT the plumbing repair).
Tue 29 Oct 2019
Insurance assessor arrived to assess damage and compare quote from Eric to what he thought needed doing:
- Didn’t need to see my photos—his moisture meter clearly showed that water had penetrated the walls (some readings were >80%; normal is <15%). Took readings on red wall outside WIR and wall inside en suite near cornice just outside shower stall. Did not take readings of pillar on outside wall of WIR.
- Advised that getting the paint off ASAP and drying out the walls with a fan was necessary to prevent further damage, mould, and a long-term wait before painting etc. can occur. Indicated it could be weeks before remediation work could happen.
- Decided that the red wall and skirting board outside the WIR weren’t showing signs of water damage and so crossed that off the quote, for insurance purposes. (Ultimately, these DID need quite a bit of repair/remediation, but weren’t an allowable claim on the insurance policy because the assessor deemed that they weren’t an issue.)
- Said that cornice and ceiling in the WIR didn’t appear to be structurally damaged, but didn’t go into the roof space to check.
After the insurance assessor left, I contacted Eric to arrange a time for him to start prep work
Thu 31 Oct 2019
Eric did these tasks:
- Replaced insulation batt that was removed from the roof space by the plumber
- Removed some of the melamine shelving from WIR to allow air flow (left the shelving framework for now—it will need replacing too)
- Scraped all paintwork from back wall of WIR and partial areas of side walls to expose the plasterwork; marked with pencil the extent of the water ingress on the side walls
- Provided an industrial floor fan to help dry out the walls; we left this on 24 hours a day for several days, along with the exhaust fan in the WIR.
Sat 2 Nov 2019
Received final insurance payment. Didn’t pay for everything, of course.
Mon 4 Nov 2019
Eric tested moisture in walls:
- Moisture in walls in WIR down to <10%, so the fan has worked well
- Moisture in walls on the other side of the WIR: approx. 25% on the red wall in the bedroom, and about 30% on the en suite wall, so still a way to go.
Eric’s advice: keep fans on and he’ll be back later in the week to take more measurements and plan from there.
Fri 8 Nov 2019
Plumbers here all day to replace the grey pipe in roof space with all copper. We decided to replace all plumbing inside the roof space with copper pipe—both the plumbers, the carpet guy, and the insurance assessor all said independently of each other that the grey pipe used 10–15 years ago was a bad batch. The carpet guy said he did water extraction and carpet remediation for about 300 houses a year just in the Bunbury area that had water damage from split pipes in the roof; the insurance assessor said similar, as did the plumbing company.
Mon 11 Nov 2019
- Eric tested moisture levels. Good in WIR, but still 20–35% on outside wall, pillar, and en suite shower wall.
- Eric stripped off paint in en suite to expose to fan air to dry out as much as possible.
Thu 14 Nov 2019
Eric tested moisture levels.
- Almost all are <15% in the en suite, but the pillar outside was still registering ~20–25%, so he focused the fan on that area.
- Moisture levels in the WIR are either the same or 1–2% higher than when the fan was on them, but still under 15%, with most under 10%.
Mon 18 Nov 2019
- Eric tested moisture levels: Readings on pillar still over 20%, so he stripped pillar and part of red wall in bedroom and put fan onto this area. Also, put initial patch on wall above shower in en suite.
- Air con serviceman here because no a/c going into the sewing room. Found a piece of ductwork had been dislodged fully from the unit!!! Only possibility was the plumbing team. I emailed the plumbers to let them know. A/c guy took photos and refitted the ductwork.
Tue 19 Nov 2019
Cleaner here; asked her to do 2nd shower as we had used it when the en suite shower was out of action a month ago. She discovered there was NO water to the shower taps. Called plumbers, who discovered that those taps had never been connected when they did the copper pipework! Added a T-piece in to pipe water to those taps.
Thu 21 Nov 2019
Eric tested moisture levels—all below 10%!!! Started work on sealing the walls.
Mon 25 and Thu 28 Nov 2019
Eric did main painting on walls, fitted WIR shelf etc.
Mon 2 Dec 2019
Eric finished off almost everything, including painting the feature wall in master bedroom.
Wed 4 Dec 2019
Eric painted last coat of red wall, final touch ups. DONE.
So, 16 October to 4 December—one tiny pinprick hole that spurted water and resulted in damage that took seven weeks to get back to normal. The insurance paid about 75% of the total cost of the repairs and remediation. Additional costs were for replacing the pipework in the roof with copper—that was always going to be our expense.


Leave a comment