In Grace Errea’s class at Houston, she gave us detailed instructions for finishing art quilts with an envelope (or pillowcase) finish, and then we created our own. Here are my notes from that class — hopefully I’ll be able to make sense of them next time I need to do this sort of finish:
- Pre-wash ALL fabrics before you start making the quilt — you’ll be wetting the quilt later when you block it (and you MUST block it), so you don’t want to ruin your work with fabrics that will run.
- Make the quilt top.
- Before you start quilting the art quilt, decide on the finish you want. If an envelope finish, then ONLY quilt two layers — the top and the batting. Do not add a backing fabric.
- Quilt as normal.
- Block the quilt.
- Stretch the quilt onto a design wall, foam core board, or something solid.
- Pin (using large T-pins) every two inches.
- Pin the top edge first (from the middle out to the sides), then pull down and stretch the quilt and pin the bottom edge (also from the middle out). Repeat for the sides. (Note: Cindy Needham also does this, but she also marks a straight line on the top and right side [squared correctly, of course] to guide her when stretching and pinning her quilts.)
- Soak the quilt using a water sprayer until completely wet.
- Let dry — this could take hours in a hot climate, or days in a cooler climate. It must be completely dry before the next step.
- Once dry, unpin the quilt. Grace assured us it will never hang wonky again!
- Square the quilt and trim.
- Cut one side, then use that cut side to mark the opposite side (typically in three places; use a square ruler or T-square if possible).
- Cut the opposite side in the same way, following the marks.
- If you’re not sure you’ll get it correct, then cut a little larger (each 1 inch all round), check the squareness, then cut again as necessary.
- Cut a backing piece a little larger than the trimmed quilt.
- Cut 3″ off the top of the backing fabric.
- Sew the 3″ piece back onto the backing fabric, using a long (or basting) stitch. Yes, this seems strange, but you’ll see why later…
- Press the seam up towards the top of the backing fabric piece.
- The final size of the backing piece should be the same as the trimmed quilt — if it’s too big, trim it to size.
- Place the right side of the backing fabric onto the front of the quilt (i.e. right sides together) and pin into place all around.
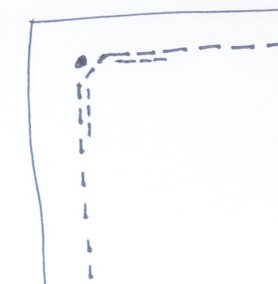
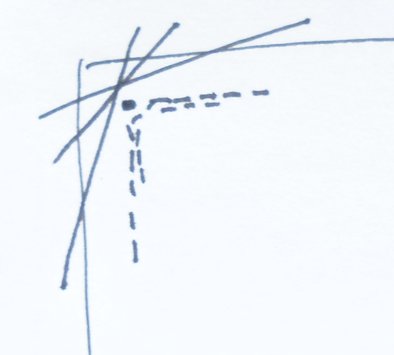
- Mark with a dot the 1/4″ vertical/horizontal position in each corner.
- Stitch with a 1/4″ seam down one side and STOP when you are ONE stitch from the 1/4″ mark.
- Backstitch for 3 stitches.
- Go forward three stitches, then pivot the piece diagonally.
- Stitch diagonally (usually one stitch, but might need two) to where you will start stitching your next side. This diagonal stitch should be just below the 1/4″ mark at the corner. It’s this diagonal stitch and trimming away the bulk (step 21) that gives the corners a sharp crisp finish.
- Pivot so you are ready to stitch the next side.
- Stitch 3 stitches, then backstitch 3 stitches.

- Continue stitching down this side.
- Repeat steps 12 to 19 for ALL sides. You will be fully enclosing the ‘envelope’.
- Trim all corners without cutting any stitches.
- Trim the diagonal ‘ear’ off.
- Then taper trim for about a half inch into the 1/4″ seam area.
- You’re taking all the bulk out of the corner.

- Unpick the seam you basted earlier on the backing fabric.
- Turn the quilt out through the opening on the back, gently poking out the corners with a ROUNDED tool (e.g. chopstick, end of an artists’ brush etc.). Be careful not to poke all the way through!
- Finger turn and finger press the edges to make sure none of the backing fabric shows on the front and vice versa.
- Steam iron (or spritz) the edges to make then sharp and flat. Keep checking none of the fabric shows on the other side.
- You’ll need to do some more quilting (MINIMAL) to make sure you don’t have a loose and floppy back.
- Turn the quilt so the back is facing up.
- From the bottom, gently push any loose fabric into the gap in the backing fabric.
- Go all around the quilt doing this.
- Using straight pins, pin as you go after pushing any fullness in the gap. Start pinning from the edges.
- Keep pushing excess looseness into the gap, and pinning as you do so.
- When you’ve finished the main part of the quilt, do the same from the top of the quilt, pushing the looseness out of the fabric in the top 3 inches. Pin.
- Turn the quilt over, and if you using basting pins, re-pin the quilt from the front side matching the straight pins on the back.
- Once pinned, turn the quilt back and remove the straight pins from the back. (Grace uses straight tailors’ pins with very tiny heads and says she doesn’t bother with this step and the quilting goes over the top of those pins without a problem — she then removes them after quilting.)
- Quilt minimally, using clear or smoke nylon thread (e.g. Madeira) top and bottom to match the quilt. The aim is to hold the layers together, not to quilt the death out of it — you’ve already done that, and any dense quilting now will only distort the quilt. Typically, you’d just quilt around the major elements of the quilt.
- Add a hanging sleeve — yes, this is another reason why you did that 3″ join earlier! Any puckers at that seam from the final quilting will be covered by the hanging sleeve.


Leave a comment