It’s with some sadness that I write this blog post — this was the last-ever Quilting Adventures to be held at T Bar M near New Braunfels in Hill Country, Texas, and one of the last workshops they’ll ever hold. Kim and Debby are closing their Quilting Adventures business later in 2017. I’ve been coming here since 2012, and have attended four Spring Seminars.
This one was great! We had the lovely Ann Shaw as our tutor, and as there were only 5 in the class, we got heaps of attention and help from her throughout the week. The workshop was ‘Designing from nature’, and as a group, we did some amazingly creative work.
My piece was a blue and yellow macaw; the photo was taken by Wade Courtney, a friend of mine from California.
**********
The notes below are to remind me what we did so that I have a reference point when I use this technique again. They are NOT a substitute for doing Ann’s class, and it’s very possible I’ve missed some steps. Do not follow these instructions without first having done one of Ann’s classes, otherwise you’ll likely get confused!
Click a photo to view it larger.
Step 1 – Create the master drawing and sewing order
- Tape your photo to the table, and tape tracing paper over it. Study your photo for the ‘gesture’ lines.
- Use a straight ruler to trace the ‘gesture’ lines of your own photo — these are straight lines.
- Make sure there are several full-width lines to create sections, then rule straight lines between those lines, as necessary and following the colours, to create sewing lines for the piecing.
- Check that ALL lines go somewhere and that there are NO pieces that will have to be inset when sewing.
- Label each section with a unique letter and a set of numbers for each piece in that section, following the logical sewing order (e.g. A1, A2, A3, etc.).
- Write down the sewing order, using a notation to represent what piece gets sewn to another, which pieces have to be sewn before others can be done, and how all get sewn together to create the section. For example, A1 A2 means sew A1 to A2, and then sew A3 to either A2 or the entire piece made from A1 and A2.
- Make a photocopy of the traced design and use coloured pencils to colour in the pieces (not the background or borders). You’ll use this when sewing to make sure you sew the right fabrics (colours and labels) together.

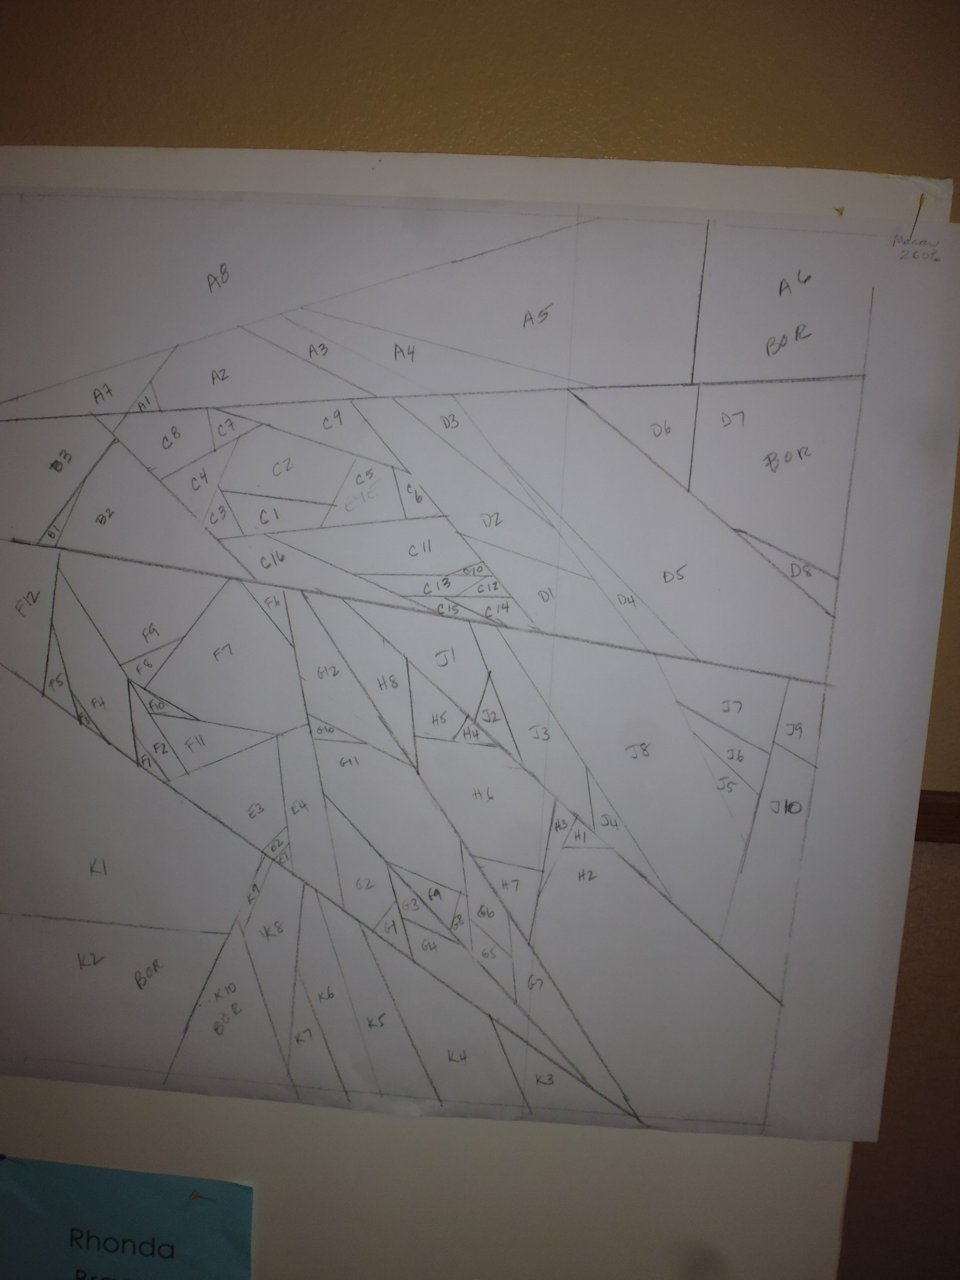
Rule straight lines around the elements of the photo

Ruled lines – not yet labelled

Labelled sections, with photocopies coloured in to show main colours

Sewing guide
Step 2 – Use the full-size copy of the drawing to create the freezer paper copy
- Resize the tracing paper copy at a large-print copy store. I had mine resized to 250% and 260%, creating a final size of around 31 x 33 inches. Write the sizes on the printouts! My 250% image was the final size and the one I used to create the freezer paper templates; the 260% image was the one I used to pin the cut fabrics on to (the reason for increasing by 10% is to allow for the seam allowance for each piece when it’s pinned so it still matches the pattern reasonably closely).
- Tape the full-size copy (mine was the 250% one) to a large window, which will act as a light box. Make sure the labels are facing you.
- Tape pieces of freezer paper (dull side up) together with first-aid cloth tape (cloth tape doesn’t melt when ironed!) so that you have a single sheet of freezer paper big enough to cover the final size image.
- Tape the freezer paper to the window over the full-size copy with the shiny side facing you (dull side against the copy).
- Using a ruler and a permanent ultrafine Sharpie, transfer ALL lines from the copy onto the shiny side of the freezer paper. Add lines for the edge of the design. DO NOT label this shiny side. Put the Sharpie away — do not be tempted to use it for anything else!
- Remove the freezer paper and the copy from the window.
- Turn the copy over and re-tape to the window, this time with the labels facing out (i.e. away from you).
- Turn the freezer paper over and re-tape to the window matching the lines in the copy — the shiny side should face away from you and correspond to the lines in the copy. The dull side should now be facing you.
- Using a lead/graphite pencil only, label each section on the dull side of the freezer paper. Make sure you don’t miss any sections.
- Use various coloured pencils to make tick marks on each edge of EACH piece. Use different colours for each edge and make sure the tick marks extend across the Sharpie lines you can see through the freezer paper. These tick marks are hugely important when you come to line up your fabric pieces for stitching.
- Mark the full-width section lines with a single colour highlighter. Mark any large subsections crossing a major section with a different colour highlighter. Mark about a half inch inside the outside edge of the design with another highlighter colour.
Enlarged photocopy of lined and labelled pieces
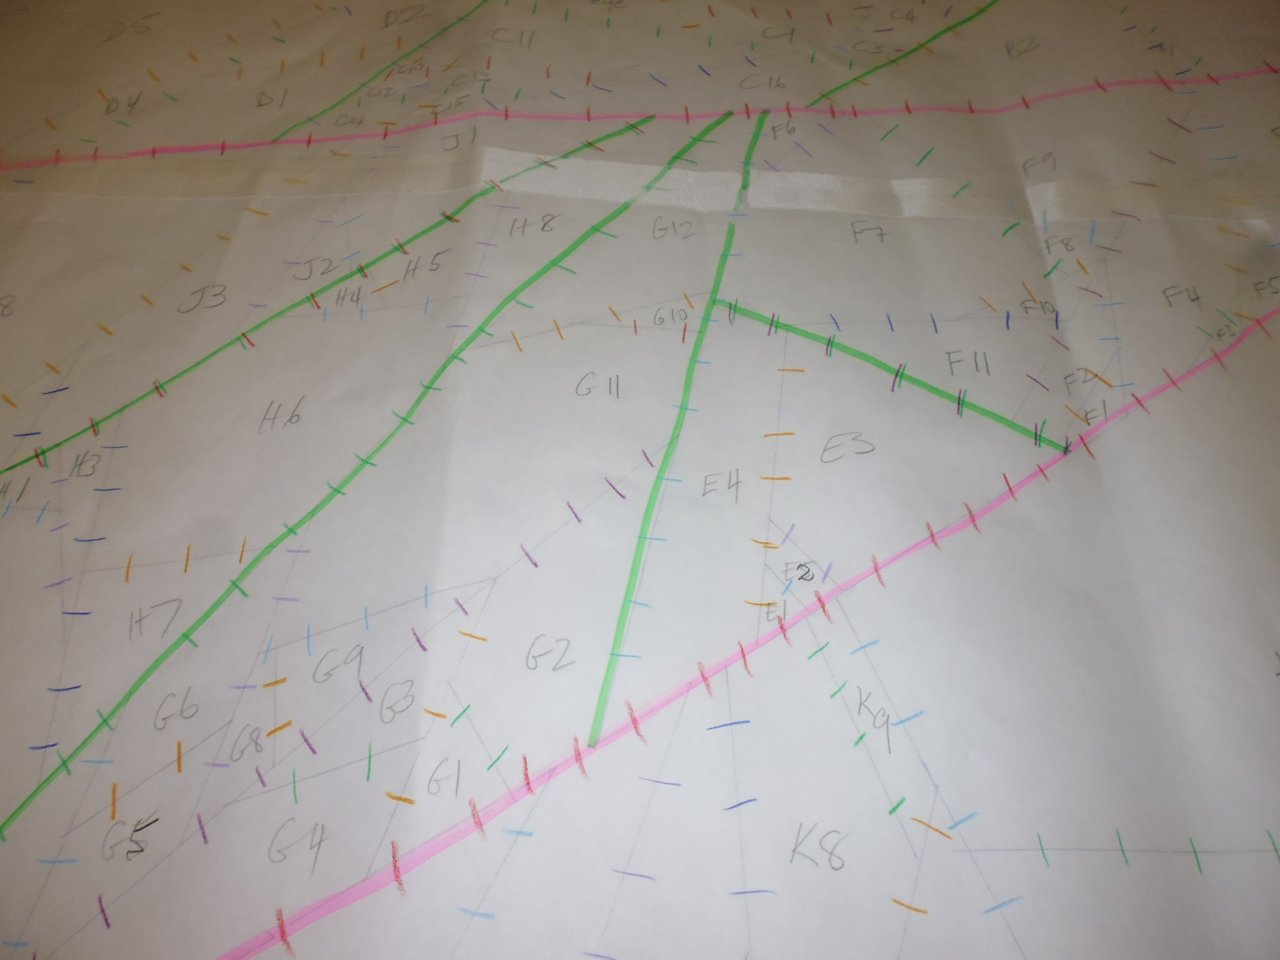
Dull side of freezer paper showing major sections (pink highlighter), subsections (green highlighter), labelled pieces, and coloured pencil tick marks for each edge of each piece

As above, but more detailed view
Step 3 – Create freezer paper templates of each piece and iron on to the fabric
- Pin the larger-size copy to the design wall, and pin the freezer paper copy over the top. Pin a ziplock bag close to the design to hold any small pieces.
- Cut out the major sections from the freezer paper and pin in place back over the paper copy (approximately is fine). DO NOT cut apart all sections or pieces at once — you’ll lose them and get very confused.
- Pick a piece inside a section and cut it from the freezer paper — make sure you cut accurately on the Sharpie lines.
- Audition fabric for this piece.
- Once you’ve selected the fabric, iron the SHINY side of the freezer paper to the WRONG side of the fabric, using a hot iron and pressing for several seconds to adhere the freezer paper to the fabric.
- Cut out the fabric around the freezer paper, adding at a quarter-inch seam allowance all the way around the freezer paper template for the seam. Use a rotary cutter for a clean cut, where possible.
- Pin the fabric (with the freezer paper on the back of it) onto the larger size copy in the position that matches its label.
- Repeat steps 3 to 7 for ALL freezer paper template pieces. This may take a day or so, so be patient, be careful, and be methodical. Swap out fabrics as necessary – the freezer paper can be lifted and repositioned and ironed onto other fabric several times.

This was not from my piece, but it shows the freezer paper template ironed to the wrong side of the fabric, ready for cutting out the piece.
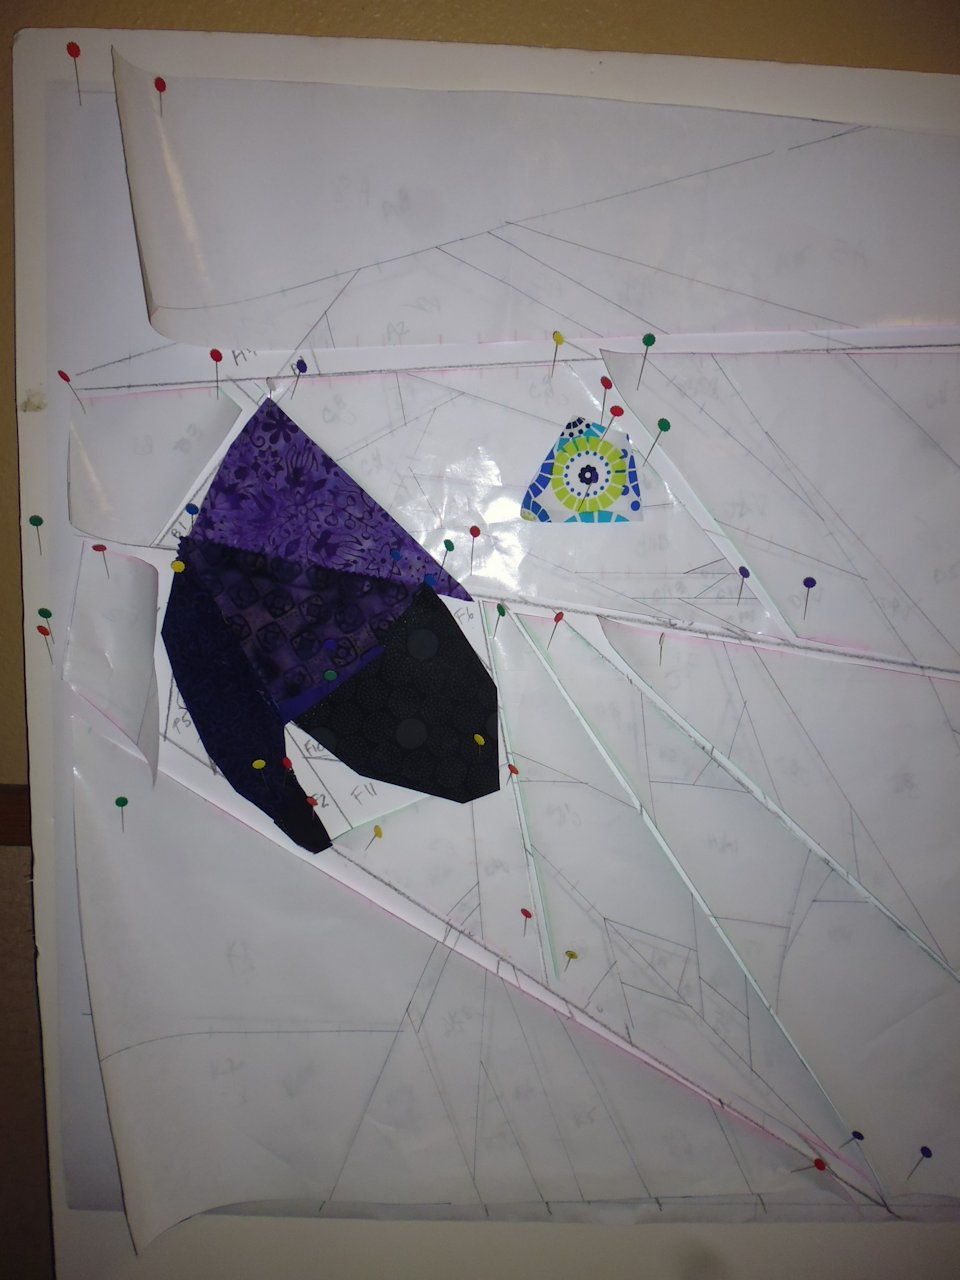
Placing the fabric pieces one at a time — note that very few parts of the freezer paper template have been cut yet
Step 4 – Sew the pieces together
- Put your sewing guide and the photocopy you coloured in Step 1 near your sewing machine — you will refer to both when sewing.
- Follow the sewing guide and place two pieces right sides together. Match the coloured pencil tick marks on the freezer paper to make sure you have matched them exactly. Use fine pins to hold the pieces in place.
- Stitch from one end of the freezer paper template to the other, using the edge of the template as your stitching line. Backtack at each end. Do not stitch into the seams. Try not to stitch into the freezer paper.
- Press the sewn seam to one side.
- Repeat steps 2 to 4 for ALL other pieces. Again, this could take a day or more so be careful and methodical.
- Eventually you will have each subsection and section stitched and can then stitch the major sections together to complete your quilt top.
- Remove the freezer paper and discard.

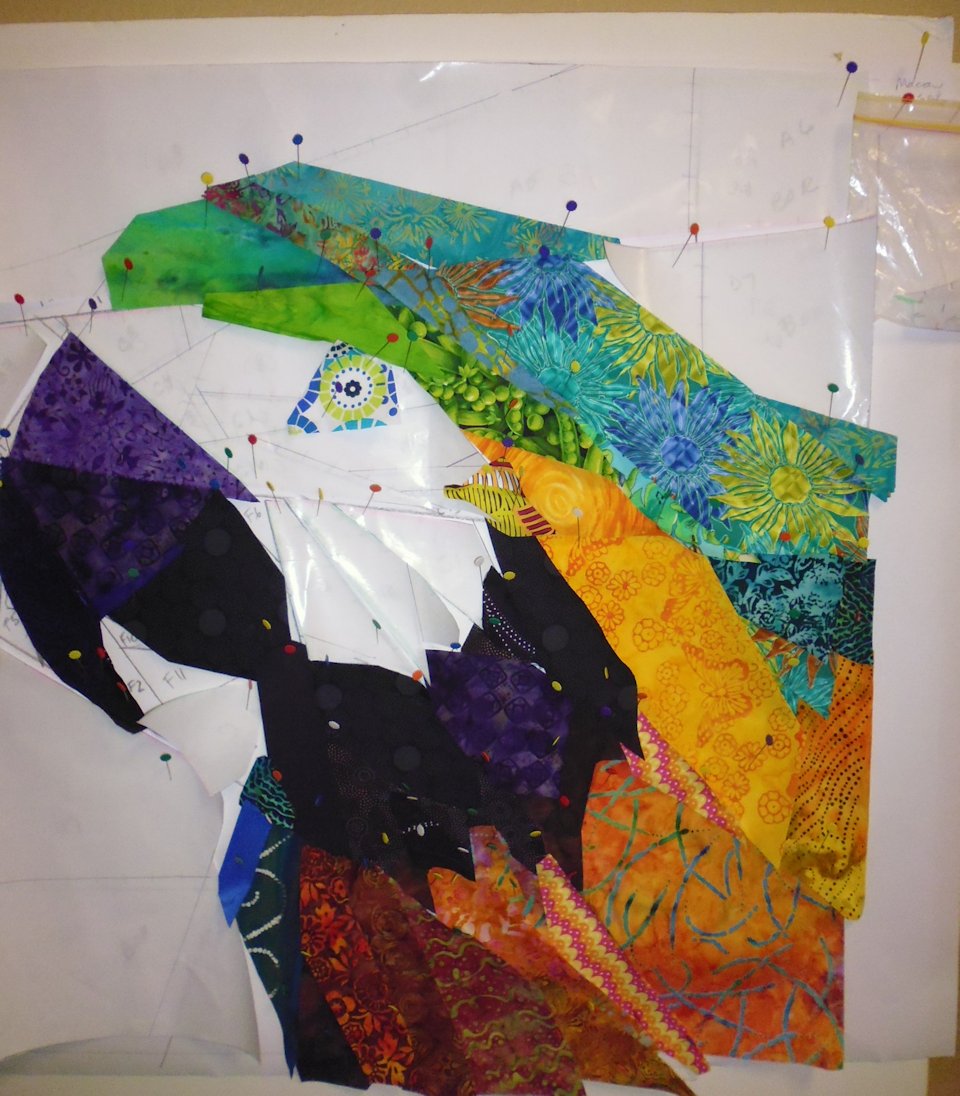
Top section all sewn together

All sections sewn together

Ready to remove freezer paper
Step 5 – Finish your piece
Once you’ve completed stitching the quilt top together, use whatever methods suit you to sandwich the quilt, quilt it, thread paint it, bind it etc. I’ll do this once I get home — one of the first things I do will be to get the black lines done around its face.
So far, I’ve spent about 30 hours to get to this stage. I expect the last stages to take around 10 hours. This is why hand-crafted art costs so much!!
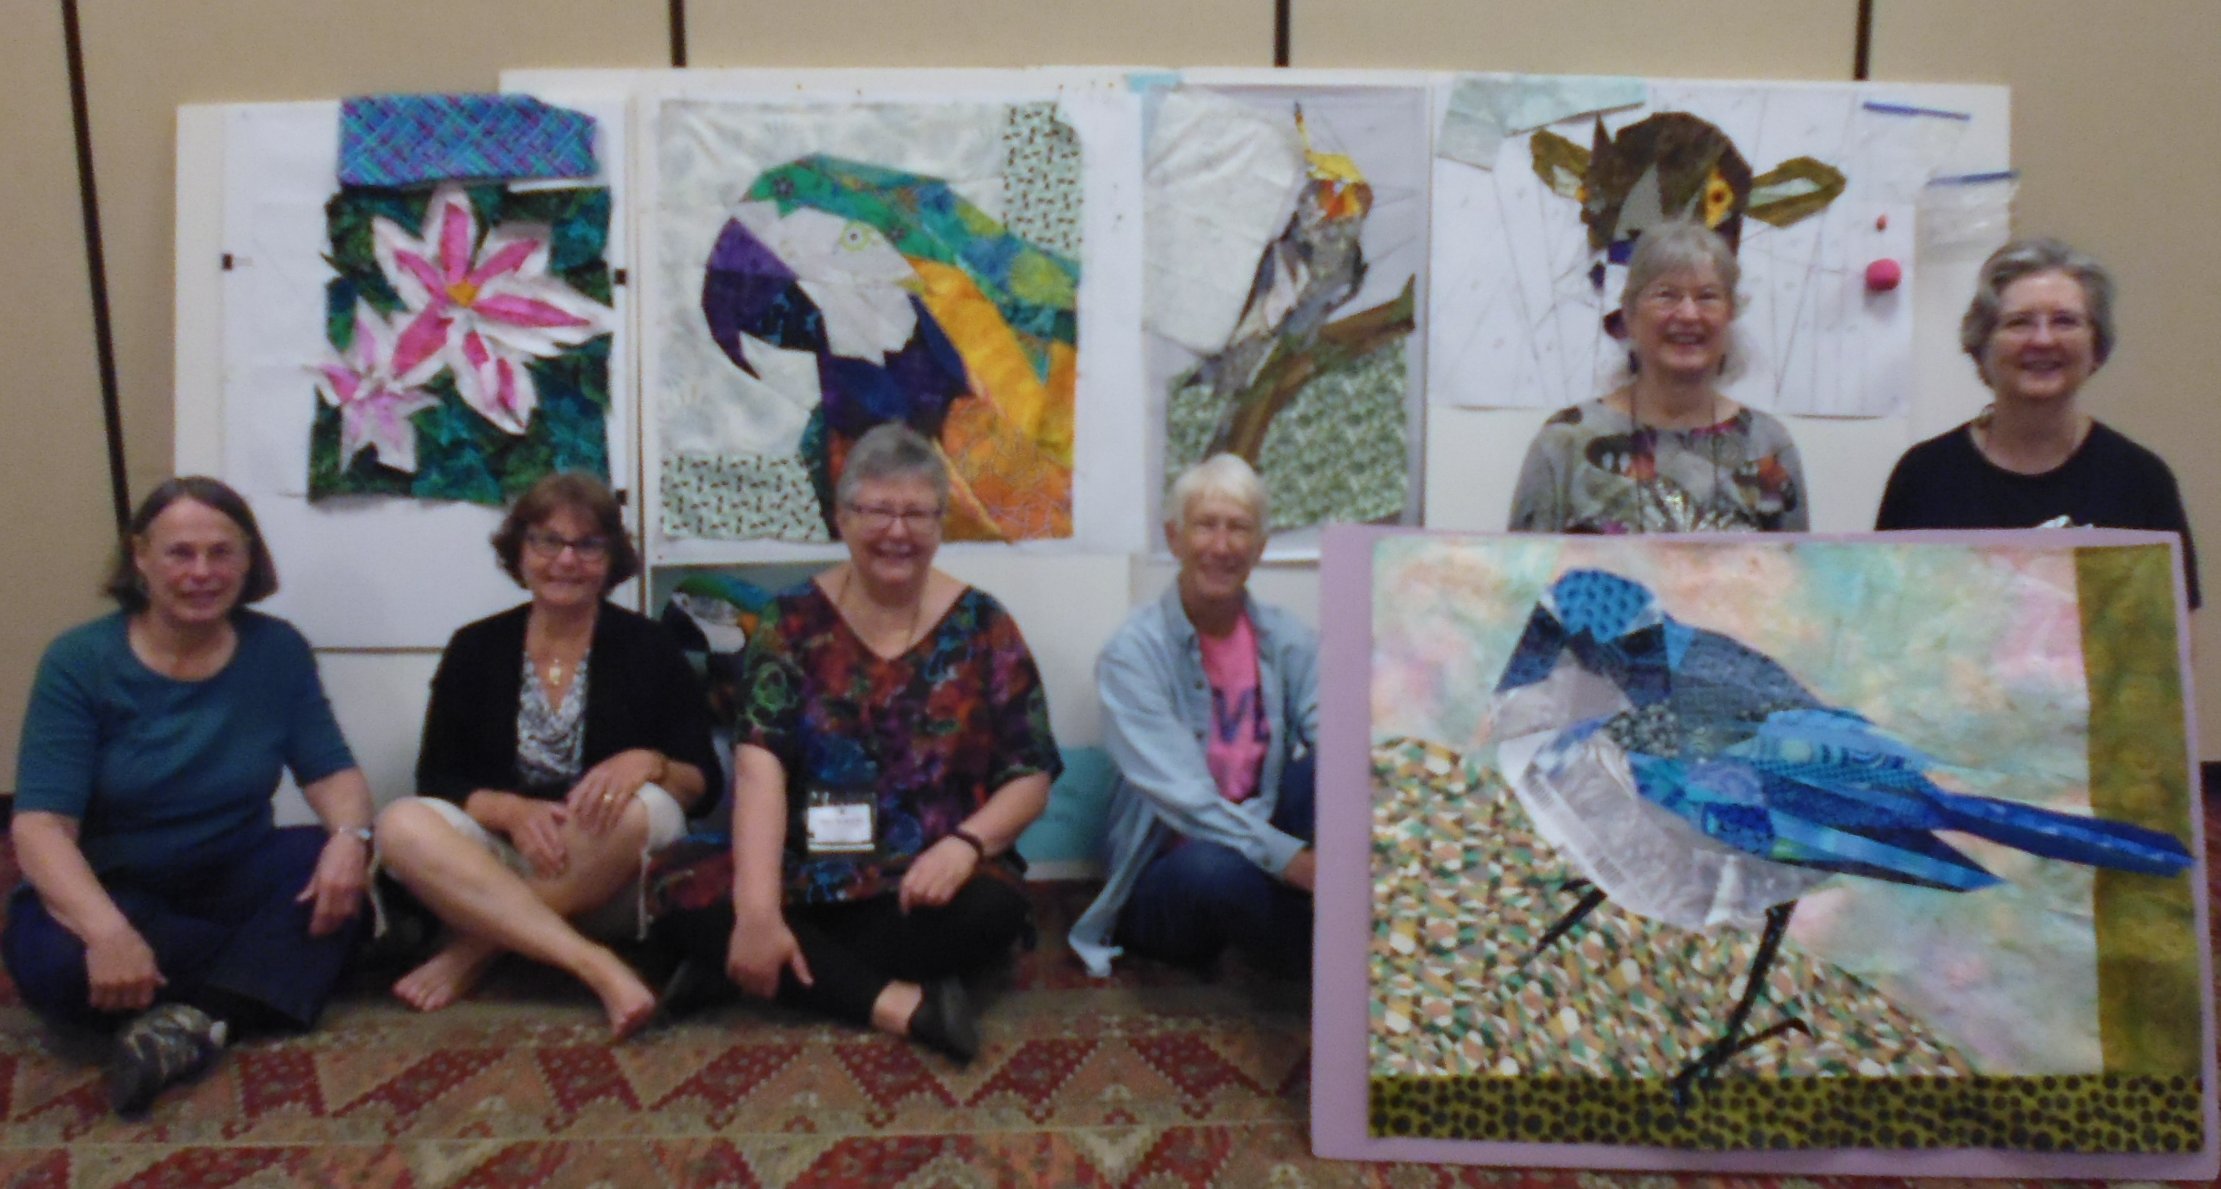
Left to right: Ann Shaw, Judy (Alaska; flower), Rhonda (Australia; macaw), Alice (Texas; cockatiel), Gayle (Texas; bison calf), and Beth (Texas; scrub jay)


