Community Quilt 65

23 02 2013

This was another very busy scrappy quilt!

How to quilt it? Well, it was so busy that I didn’t want to quilt anything that was too overpowering, so to soften the angled straight edges of the top’s geometric design I just did an all-over large meandering stipple in a pastel variegated thread (pink, yellow, and blue).

(Click on a photo to view it larger)

quilt65_01

quilt65_02


Back:

quilt65_03

Threads used:

  • Top: Wonderfil Silco in a variegated pastel of yellow, pink and blue (40? wt, cotton; colour #SCM03)
  • Bobbin: Bobbinfil (cotton, white)


Community Quilt 64

23 02 2013

This was one busy quilt! It was all scraps, and in my opinion it looks far better from a distance than it did close up. That’s not to say it was ‘ugly’ — just a real mish-mash of fabrics, prints, and colours, typical of a scrappy quilt. But from a distance, the optical illusion created by the blocks outlined in dark blue is quite striking.

How to quilt it? Well, it was so busy that I didn’t want to quilt anything that was too overpowering; likewise, I didn’t want to just ‘stitch in the ditch’ though it was tempting to do so. Instead, I went for the opposite of the straight edges in this quilt and quilted big circles, bubbles, pebbles — whatever you want to call them. I wasn’t too precious about getting them exact — as you can see from the photos!; the whole idea was to soften the straight edges of the top’s very geometric design.

(Click on a photo to view it larger)

quilt64_01

quilt64_02

Back:

quilt64_03

Threads used:

  • Top:  Fil-Tec Glide ‘Rock Navy’ (40 wt, trilobal polyester; colour #30001)
  • Bobbin: Wonderfil Deco-Bob (80wt, colour DB 245)


Community Quilt 63

12 02 2013

This one was quite a traditional quilt, with some big star blocks in purple, green, and cream florals.

How to quilt it? I decided to get away from the geometry of the blocks and quilt large freeform flowers in each star block, starting with the purple blocks where the star points were evenly spaced, then continuing into the cream/green blocks where they weren’t. I was originally going to quilt the flowers in the cream/green blocks in a cream, but then decided to continue using the same purple, blue, and green variegated thread I used in the purple blocks in these blocks too. For each flower, I stitched a sort of circle around the centre join in the block, then radiated out the petals from there, doing the long petals all the way around first, then filling in with the petals to the shorter points.

For the border, I kept with the same thread and stitched loopy flowers and leaves.

(Click on a photo to view it larger. The colours look a little washed out as this photo was taken in the heat of a very hot summer’s day. Sorry about that!)

quilt63_01

quilt63_02

quilt63_03

Back:

quilt63_04

Threads used:

  • Top: Superior King Tut ‘Cairo’ (40 wt, cotton, colour #932)
  • Bobbin: Bobbinfil (white, cotton)


Community Quilt 62

12 02 2013

I LOVE this panel! Normally, I’m not fussed by fabric panels. Either I don’t like the colours or the theme, but this one was different and not like any panel I’ve ever seen before. I love the colours and I especially like the birds — macaws are some of my favourite birds, and I love the over-the-top design of the toucans.

I was originally going to do a lot of thread painting on this quilt in matching colours, but realised fairly quickly that all that would do would be to tighten up the quilt and make it quite stiff. I suspect this quilt will go to a small child, and it needs to be comforting. So after doing a little thread painting in black, I switched to an invisible thread in smoke and mostly just outlined the main features, adding a bit of texture to the waterfall, the tree trunks, the edges and veins of the leaves, etc.

(Click on a photo to view it larger. The colours look a little washed out as this photo was taken in the heat of a very hot summer’s day. Sorry about that!)

quilt62_01

quilt62_04  quilt62_03

quilt62_02

Threads used:

  • Top: YLI Wonder Invisible Thread ‘Smoke’ (nylon)
  • Bobbin: Wonderfil Deco-Bob (80 wt, colour DB 245)


Community Quilt 61

12 02 2013

Another Disappearing 9-patch quilt, this time in yellow and green, with patches of a red wattle fabric — I’ll call it an Aussie quilt! Green and gold are Australia’s national sporting colours, and the green and gold wattle is our national flower.

I used my favourite quick and easy ‘open headband‘ motif all over the main top of this quilt in a variegated yellow, purple, and green thread. And for the borders I also used a variegated green thread to stitch the meandering leaves and stems. Each stem starts at the centre of the border and extends to the yellow corner block, where it meets the leaves from the opposing side.

(Click on a photo to view it larger. The colours look a little washed out as this photo was taken in the heat of a very hot summer’s day. Sorry about that!)

quilt61_01

quilt61_02

Threads used:

  • Top: Superior King Tut ‘Passionfruit’ (40 wt, cotton, colour #931) for the main top; Superior King Tut ‘Green Olives’ (40 wt, cotton, colour #990) for the border
  • Bobbin: Wonderfil Invisifil (100 wt, colour IF 702)


Community Quilt 60

3 02 2013

I really liked this quilt! The colours were so bright and cheery, and the black set them off perfectly. I’m pretty sure it’s a Disappearing 9-patch quilt, and it had a pieced backing in fun coordinating fabrics.

I suspect this quilt will go to a teenager (likely a girl as boys tend not to choose pink!), as the text on the pink fabric is all text message shorthand, and the pattern on the white fabric is of phone keypads and keyboard keys.

So how to quilt it? I wanted to echo the straight lines of the pieces in the blocks and give a hint of a computer circuit board, so I did a ‘squared stipple’ as an all-over motif. But unlike a traditional stipple, the stitching lines in this one are meant to cross, though typically only once per square/rectangle. I continued the single line stitching (yes, there’s only one long continuous line of stitching in this quilt top) into the border to tie the border to the quilt’s theme. And I decided on a purple/pink variegated thread to coordinate with the pinks and purples in the quilt. I think the black border sets this thread off nicely too.

(Click on a photo to view it larger.)

quilt60_01   quilt60_02

Back:

quilt60_023JPG

quilt60_04JPG

Threads used:

  • Top: Superior King Tut ‘Egyptian Princess’ (40 wt, cotton, colour #403)
  • Bobbin: Wonderfil Deco-Bob (80 wt, colour DB 205)


Community Quilt 58

28 01 2013

Another large quilt. This time a ‘Road to California’ (or similar) block.

Like Community Quilt #22, I stitched straight lines for this one, with a free-form (not marked) circle in the centre of each inner square. Again, I used my trusty Line Tamer ruler for the straight lines and knocked this big quilt out in an afternoon.

(Click on a photo to view it larger.)

quilt58_03  quilt58_01

quilt58_02

Threads used:

  • Top: Fil-Tec Glide ‘Cream’ (40 wt, trilobal polyester, colour #20001)
  • Bobbin: Wonderfil Deco-Bob (80 wt, colour DB 414)


Community Quilt 57

26 01 2013

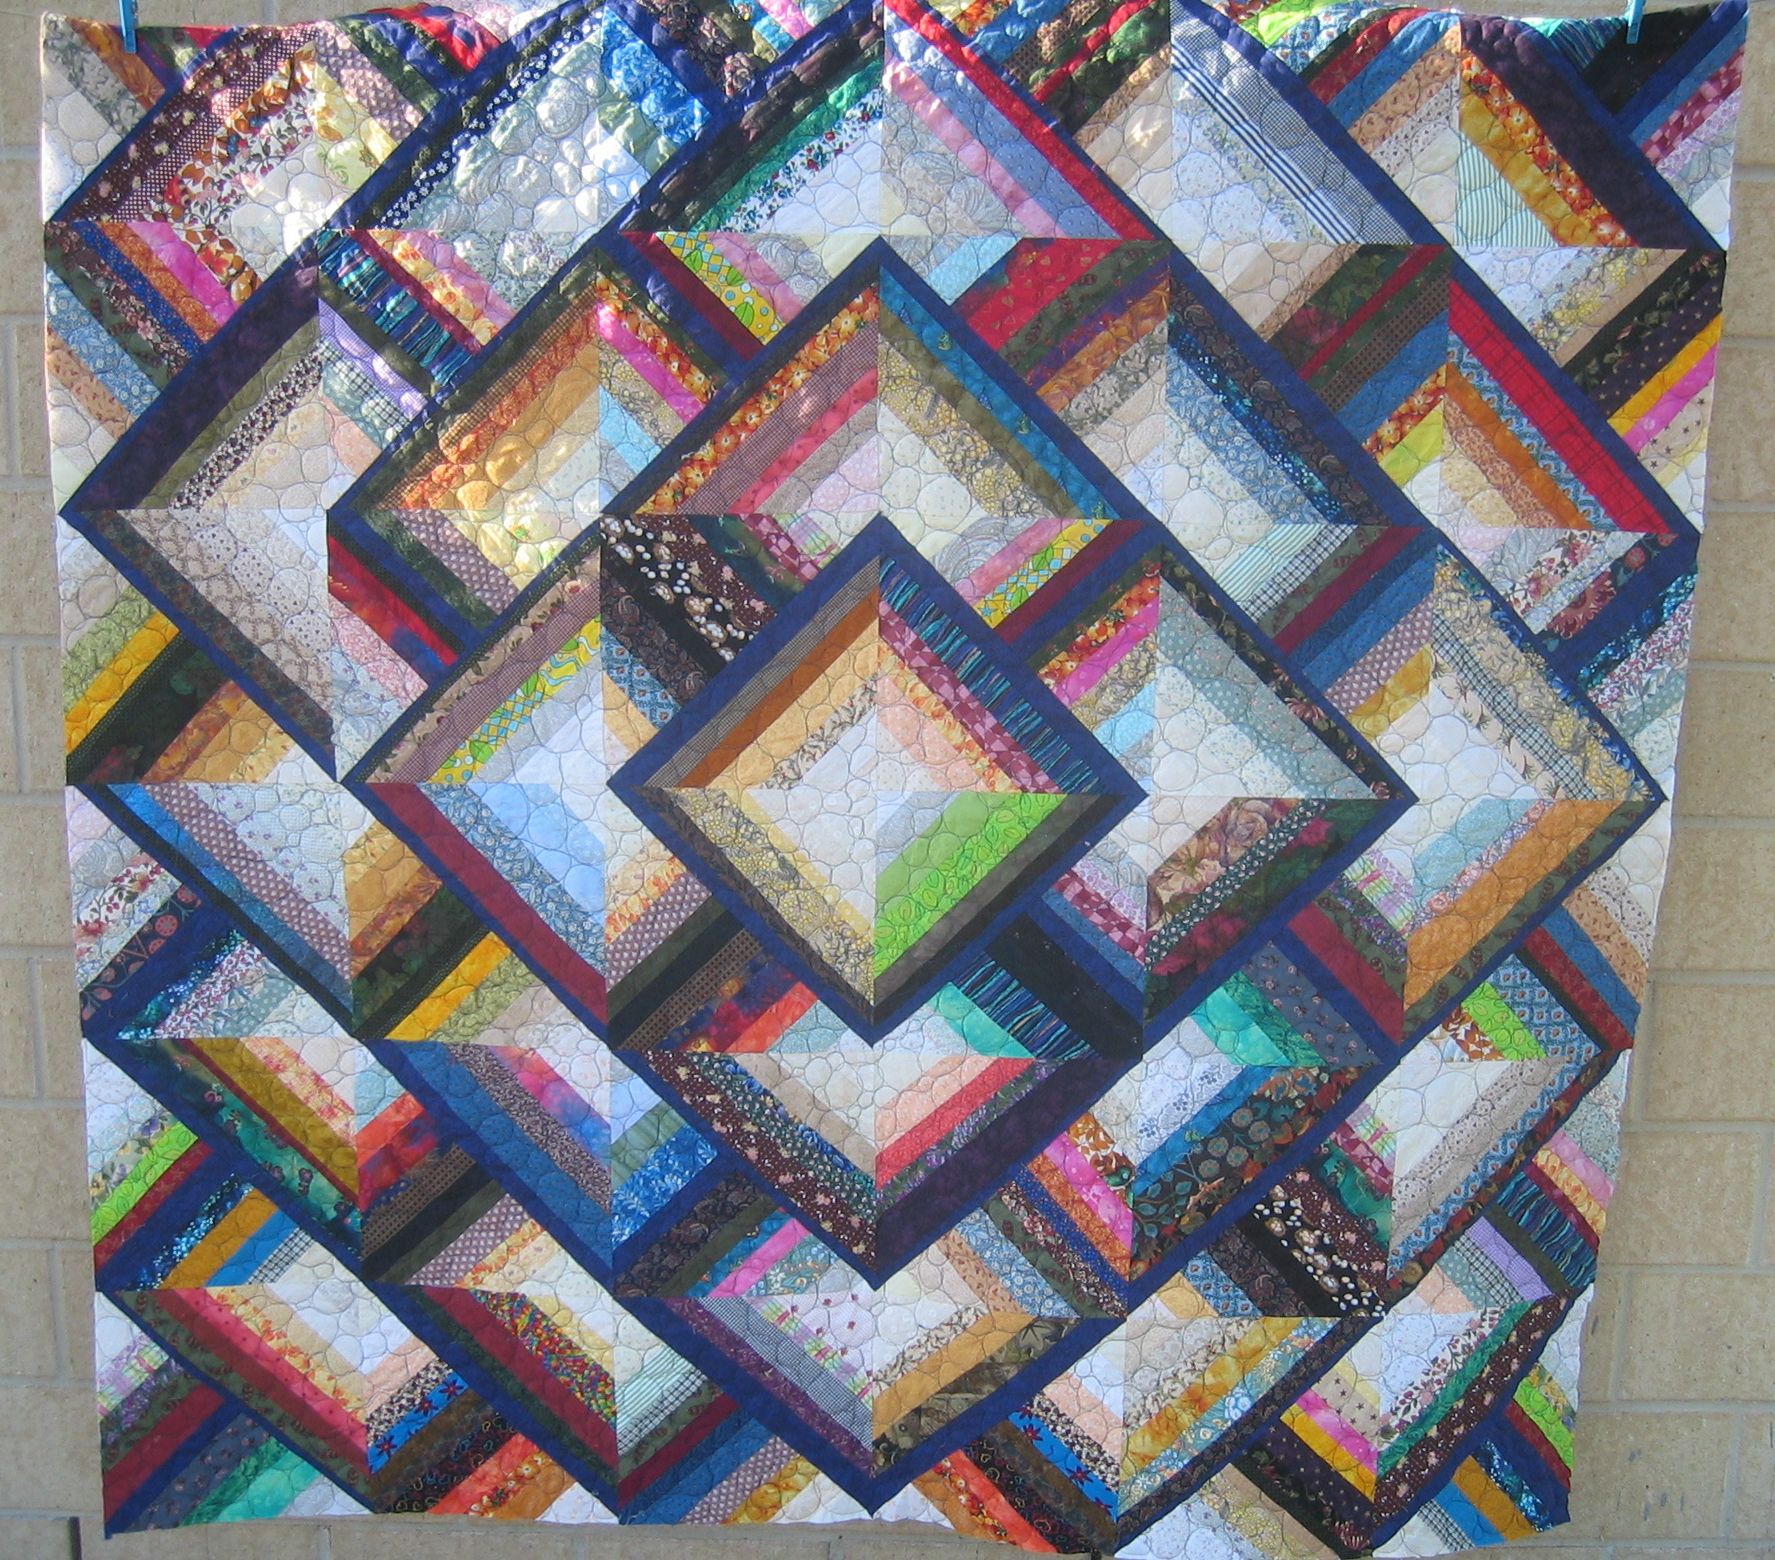
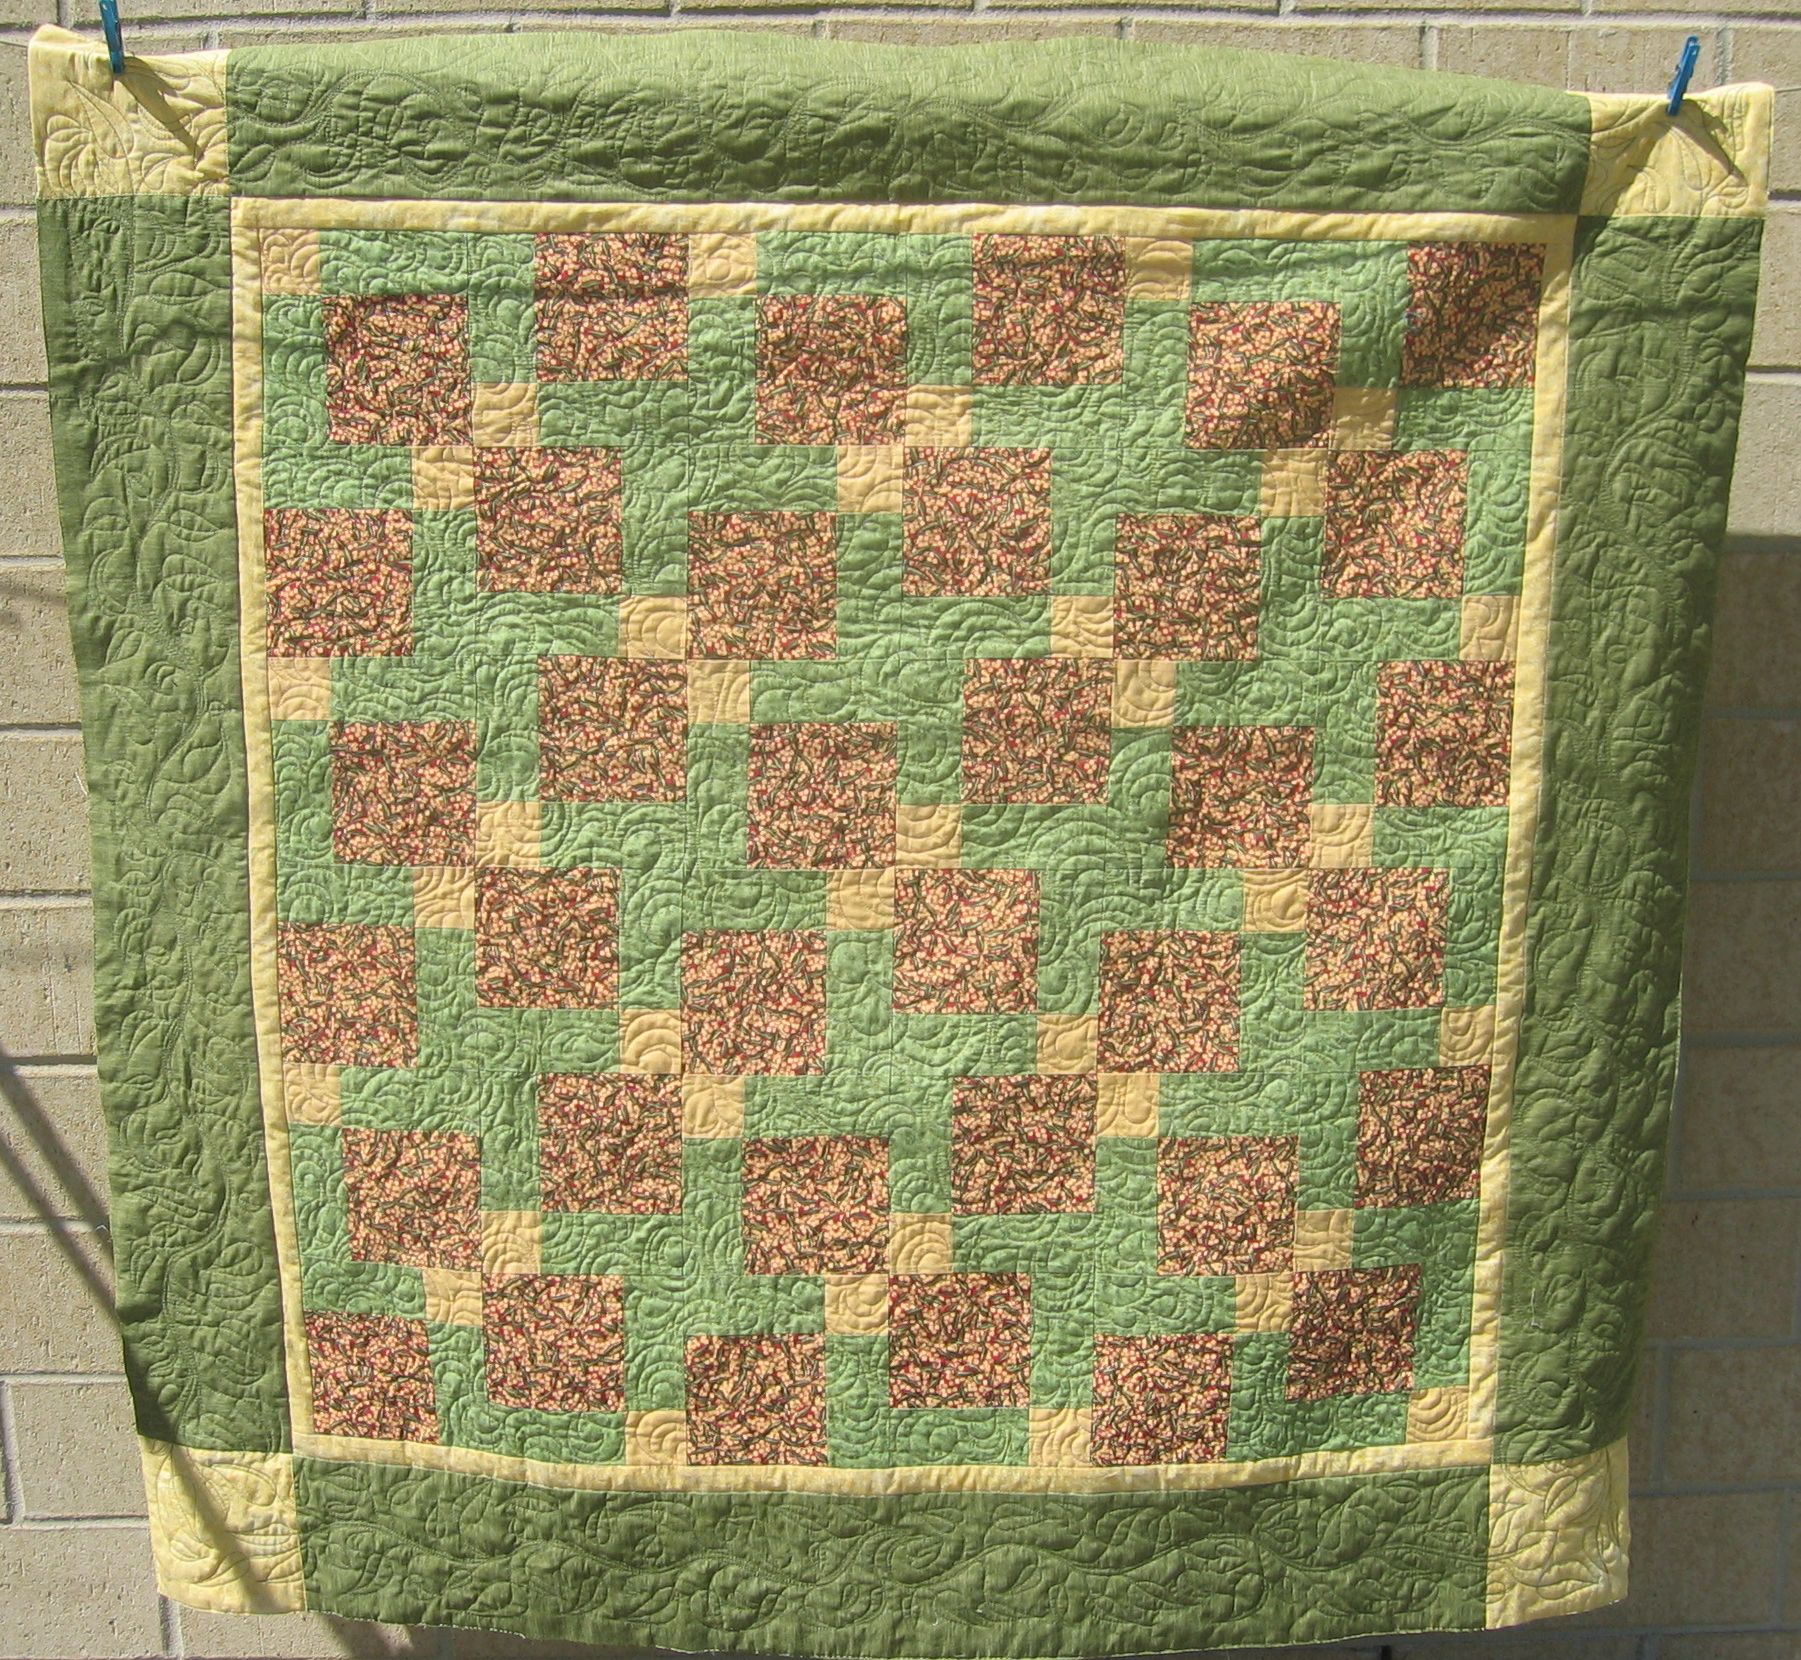
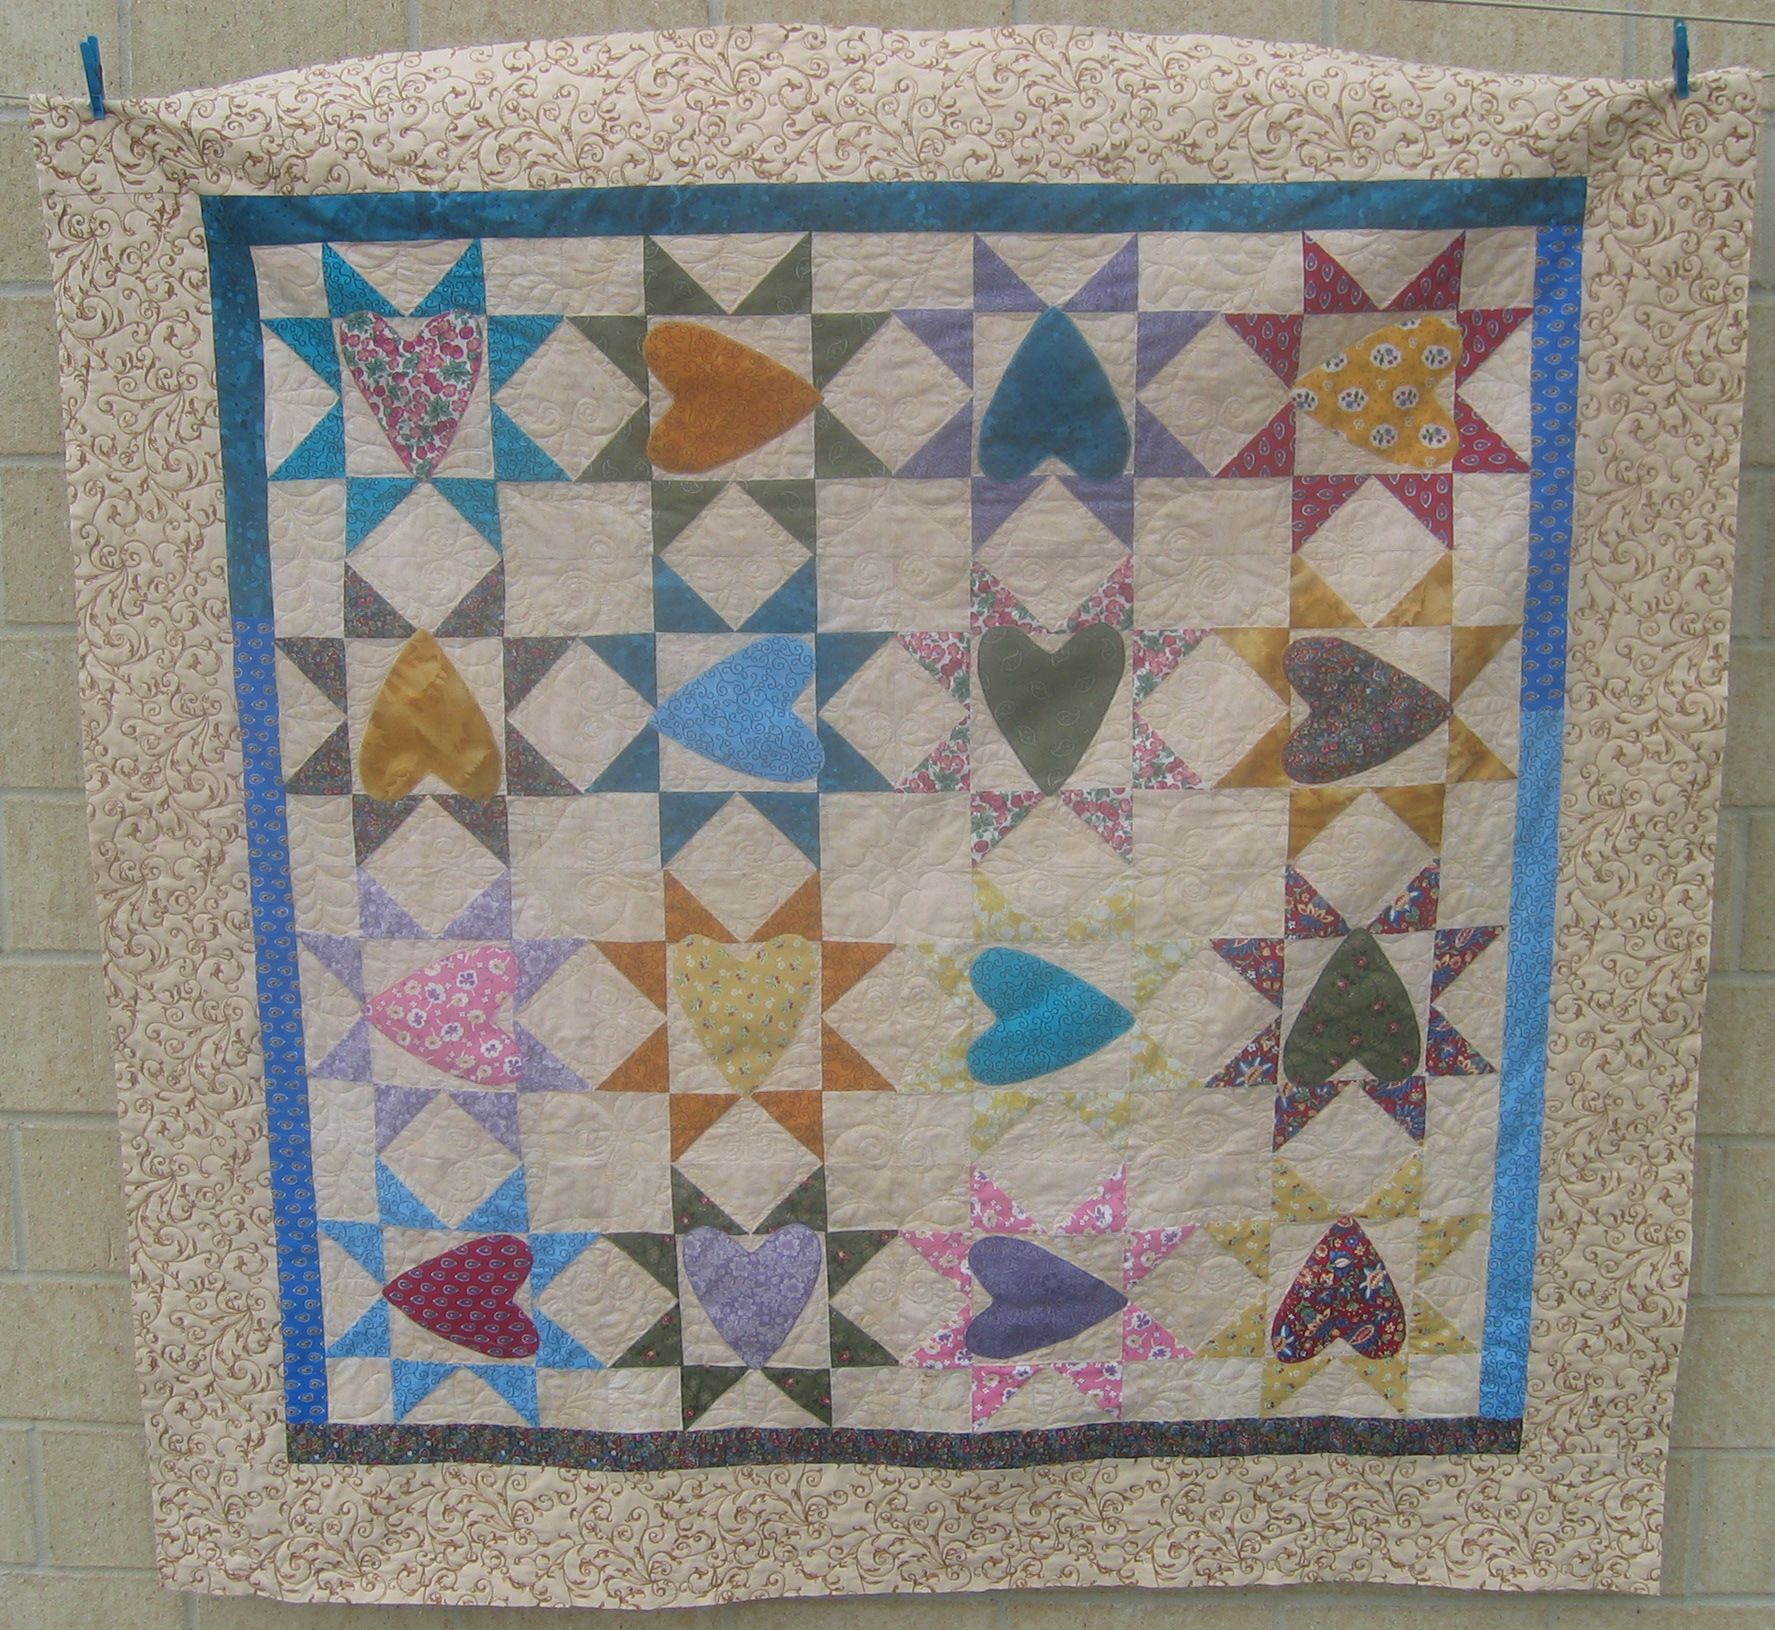
This was a BIG quilt, with heaps of lovely autumnal fabrics. In the photo below, there’s about a 12″ fold at the top to stop it dragging on the path.

(Click on a photo to view it larger.)

quilt57_01

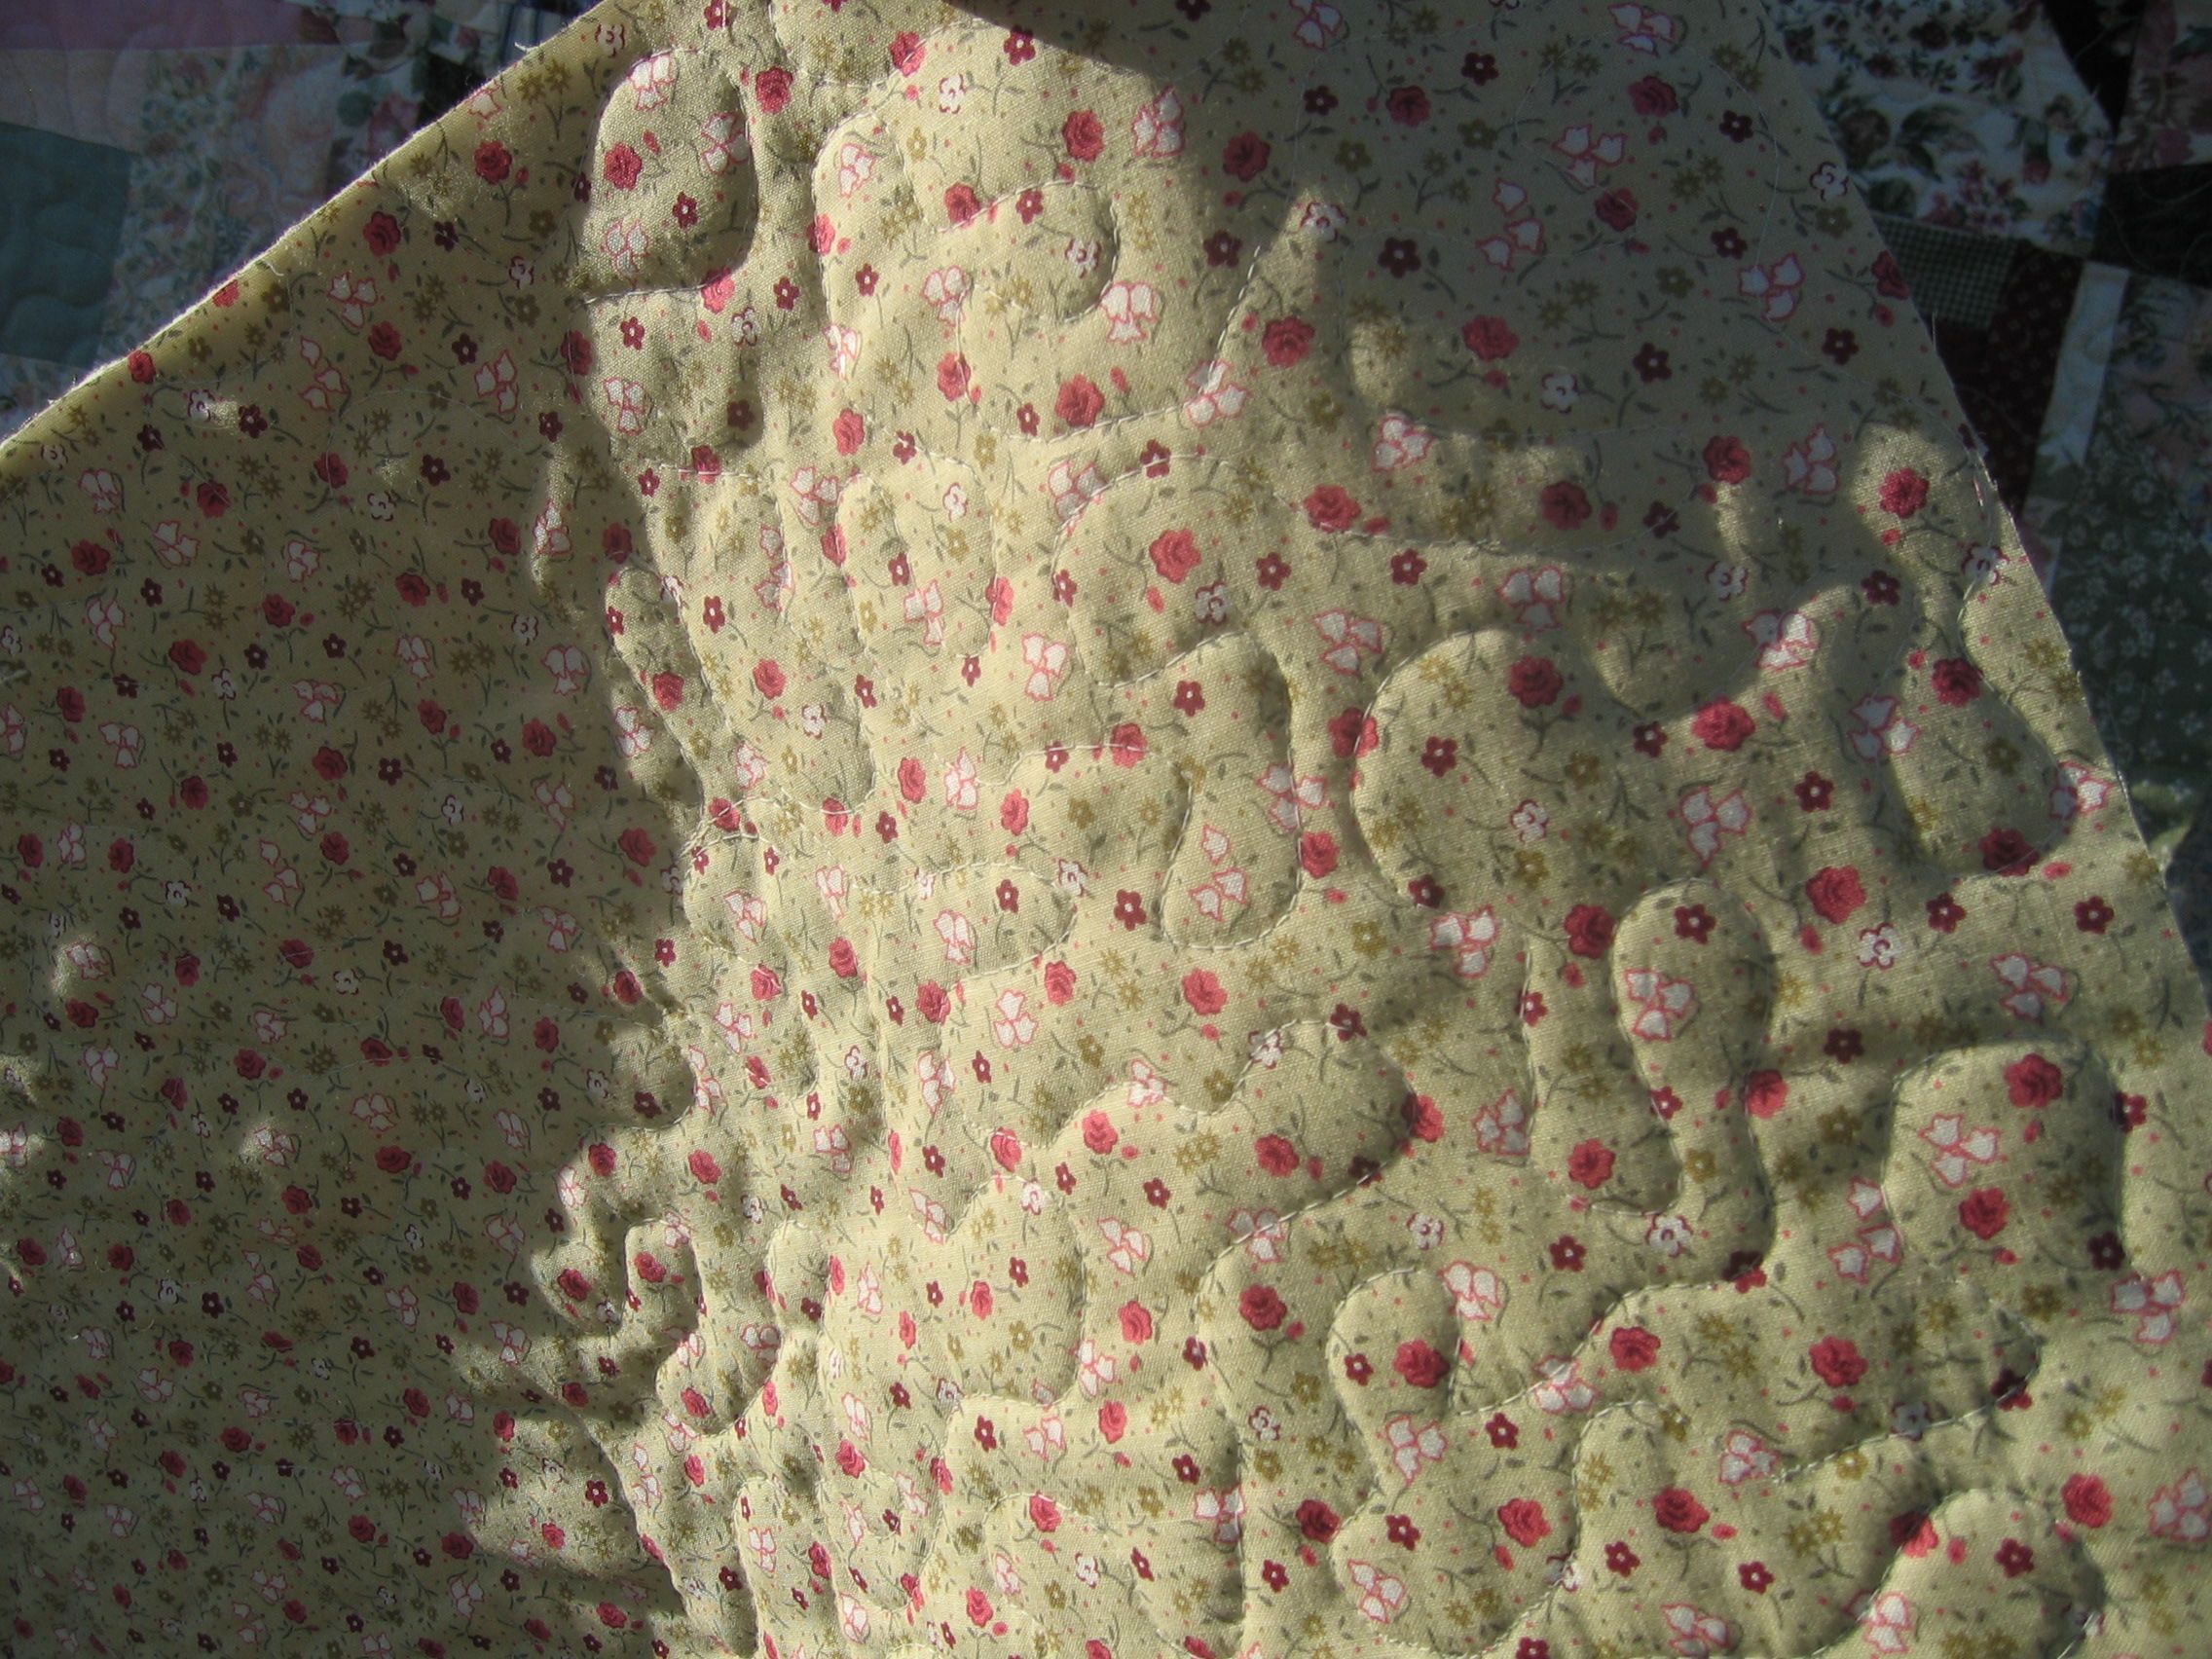
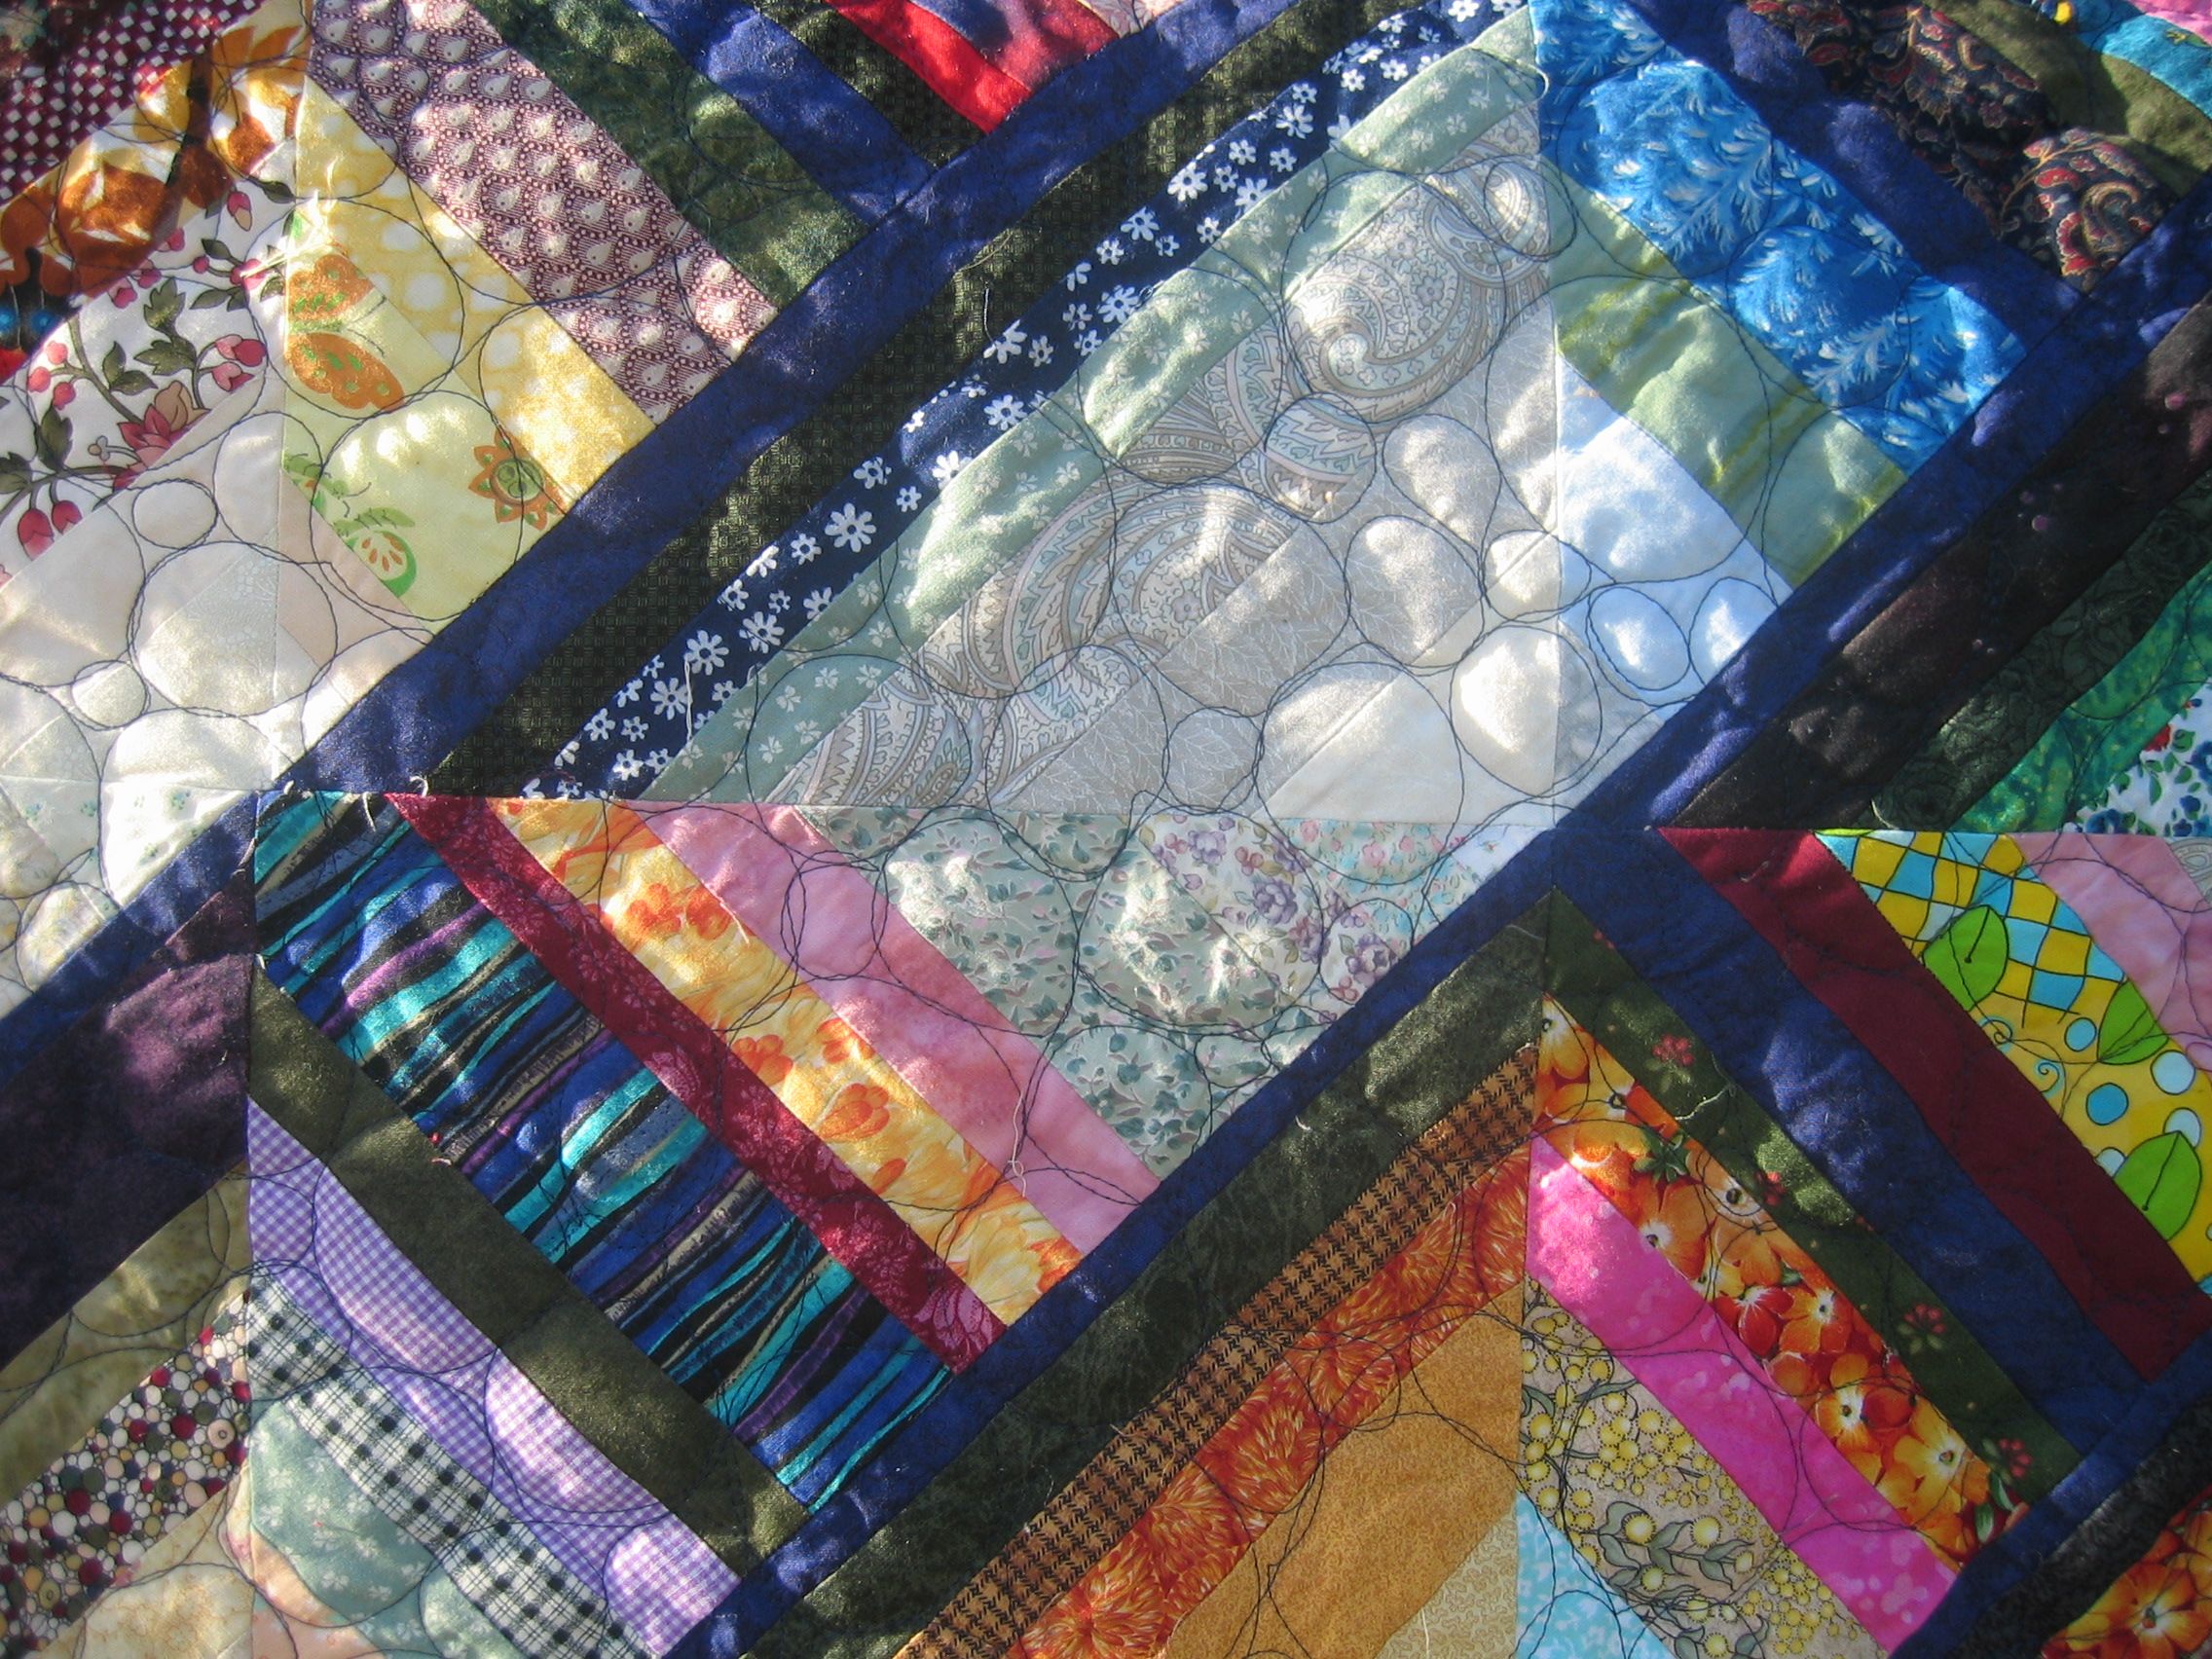
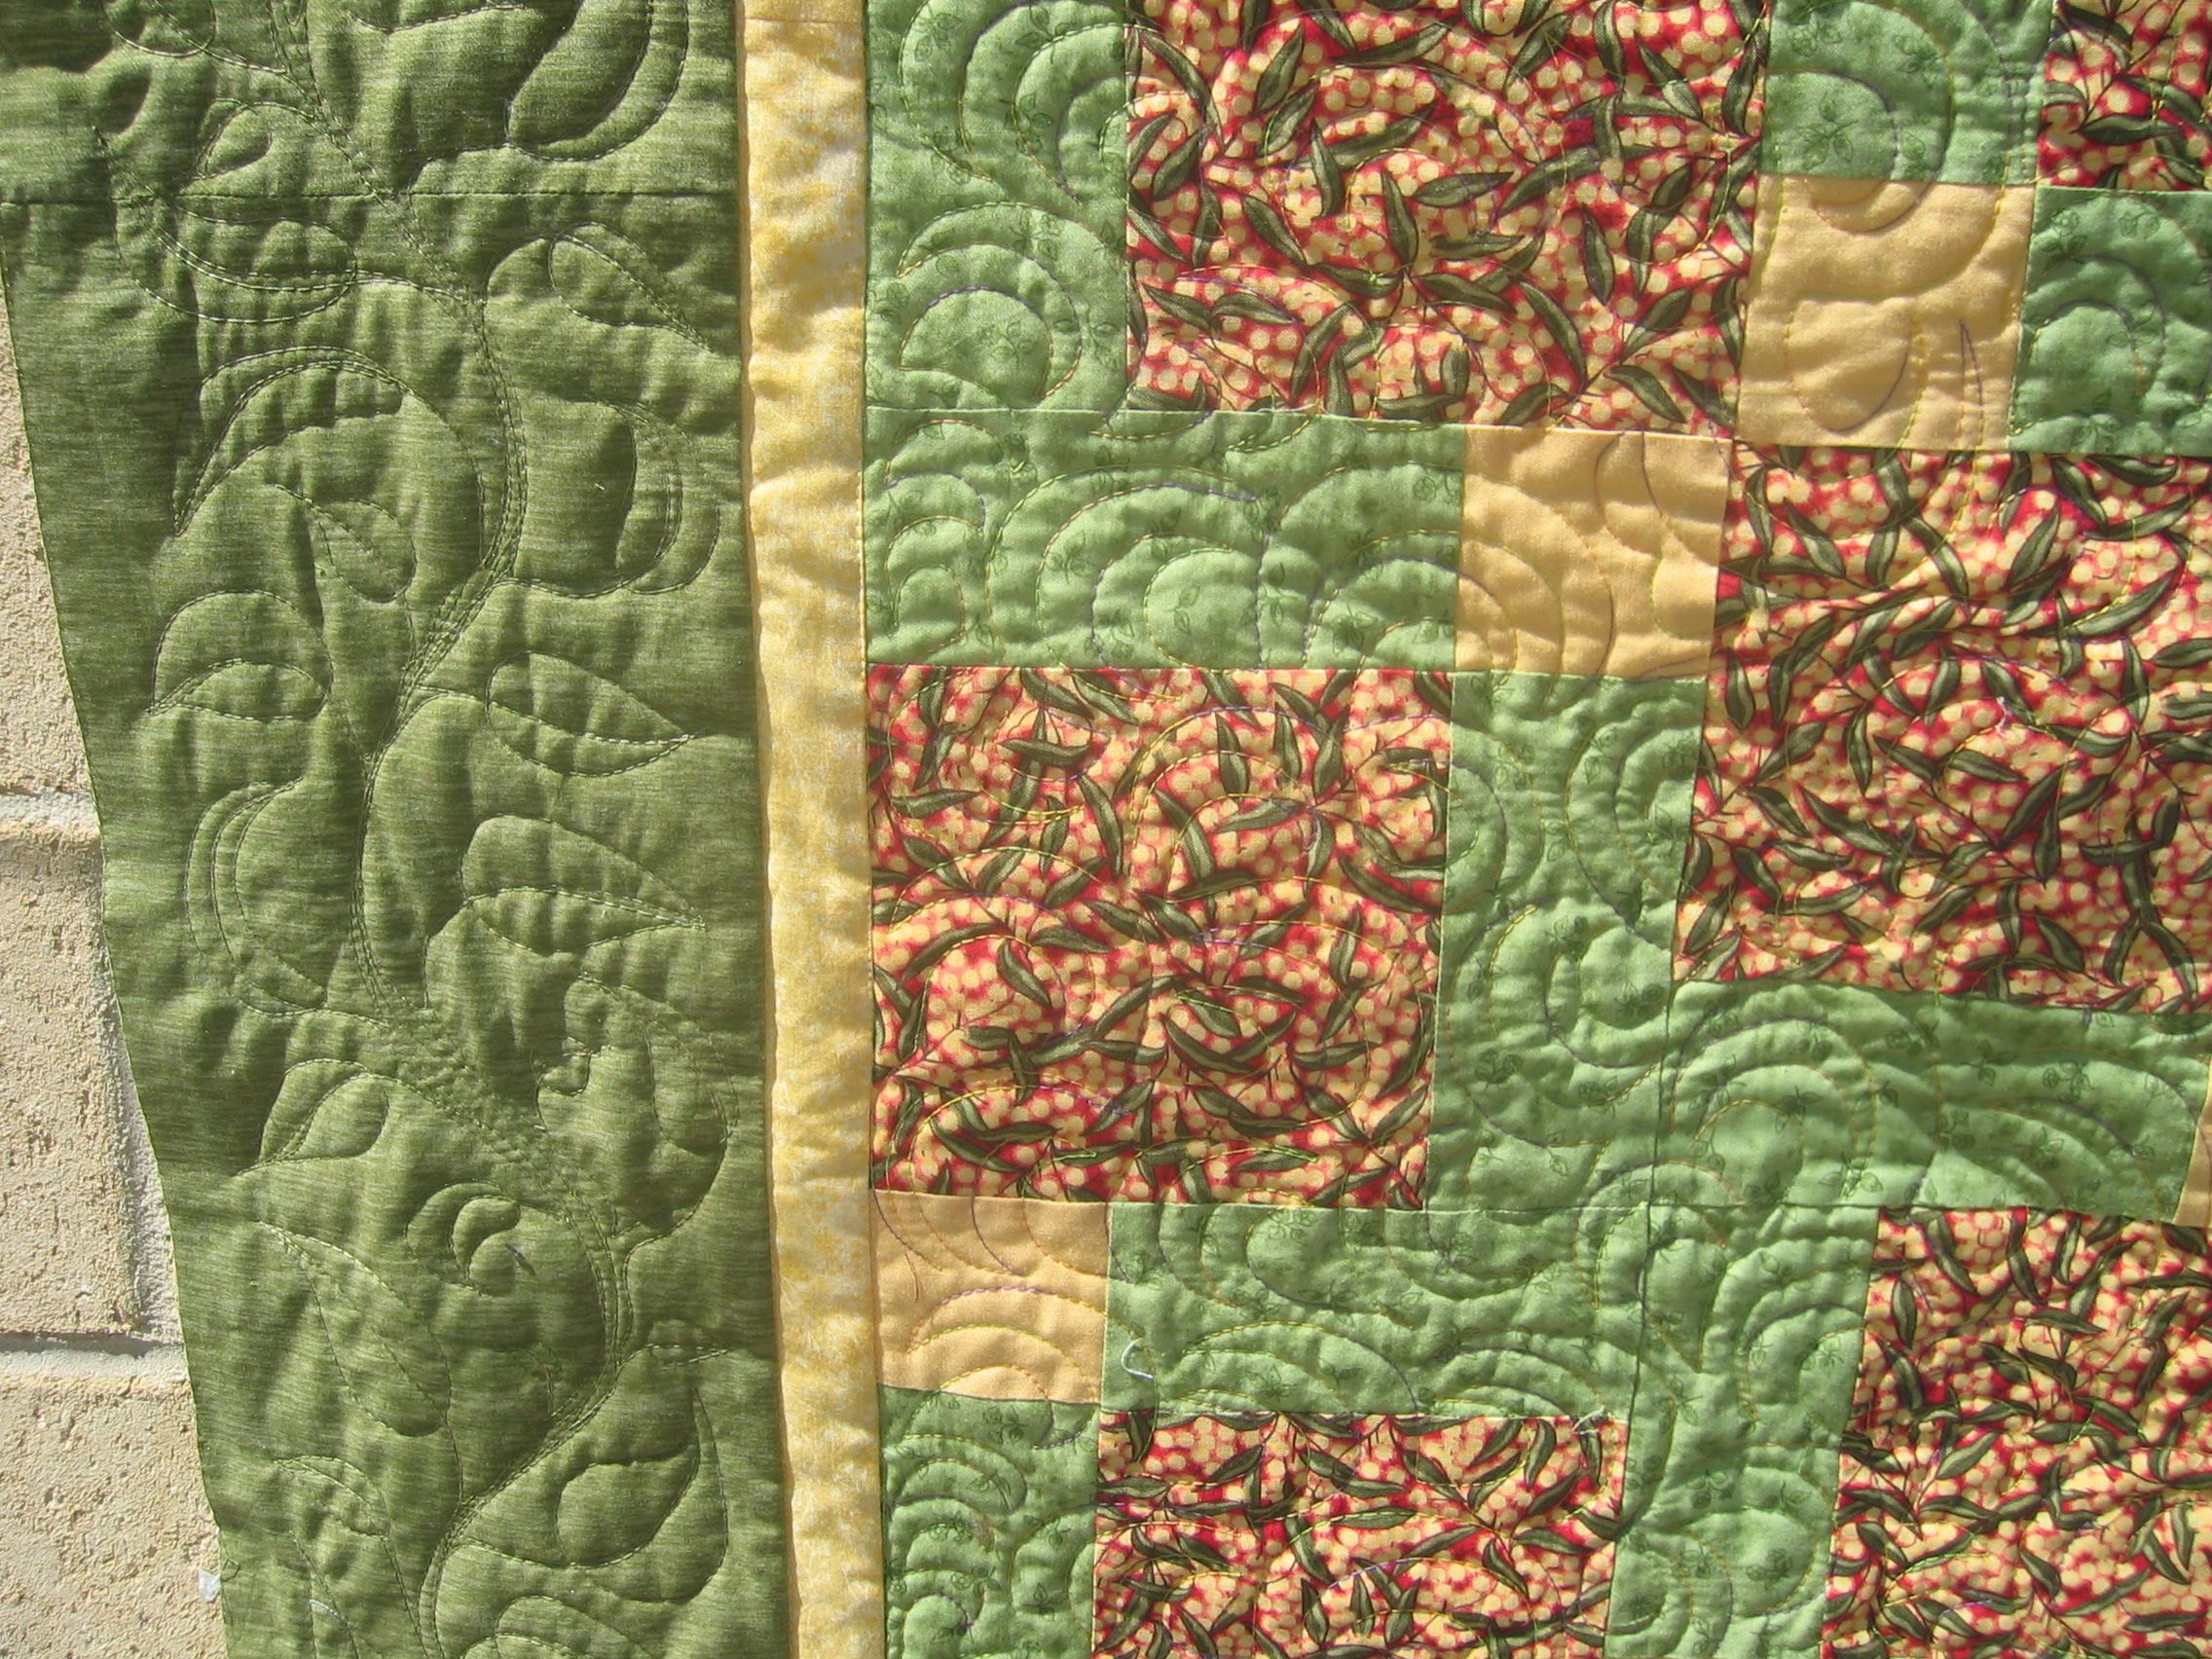
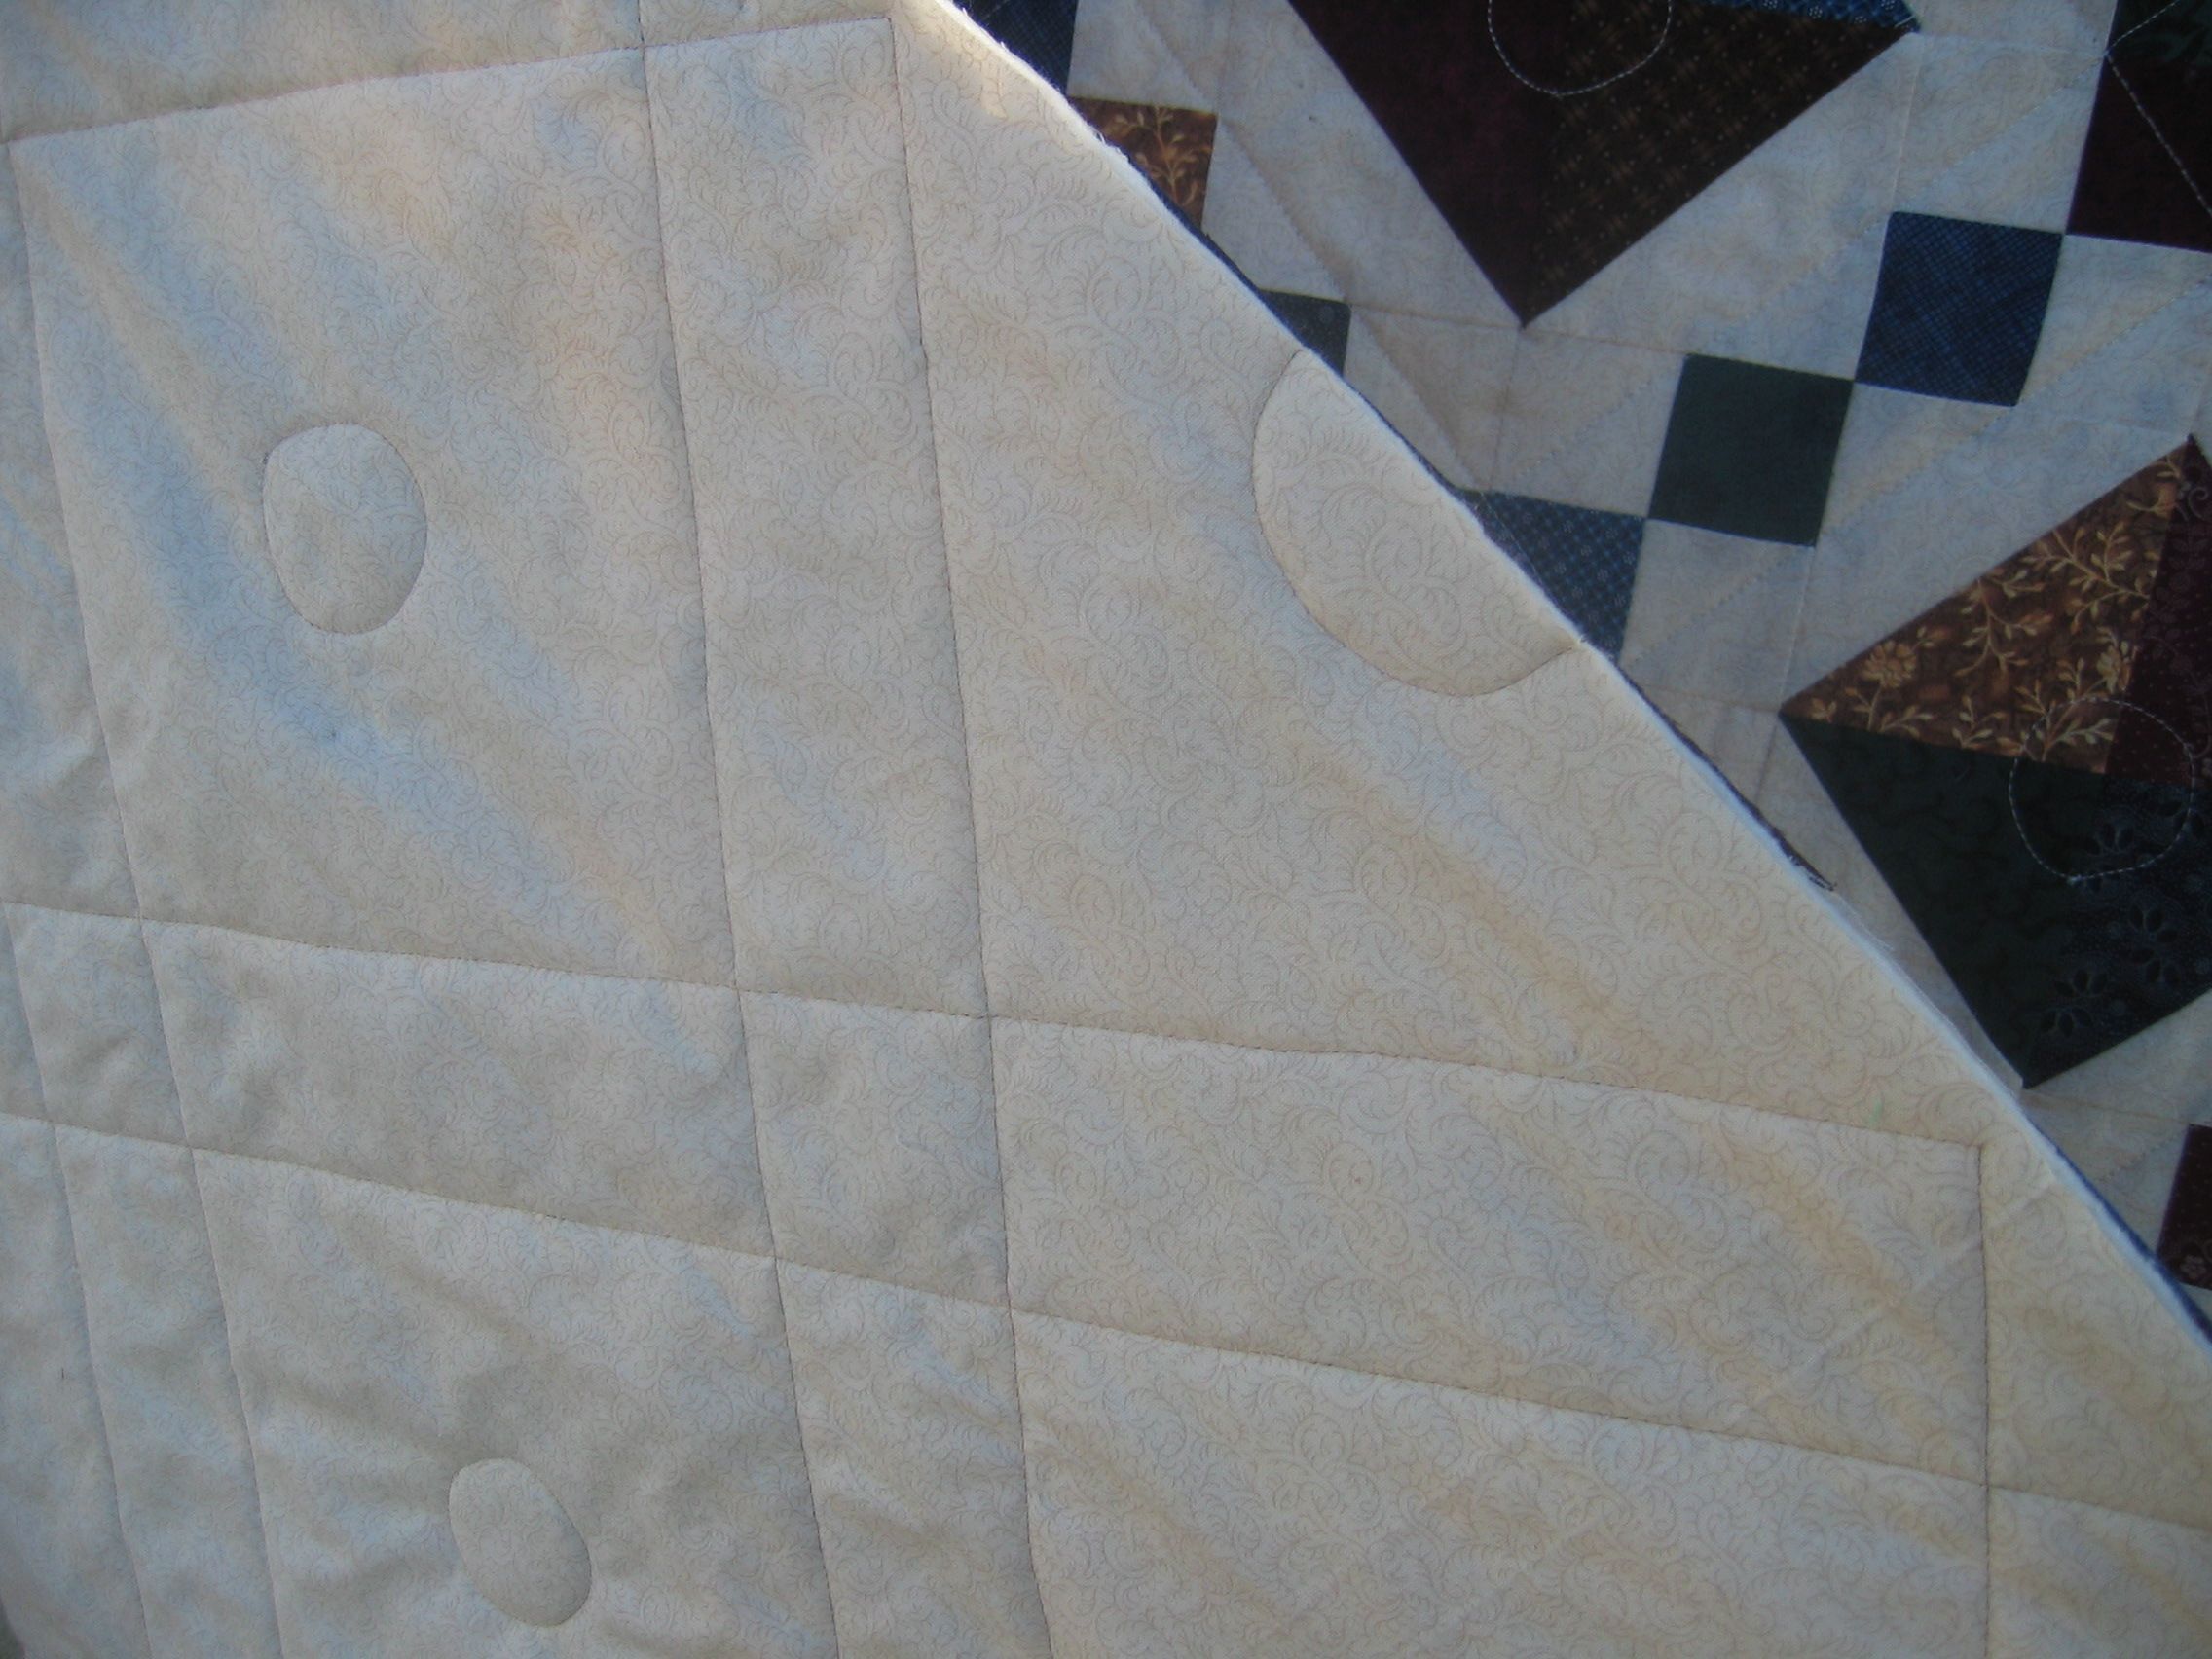
How to quilt it? I decided to start with the light areas of the snowball blocks (I think they are snowball blocks…). I picked out a lovely variegated thread in tans and golds and stitched a small centre circle around the joins in the fabric, then radiated out with nice big bulbous feathers (with echoes), thus creating big flowers. I decided not to do these flowers for ALL the light coloured blocks — there were a LOT of them, so I only did flowers every second row.

quilt57_04

What to do with the other light coloured centres? Ah! My favourite — bird feathers! I knew I’d have to curl them around so stitched the spine of each one first in a big ‘J’ shape, then came out to the edges of the space with the ‘S’ curves needed for each feather.

quilt57_03

Again, I used the variegated Sulky thread, but I had to change to a different thread after doing about five of these blocks with that thread. It played up something awful — shredded, snapped, bunched up in a mass on top and below the quilt. It had been mostly OK when I stitched the flowers.

I tried all the tricks I knew — I changed the needle to a brand new one in a larger size; I oriented the needle at the 5:30, 6:00, and 6:30 positions; I rethreaded the thread from different spool holders and through various tension holes; I adjusted the top and bobbin tension; I slowed down the speed dramatically… NOTHING would make that thread behave. It would stitch for a minute or so and then something would go wrong and I’d have to stop and fix it and unpick etc. This was becoming very tedious… So I eventually bit the bullet and swapped to a soft gold thread in a single colour and from a different manufacturer. This thread behaved perfectly. I wasn’t going to unpick all those other feathers I’d already done and redo them, so someone with a keen eye will see that they are slightly different, but for most people, they probably wouldn’t notice.

quilt57_05

Next, how to quilt the half blocks on the edges of the quilt… I kept with the bird feather motif as these would have been bird feather blocks had they been full size. But instead of trying to do half a feather, I just did a double stitched arc for a ‘spine’ and radiated out on only one side with the ‘S’ curves. It looks a bit like a rising sun.

quilt57_02

Finally, I did a large meandering stipple in all the dark areas, in a tan coloured thread. I figured it didn’t need any more close quilting 😉

I like how the quilt sort of ended up looking a bit Japanese with the big flowers and the bird feathers.

Threads used:

  • Top: Robison-Anton ‘Penny’ for many of the bird feathers in main quilt top (rayon, 40 wt, colour #2332); Robison-Anton ‘Date’ for the stippling in the dark areas(rayon, 40 wt, colour #2290); Gutermann Sulky variegated thread in tan and gold tones (rayon, 40 wt, colour #2120)
  • Bobbin: Wonderfil Deco-Bob (80 wt, colour DB 115)


Community Quilt 56

15 01 2013

This was another busy quilt, with a lot going on in the blocks (stars and large appliqued hearts) and in the border fabric. I decided to only quilt the ‘white space’ and leave the star points, the hearts, and the first border unquilted.

I started with the diamond shapes between the big stars, quilting a free motion heart (with curlicues) in each and finishing the hearts off with free motioned feathers. I did something similar in the large cream squares.

Next, I did the cream triangles along the blue border — also doing another featherlike motif. More feathers for the rectangular shapes along the blue border — I got the idea for how to quilt this odd shape from the ‘Create Your Own Dream Feathers’ book by Peggy Holt (thanks for this book, Glenys!).

I then stitched feathers around each appliqued heart. And stitched some plainish hearts in the very centre and the corner squares. Then the main part of the top was finished.

For the border, I decided to just follow (in general terms!) the design motif of the fabric using a similar coloured thread. This fabric was already very busy and I thought that doing something equally as busy but using another different quilting motif was going to be overload in this area. I’m glad I stuck to my original decision, even though it took much longer to quilt than I expected — there must have been thousands of curlicues in that pattern!

As an aside, I must be getting more confident in my quilting as I did all the quilting at 60-70% speed on my Handi Quilt Sweet Sixteen! That’s pretty fast!

Click on a photo to view it larger.

quilt56_01

quilt56_04

quilt56_03

quilt56_02

Threads used:

  • Top: Robison-Anton ‘Maize’ for the main quilt top (rayon, 40 wt, colour #2264); Robison-Anton ‘Old Gold’ for the border (rayon, 40 wt, colour #2201)
  • Bobbin: Wonderfil Deco-Bob (80 wt, colour DB 115)


Community Quilt 55

15 01 2013

I kept this one a while before deciding how to quilt it. The blue pinwheels were quite small and dense and then there was that great expanse of white space to deal with. How to quilt it???

I started with the central pinwheel area first. I thought about ‘stitch in the ditch’, but then decided to do hopping arcs, thus creating the illusion of flowers or ‘cathedral windows’. I just did these free hand — no marking of any sort — so they are a bit wonky, but as this quilt isn’t going to be in a show, I wasn’t too fussed by a little wonkiness 😉 I did these in the blue areas (with a blue variegated thread) and in the cream areas too (with a matching thread).

The next decision was how to quilt all that white space. I thought of doing Zentangle-style doodling, but it was a hot day and I really didn’t want to spend another eight hours on this quilt, even in the air conditioning. Also, the pinwheels were the focus, not the white space. So I did another variation on the open headband motif — instead of doing a second and third arc back over the first, I made a few spiky star points, then arced back and started the next one. I made these quite big, which meant they were quick to stitch. The reason I chose the spiky start points was to reflect the points of the pinwheels.

Click on a photo to view it larger.

quilt55_01

quilt55_02

quilt55_03

Threads used:

  • Top: Superior Rainbows variegated blue (trilobal polyester, 40 wt, colour #817), and Fil-Tec Glide for the cream (trilobal polyester, 40 wt, colour #20001)
  • Bobbin: Bobbinfil (white, 70 wt)